
User manual


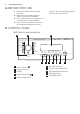

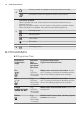
Table Of Contents
- CONTENTS
- 1. SAFETY INFORMATION
- 2. SAFETY INSTRUCTIONS
- 3. PRODUCT DESCRIPTION
- 4. BEFORE FIRST USE
- 5. CONTROL PANEL
- 6. PROGRAMMES
- 7. CONSUMPTION VALUES
- 8. OPTIONS
- 9. SETTINGS
- 10. DAILY USE
- 10.1 Loading the laundry
- 10.2 Installing the flap for liquid detergent
- 10.3 Using detergent and additives
- 10.4 Detergent compartments
- 10.5 Liquid or powder detergent
- 10.6 Activating the appliance
- 10.7 Setting a programme
- 10.8 Coin operated machine
- 10.9 Starting a programme without the delay start
- 10.10 Starting a programme with the delay start
- 10.11 Cancelling the delay start
- 10.12 Interrupting a programme and changing the options
- 10.13 Cancelling a running programme
- 10.14 At the end of the programme
- 10.15 AUTO OFF option
- 11. HINTS AND TIPS
- 12. CARE AND CLEANING
- 13. TROUBLESHOOTING
- 14. EMERGENCY DOOR OPENING
- 15. TECHNICAL DATA

3. PRODUCT DESCRIPTION
3.1 Appliance overview
3
1 2
5
6
7
8
4
1
Worktop
2
Detergent dispenser
3
Control panel
4
Door handle
5
Internal light
6
Rating plate
7
Emergency door opening
8
Feet for the appliance level
3.2 Accessories
1
345
2
1
Spanner
To remove the transit bolts.
2
Plastic caps
To close the holes on the rear side of the
cabinet after the removal of the transit bolts.
3
Inlet hoses
To connect the appliance to the cold and hot
water tap: blue cap hose for cold water and
red cap hose for hot water.
4
Flap for liquid detergent
To slow down the liquid detergent flow.
5
Drain hose and clamp
To connect the appliance to a drain system.
Use the clamp to fix the drain hose tight. If
necessary, the drain hose can be cut and
shortened.
www.electrolux.com6