Welcome to the family of Electrolyte users. This booklet not only tells you how to operate your new electrolyte tumble dryer, but also contains a number of helpful tips on how to get the best results, $0 PLEASE READ (T THROUGH CAREFULLY BEFORE YOUR FIRST WASH. IT ALSO INCLUDES AN IMPORTANT CHECKLIST OF WHAT TO DO SHOULD A FAULT OCCUR, PLUS A LIST OF ELECTROLYTE SERVICE OFFICES WHERE SERVICE CAN BE OBTAINED IF NEEDED.
Installation Location Install the appliance in a well ventilated room with 3 window which can be opened to allow free circulation of air. This is necessary for the release of stern which builds up when the dryer is in aeration: There are 2 vent positions, one at the rear of the appliance and one on the side; use whichever is most convenient when installing and using the making, {See Fig. 1}, A venting kit is available as an optional extra.
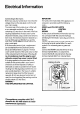
Electrical Information Connecting to the mains Before you use your tumble dryer check that the voltage shown on the data plate conforms with your mains supply. The mains deaf of the tumble dryer is fitted with nonrenewable mo tided-on 13 amp plug containing 213 amp fuse. In the event of the fuse requiring replacement, the fuse cover /carries should be removed, using a small screw driver to fever it out.
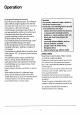
Operation Sorting and loading the laundry Open the door by depressing the ‘Door Release’ button. Before using the appliance for the first tire, clear: the inside of the drum with a piece of cloth soaked in a little mild detergent. Sort the laundry according to type of fabric. If you have washed the clothes in a machine prior o tumble drying, then they will have been grouped according te fabric type and can be simply transferred direct to the dryer.
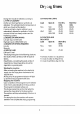
Drying time should be selected according to L TYPE OF LAUNDRY (Cotton and linen type fabrics/synthetics & delicate, This will determine the temperature at which you should set the selector. It can be set high or low for cottons. Low is automatically selected for synthetics, Cold for removal of dust from heavy curtains and for freshening up rems. 2. DEGREE OF SPIN DRYING Low spin {spun at 500 rpr) High spin {spun at 80071000 rpm} 3. DEGREE OF DRYING REQUIRED from dry Store dry 4.
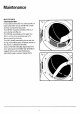
Maintenance MAINTENANCE Cleaning the filter incorporated in the lower rim of the porthole s a large surface filter o trap ali fluff that normally develops during the drying cycle. The fluff filter should be cleaned at the ead of every drying cycle (Fig. 4) The fluff that accumulates on the walls of the fitter is not due to an excessive wear of the fabrics caused by the dryer.
Useful Hints As snog as the making has composted the drying cycle, remove the laundry This wit prevent the fabrics from creasing. Tablecloths, sheets and similar cotton & linen items should berried to the point where they are ready for ironing ('iron dry). To maintain this degree of dampness, it s advisable to roll the laundry until i is ready to be ironed. Never select excessively long drying times; over dried items, particularly vests, may shrink as a result.
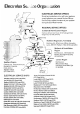
Directions for the installer Fitting the optional venting kit Fixed steam vent installation Fittings to be used: Plastic hose with 100 mm dia. Resew the ring nut (A Fig. 6} on to one end of the hose and insert the assembly into the steam vent connector of the machine. Fitting the optional stacking kit Stacked installation {KITCHEN} Remove the work top from the washing machine by unscrewing the rear fusing screws, Fix protection panel B as shown in Fig.
Electrocute Se. .ice Southern Region Electrolyte Ltd, Hippodromes House Brochette Rd, Alder shot, Harts, GILLIE.
Guarantee This Guarantee is offered to you as an extra benefit and doesn't affect your legal rights, Electrolyte products are carefully designed, manufactured, tested and inspected and in consequence we undertake to replace or repair any part found to be defective in material or workmanship, within one year of delivery to the original purchaser, free of charge.