user manual Washing Machine WT SL4 E 101
electrolux Electrolux. Thinking of you. Share more of our thinking at www.electrolux.
electrolux 3 Installation • This appliance is heavy. Care should be taken when moving it. • When unpacking the appliance, check that it is not damaged. If in doubt, do not use it and contact the Service Centre. • All packing and transit bolts must be removed before use. Serious damage can occur to the product and to property if this is not adhered to. See relevant section in the user manual.
electrolux clockwise until the groove is horizontal. If necessary use a coin. To disable this device and restore the possibility of closing the door, rotate the button counterclockwise until the groove is vertical. Product description Your new appliance meets all modern requirements for effective treatment of laundry with low water, energy and detergent consumption. The NEW JET system allows total use of detergent and reduces water consumption so saving energy.
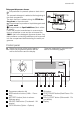
electrolux 5 Detergent dispenser drawer Compartment for prewash phase or stain remover. The prewash detergent is added at the beginning of the wash programme. The stain remover is added during the STAIN-Action phase in the main wash. Compartment for powder or liquid detergent used for main wash . Compartment for liquid additives (fabric softener, starch). Follow the product manufacturer’s recommendations on quantities to use and do not exceed the «MAX» mark in the detergent dispenser drawer.
electrolux Symbols on the control panel : = Handwash = Child Lock Display 9.1 9.2 9.3 9.4 9.9 9.8 9.5 9.1 - Spin Speed indicator, RINSE HOLD , NIGHT CYCLE - symbols 9.2 - Drying degree indicator, allowed by the set programme: IRON DRY , CUPBOARD DRY and EXTRA DRY - symbols, selectable by pressing the button 3 ; indicator AUTO, connected to the drying programme and to button 4 . 9.
electrolux 7 In the event of operating problems, some alarm codes can be displayed, for example (see chapter «What to do if...»). • End of the programme When the programme has finished a blinking zero is displayed, the DOOR symbol disappears and the door can be opened. 9.8 - DRYING TIME duration - symbol 9.
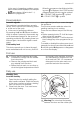
electrolux Measure out the detergent and the fabric softener Your new appliance was designed to reduce water, energy and detergent consumption. 1. Pull out the dispenser drawer until it stops. Measure out the amount of detergent required, pour it into the main wash compartment and, if you wish to carry out the prewash phase or to perform the stain function, pour the detergent or the stain remover into the compartment marked . 2.
electrolux 9 at night or in times with a more economical power rate. In some programmes the rinses will be performed with more water. At the end of the programme, a blinking and the RINSE HOLD symbol appear on the display, the DOOR symbol remains lit and the pilot light of button 7 goes off. The door is locked to indicate that the water must be emptied out. Important! RINSE HOLD or NIGHT CYCLE option cannot be selected with a NON-STOP programme (see Drying section).
electrolux EXTRA RINSE option (additional rinse) This appliance is designed for saving water. However, for people with a very delicate skin (allergic to detergents) it may be necessary to rinse the laundry using an extra quantity of water (extra rinse). The relevant symbol will appear on the display and this option is active for selected washing programme. If you wish to activate this option permanently press simultaneously buttons 2 and 3 for a few seconds: the relevant symbol appears on the display.
electrolux 11 reason, it is necessary to open it, set firstly the machine to pause by pressing the button 7. • If the DOOR symbol disappears from the display, the door can be opened. • If the DOOR symbol stays on, and the door remains locked, this means that the machine is already heating or that the water level is too high. In this case the door can not be opened. If you cannot open the door but you need to open it you have to switch the machine off by turning the selector dial to .
electrolux – Select the timed drying by pressing the button 4 With this button is possible to select the duration of the drying cycle from 10 to 250 minutes according to the type of fabric (cotton or synthetic). Press this button, until the time you want appears on the display. Every time you press this button the drying time increases by 5 minutes. The DRYING TIME DURATION symbol appears for a few seconds on the display near the duration value. Press then button 7 to start the programme.
electrolux 13 Helpful hints and tips Sorting out the laundry Follow the wash code symbols on each garment label and the manufacturer’s washing instructions. Sort the laundry as follows: whites, coloureds, synthetics, delicates, woollens. Before loading the laundry Never wash whites and coloureds together. Whites may lose their «whiteness» in the wash. New coloured items may run in the first wash; they should therefore be washed separately the first time.
electrolux Quantity of detergent to be used The type and quantity of detergent will depend on the type of fabric, load size, degree of soiling and hardness of the water used. Follow the product manufacturers’ instructions on quantities to use. Use less detergent if: • you are washing a small load • the laundry is lightly soiled • large amounts of foam form during washing. of the water in your area can be obtained from the relevant water supply company, or from your local authority.
electrolux 15 Programme - Maximum and Minimum Temperature - Cycle Description - Maximum Fabrics Load - Type of Laundry Options PFLEGELEICHT -SYNTHETIQUES SYNTHETICS 60° - 50° - 40° - 30° Main wash - Rinses - Short spin Max. load 3.5 kg - Reduced load 1.5 kg Synthetic or mixed fabrics: underwear, coloured garments, non-shrink shirts, blouses.
electrolux Programme - Maximum and Minimum Temperature - Cycle Description - Maximum Fabrics Load - Type of Laundry FEINSPÜLEN - RINÇAGES DELICATS DELICATE RINSES Rinses - Short spin Max. load 7 kg With this programme it is possible to rinse and spin garments which have been washed by hand. The machine performs some rinses, followed by a final spin. Options SPIN REDUCTION NIGHT CYCLE RINSE HOLD EXTRA RINSE PUMPEN - VIDANGE DRAIN Draining of water Max.
electrolux 17 Programme - Maximum and Minimum Temperature - Cycle Description - Maximum Fabrics Load - Type of Laundry Detergent Compartment Options = OFF For cancelling the programme which is running or to switch the machine off . 1) If you select the Super Quick option by pressing button 5 , we recommend that you reduce the maximum load as indicated. Full loading is possible however with somewhat reduced cleaning results. 2) If using liquid detergents, a programme without prewash must be selected.
electrolux Drying Hints Preparing the drying cycle As a dryer, the appliance works on the condensation principle. Therefore, the water tap must be open and the drain hose must drain water into a sink or into the drain pipe, even during the drying cycle. Attention! Before starting the drying programme, reduce the loads of washed laundry, in order to obtain good performances.
electrolux 19 ing inside the appliance. Keeping the door open after a wash will also help to preserve the door seal. Maintenance wash With the use of low temperature washes it is possible to get a build up of residues inside the drum. We recommend that a maintenance wash be performed on a regular basis. To run a maintenance wash: • The drum should be empty of laundry. • Select the hottest cotton wash programme. • Use a normal measure of detergent, must be a powder with biological properties.
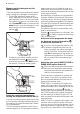
electrolux 4. Place a container close to the pump to collect any spillage. 5. Release the emergency emptying hose, place it in the container and remove its cap cover. 8. Put the cap back on the emergency emptying hose and place the latter back in its seat. 9. Screw the pump fully in. 10. Close the pump door. 6. When no more water comes out, unscrew the pump and remove it. Always keep a rag nearby to dry up spillage of water when removing the pump.
electrolux 21 2. Unscrew the hose from the tap. 3. Clean the filter in the hose with a stiff brush. 4. Screw the hose back onto the tap. Make sure the connection is tight. 5. Unscrew the hose from the machine. Keep a rug nearby because some water may flow. 6. Clean the filter in the valve with a stiff brush or with the piece of cloth. 7. Screw the hose back to the machine and make sure the connection is tight. 8. Turn on the water tap.
electrolux By doing this, any water remaining in the machine is removed, avoiding ice forming and consequently damage to the appliance. When you use the machine again, make sure that the ambient temperature is above 0°C. What to do if… Certain problems are due to lack of simple maintenance or oversights, which can be solved easily without calling out an engineer. Before contacting your local Service Centre, please carry out the checks listed below.
electrolux 23 Problem Possible cause/Solution The machine does not empty and/or does not spin: The drain hose is squashed or kinked. • Check the drain hose connection. The drain filter is clogged. • Clean the drain filter. An option or a programme that ends with the water still in the tub or a that eliminates all the spinning phases has been selected. • Select the draining or the spinning programme. The laundry is not evenly distributed in the drum. • Redistribute the laundry.
electrolux Problem Possible cause/Solution Spinning starts late or the machine does not spin: The electronic unbalance detection device has cut in because the laundry is not evenly distributed in the drum. The laundry is redistributed by reverse rotation of the drum. This may happen several times before the unbalance disappears and normal spinning can resume. If, after some minutes, the laundry is still not evenly distributed in the drum, the machine will not spin.
electrolux 25 Technical data Dimensions Width Height Depth 60 cm 85 cm 60 cm Electrical connection Voltage - Overall power - Fuse Information on the electrical connection is given on the rating plate, on the inner edge of the appliance door. Water Supply Pressure Minimum Maximum 0,05 MPa 0,8 MPa Maximum Load Cotton 7 kg Maximum Dry Load Cotton Cotton Big Capacity Synthetic 3.
electrolux 4. Slide out the relevant plastic spacers. 2. Remove the power supply cable and the draining hose from the hose holders on the rear of the appliance. 5. Open the porthole, take out the inlet hose from the drum and remove the polystyrene block fitted on the door seal. 3. Unscrew the three bolts with the key supplied with the machine. 6. Fill the smaller upper hole and the two large ones with the corresponding plastic plug caps supplied in the bag containing the instruction booklet.
electrolux 27 7. Connect the water inlet hose as described under the paragraph «Water inlet». Positioning and levelling Install the machine on a flat hard floor. Make sure that air circulation around the machine is not impeded by carpets, rugs etc. Before placing it on small tiles, apply a rubber coating. Never try to correct any unevenness in the floor by putting pieces of wood, cardboard or similar materials under the machine.
electrolux 4. Connect the hose to a tap with a 3/4” thread. Always use the hose supplied with the appliance. The inlet hose must not be lengthened. If it is too short and you do not wish to move the tap, you will have to purchase a new, longer hose specially designed for this type of use. Installation should comply with local water authority and building regulations requirements. Check the minimum water pressure required for safe operation of the appliance in the chapter "Technical Data".
electrolux 29 pipe must be larger than the outside diameter of the drain hose. The drain hose must not be kinked. Important! The drain hose may be extended to a maximum of 4 metres. An additional drain hose and joining piece is available from your local Service Centre. Electrical connection Information on the electrical connection is given on the rating plate on the inner edge of the appliance door.
electrolux • Normally soiled laundry may be washed without prewashing in order to save detergent, water and time (the environment is protected too!). • The machine works more economically if it is fully loaded. • With adequate pre-treatment, stains and limited soiling can be removed; the laundry can then be washed at a lower temperature. • Measure out detergent according to the water hardness, the degree of soiling and the quantity of laundry being washed.
electrolux 31
www.electrolux.com electrolux.