
User's Manual


ESI RF BRIDGE User Guide DRAFT, rev 4
www.elec-solutions.com © 2013 Electronic Solutions, Inc. Page 6 of 13
ESI RF Bridge
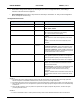
ACTION
RESULTS
twice, then the Blue LED blinks twice (indicates the ESI RF Bridge
is a Hub Device). A serial string with the version number is sent to
the PC or automation system.
Single press
Starts Network Invite. Use only when the Yellow LED is off, and
you want to join a ESI RF devices and a SUITE remote to the ESI
RF network.
The Yellow LED flashes indefinitely.
Single-press the Network Button again to turn off Network
Invite (Yellow LED stops flashing).
Press and hold for 10 seconds, until
Yellow LED blinks once, then release.
A partial reset that resets the Baud Rate and Terminal Emulator
settings for the ESI RF Bridge.
Reset Button
Single press
A full reset of the ESI RF Bridge to factory default.
The Blue LED blinks twice to indicate the ESI RF Bridge is a
Hub Device.
A serial string with the version number is sent to the PC or
automation system.
Network Invite
Press Network Button on ESI RF Bridge.
Press STOP button on SUITE remote.
The time frame while the Hub Device allows other ESI RF devices
to join the network.
ESI RF Bridge: Yellow LED flashes indefinitely.
SUITE Remote: Green LED flashes for 60 seconds.
Network Search
Press PRESET, UP, STOP, or DOWN
button on SUITE remote when remote is at
factory default and asleep.
The 30 second time frame while a remote looks for ESI RF
devices to join when no network is present. On the remote, the
Green LED is on solid.
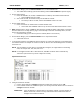
Steps
1. Verify that no devices are currently joined to the ESI RF network:
a. In the terminal emulator, press Ctrl-T to show the Device List.
b. If the Device List is empty, continue with Step 2.
Empty Device List:
c. If the Device List contains devices, then triple-press (within 1 second) the Network Button on the
ESI RF Bridge.
The Yellow LED blinks twice, then the Blue LED blinks twice.
A serial string with the version number is sent to the PC or automation system.
d. In the terminal emulator, press Ctrl-T to show the Device List, which should be empty. Continue
with Step 2.