MIDI FILES MP3 PLAYER User’s Manual: Electronic Sound Solutions s.r.l., via Monviso 54, 46042 Castel Goffredo MN, tel. + 39 0376 780360, fax + 39 0376 778225 www.essound.com e-Mail info@essound.com Distributed in Australia by The Midi People: PO Box 270 Jannali NSW 2226 Ph: 02 9542 4105 Web: www.ausmidi.com Email: info4u@ausmidi.
INDEX INTRODUCTION..........................................................................................3 CONNECTION AND COMMANDS..............................................................4 POWER SUPPLY .......................................................................................6 AUDIO CONNECTIONS..............................................................................6 HOW TO START .........................................................................................
INTRODUCTION First of all, ESS would like to thank you for your purchase of M-Blaster. M-Blaster is a MIDI, Karaoke and MP3 player characterised by a very intuitive user interface. M-Blaster plays: Standard MIDI files (.mid format 0 and 1) Karaoke files (.kar format 1) MP3 files (VBR/CBR, successfully tested up to 256 Kbps (depending on the encoder)) M-Blaster uses a Compact Flash Card as a data storage unit. The M-Blaster can be loaded with up to 511 songs.
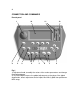
CONNECTION AND COMMANDS Frontal panel 1 9 10 2 3 4 11 5 6 12 7 8 Fig.
3) Use this button to access options like: song erasing, adjustment of the TV set if connected and transferring files from PC to Compact Flash Card. If this button is pressed while a song is in “play” mode, the screen will display info about the song. It is possible to adjust the display contrast by pressing this key and rotating the alpha dial knob. 4) These buttons are used for the “Easy Tune” feature, which enables instant adjustment of the tonality/key of the song for a Male or a Female performer.
6) Port MIDI Out to connect an external sonic generator; 7) USB connector to connect M-Blaster to a PC; 8) Switch on; 9) Connection to the supplied external power supply adapter; POWER SUPPLY Connect the adapter plug (male) to the PWR IN female connector positioned on the M-Blaster back panel (Fig.2/9). Then connect the adapter plug to a power point. IMPORTANT Please only use the adapter supplied, otherwise the equipment can be damaged.
Note: when executing the program, if correctly set, M-Blaster will automatically position on the “USB” page. After having done this, launch the program by double clicking on the icon created during installation. As for the software utilization, please refer to the on-line guide included with the software. SWITCHING ON To switch the M-Blaster on, insert the supplied adapter connector into the corresponding socket positioned on the back panel and push the ON button.
Insert the Compact Flash in its proper housing (fig1/6) without forcing it. MBlaster will then display the songs page by page. It is possible to adjust the display contrast by pressing the MENU key (fig 1/3) and rotating the alpha dial knob (fig. 1/1). SONGS The page on the display contains the songs list, in MIDI or MP3 format, in alphabetical order, 6 titles of 26 letters per line. The audio songs (MP3) are marked by the “A” letter before the title while the MIDI files are preceded by the suffix “M” (.
NORMAL: if this key is lighted M-Blaster will play the MIDI song in its original key; FEMALE: if this key is lighted M-Blaster will adjust the MIDI song key for a female voice. Note: the tonal transposition of “EASY TUNE” is not automatically saved. In order to do that, the transposition will have to be done (and then saved) in the “TRKCHANG” (track change) page.
In this way the four function keys can always access the “typical” functions of the operational mode running in that moment. SONGS MODE The functions offered by the SONGS mode allow to: Choose with the arrow buttons a single song to play using the PLAY key; Visualize chords and lyrics (if memorized in the song); Adjust volume, effects, transposition and tempo of the song (“TRKCHANG”); Instantly exclude the melody track (if present in the MIDI file).
chorus, transposition and tempo of the song being played. Note: The function TRKCHANG is only available when the song is in “PLAY” because the adjustment values of the single parameters vary depending on the starting value that’s preset on each song. To read the preset starting values of each song (normally included in the first measure of the song) it is necessary to put the song in PLAY. Pushing the STOP button twice, makes the effects (Rev./Delay/Chorus) come momentarily off from MIC1/2 (“TALK” mode).
performer the time to get ready. The amount of time the lyrics come up in advance depends on the setup of the midi file. It is possible to enter the TEXT mode even after having the song in PLAY. It is also possible to enter and exit the TEXT mode at any time during the song performance. If you enter the TEXT mode while the song is being played, it will sometimes be a short wait before being able to visualize the correct lyrics on the display.
(to restart the song playback from the point where it was paused). You can also push the PLAY button again to restart the song from the beginning. NOTE: The song that is playing is always the one highlighted with the arrow buttons. If one song is playing then another one is highlighted pushing the PLAY button will stop the first song and the new song will start immediately.
The adjustable parameters are: TREBLE : high frequencies; BASS: low frequencies. 3. “MIC EQ”: This adjusts the equalization of the microphone inputs Mic1 and Mic2. The adjustable parameters are: HIGH: high frequencies; MID F: MID intervention frequency; MID: medium frequencies; LOW: low frequencies. NOTE: The equaliser on the medium frequencies is of the “semi-parametric” type.
TRKCHANG (TRACK CHANGE) This function allows adjustment to the customized parameters of each song (volumes/effects /transposition/time etc). During playback it is possible to adjust and save customizations for each single song by pressing the TRKCHANG function key (can only be activated while the song is playing) The TRKCHANG page is different depending on the type of file played, MIDI or audio (MP3).
SAVE: Saves the modifications made by the user. RELOAD: Recalls the last values saved by the user. MUTE: Mutes a track (same as zeroing the volume MIDI channel). This function is only available if ‘VOL’ in the TRKCHANG window is highlighted. SOLO: “Solos” the highlighted channel. This function is only available if ‘VOL’ in the TRKCHANG window is NOT highlighted. NOTE: None of the variations done through the TRKCHANG function will modify the original parameters of a song.
Variations can be made on the following parameters: VOL (Volume) TRN (Transpose) PRG (Program change) BNK (Bank select) REV (Reverberation) CHR (Chorus) PAN (Panpot) TEMPO (metronomic time) Use the arrow buttons to highlight a parameter of the lower part to work on. You can also globally modify all the MIDI channels using the adjustment knob (fig. 1/1).
“SOLO”: Visualized for all the other parameters. Pushing this function key will play only the channel on which the arrow buttons are positioned in that moment. PARAMETERS FOR MP3 FILES To make adjustments to an audio file (MP3) select the TRKCHANG function. As described above, this function is accessible from the main SONGS page by using the corresponding function key.
TREBLE: Increases or decreases the level of the high frequencies (treble), BASS: Increases or decreases the level of the low frequencies (bass), PANPOT: Adjusts the balance between the two stereo channels (left/right), PITCH: Modifies the key of the song playing without altering its tempo. The values allowed are +/- 6 semitones, TIME STRETCH: Modifies the tempo of the song in playback without altering its key (pitch). The values allowed are +/- 3.
Function Keys activated: If you are in PLAY LIST mode and there are no songs PLAY LIST (or if the previous song is finished) M-Blaster is in “Stand-by” (STOP button is lighted – PLAY button is not); in the last line of the display the following function keys are active: LOOP/NOLOOP: To decide whether songs start to play immediately after the previous song is finished (LOOP) or if the M-Blaster should wait for you to press PLAY before it plays the next song (NOLOOP) ; LIST: To show the list of so
will be selected manually after the previous song is finished). This selection is made using the LOOP/NOLOOP function key. The current selection (LOOP/NO LOOP) is visible on the lower left part of the display. Pushing the corresponding function key will change from LOOP to NOLOOP and vice versa. NOTE: The switchover between the two modes LOOP/NOLOOP can be activated while a song is playing. If you push the PLAY button upon first opening the play list, the first song from the group will start.
TEXT and TRKCHANG In PLAY LIST mode the TEXT and TRKCHANG functions are similar to their functions in SONGS mode. If a playlist is in LOOP mode and the TEXT or TRKCHANG function is active, the data about the song currently playing will always be showing. (For example, if the current song finishes and the next one starts, the data showing in the TEXT or TRKCHANG display will also change to the new song).
The activated function keys are: INTRO ON / OFF: Allows the user to activate / deactivate the short musical intro when the unit is turned on. SELECT: Allows access to one of the functions previously described (the selected one). Once the MENU page is showing, to access one of the functions previously described, highlight the desired function (using the arrow buttons) and then select it with the SELECT function key. SONGS ERASE This function allows the permanent deleting of a song.
USB This page should be shown when the M-Blaster is connected to the PC. If you modify the content of the Compact Flash, the “INDEX” is automatically shown when you exit from the USB page. TV SETUP In this section it is possible to adjust the functions related to the device connected through the video connector positioned on the back panel (fig 2/4). To activate the TV SETUP function: 1. Push the MENU button; 2. Use the arrow buttons to highlight TV SETUP; 3. Push the function key SELECT.
VIDEO/CAMERA IN: If the optional Video camera is connected, use this parameter to adjust signal of the video camera in the background of the TV. CLEAR ALL DATA: This function is used to delete all contents of the Compact Flash. To clear Compact Flash, “YES” has to be pushed, and then pushed again in order to confirm deleting the songs. At the end of deleting, this message shows: “SWITCH POWER OFF – THEN ON AGAIN”.
It requests that the M-Blaster is switched off and then on again. After switching on, the operating system will be installed and the version number can be verified on the opening screenshot. TECHNICAL DATA SHEET • ADAPTER: External off-line power supply adapter desktop switching Off Line In .......90/240 Vac Out ....15 v. 2A • CONNECTORS: Inputs Mic balanced (Jack 6,3mmTSR) Stereo output (n.
WHAT TO DO IF If the message “compact flash not formatted” appears while the card is in, format the Card on your PC with file system “fat” in slow Mode. If the message “fat type not supported” appears while the card is in, please format the card on your PC with file system “fat” in slow mode. Important: Not every compact flash is compatible with M-blaster.