Lighting Control Console Quick Guide Version 3.1 C o p y r i g h t © E le c tr o n i c T h e a t r e C o n t r o l s , I n c . All Rights reserved. P r o d u c t in f o r m a t i on a n d s p e c i f i c a t i o n s s u bj e c t t o c h a n g e . P a r t N u m b e r : 4110M1300-3.
ET C ®, E m p h a s i s ™ , E x p r e s s i o n ®, I n s i g h t ™ , I m a g i n e ™ , F o c u s ™ , E x p r e s s ™ , U n i s o n ®, O b s e s s i o n ® I I , E T C N e t 2 ™ , E D M X ™ , S e n s o r ®, a n d W Y S I L i n k ™ a r e e i t h e r r e g i s t e r e d t r a d e m a r k s o r t r a d e m a r k s o f E l e c t r o n i c T h e a tr e C o n t r ol s , I n c . i n t h e U n i t e d S t a t e s a n d o th e r c o u n t r i e s .
Table of Contents Console Panels . . . . . . . . . . . . . . . . . . . . . . . . . . . 1 Keypad Features . . . . . . . . . . . . . . . . . . . . . . . . . . 3 Introduction to Programming . . . . . . . . . . . . . . . . . 6 Patching . . . . . . . . . . . . . . . . . . . . . . . . . . . . . . . . . 7 Working with Channels. . . . . . . . . . . . . . . . . . . . . . 8 Two-scene Operation . . . . . . . . . . . . . . . . . . . . . . . 9 Recording . . . . . . . . . . . . . . . . . . . . . . . . . . . . . . .
ii Table of Contents
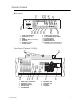
Console Panels Back panel Lamps 12V Electronic Theatre Controls, Inc. Product: 1. 2. 3. 4. 5. 6. 7. 8. 9. 10. 11. 12. 13. Desk Light Dimmer RFU fuse (T2.5A) RFU DMX512 Out (2 universes) ETCLink Disk Drive (side) Power switch Power input connector Command Display output Parallel Printer Remote Macros MIDI In/Out/Thru ETCNet (newer facepanels do not have Thin-net connector) PUSH Face Panel (Express 125/250) 10 9 8 4 3 2 1 0 1. 2. 3. 4. 5.
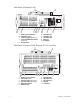
Face Panel (Express 24/48) 1. 2. 3. 4. Desk Light connectors Disk Drive (side) Channel faders (Scene A) Channel/Submaster faders (Scene B) 5. Blackout key 6. 7. 8. 9. 10. Grandmaster AB Fader pair CD Fader pair Keypad Trackpad Face Panel (Express 48/96, Express 72/144 is similar) Cha 1. 2. 3. 4. 5. 6. 2 Desk Light connectors Disk Drive (side) Channel faders (Scene A) Channel faders (Scene B) Submaster faders Blackout key 7. 8. 9. 10. 11.
Keypad Features Macro Keys Display Keys Navigation Keys Stage Blind Patch Setup About Learn Help Enter Macro M1 M2 M3 S1 S2 Page Cue 7 8 Type Sub 4 Link Group 1 Wait Time S3 Cluster A Cluster B Track M* S4 S5 S6 S7 S8 9 Chan Dim 5 6 Thru At 2 3 And Full 0 Record Softkeys Cluster C Level Enter Clear Focus Point Rel Numeric Keypad Display Keys Stage About Blind Learn Patch Setup Enter Macro M1 M2 M3 S1 S2 S3 M* S4 S5 S6 S7 S8 • The
Cluster A • The [About] key opens a window containing information about a channel, dimmer, or the show according to which key you press after pressing [About]. For example, [About] [Chan] [3] [Enter] will display information about channel 3. Stage Blind About Learn Patch Setup Enter Macro M1 M2 M3 S1 S2 S3 M* S4 S5 S6 S7 S8 • The [Learn] key enables you to record keystrokes in real time into macros as an alternative to using editing screens.
Numeric Keypad The Numeric keypad is for numerical entry. This grouping also includes the [Enter] and [Clear] keys. Press [Enter] to complete operations. Press [Clear] to cancel operations.
Introduction to Programming The procedures explained in this introductory guide are grouped under the following categories: • Patching ~ What it means and how to do it. • Working with Channels ~ Select and set channel levels. • Two-scene Operation ~ Using the manual playback features. • Recording ~ Steps to follow to record cues, groups, submasters, focus points and effects (chases). • Playback ~ See the results of your recordings. • Disk Operations ~ Save and retrieve showfiles.
Patching Conventional lights are powered by dimmers, which in turn are controlled by console control channels. You associate certain dimmers with certain channels by performing a patch in the Patch display, and then record the channels into show elements such as cues, groups or submasters. You may patch more than one dimmer to a channel, but dimmers may only be assigned to one channel at a time. Your console is shipped with a default patch that associates each dimmer with control channels on a 1:1 basis.
Working wi th Channels Channel Selection To set a level for a channel, you must select it. Selecting a channel is as easy as pressing its number on the keypad. You may also use the [And], [Thru] and [Except] keys to select ranges of channels. The Stage display will default to channel selection. The Blind display defaults to cue selection, so you will need to press the [Channel] key prior to entering channel numbers. Select channels: • Press [Channel] [#].
Two-scene Operation Overview You can use the Express 24/48, 48/96 and 72/144 consoles in “single-scene” or “twoscene” mode. In single-scene operation, the channel faders access the first 48, 96 or 144 channels, based on the console type. In two-scene operation, the top and bottom rows of channel faders access the first 24, 48 or 72 channels. For example, on an Express 24/28, fader 1 and 25 will both access channel 1, faders 2 and 26 access channel 2, and so on.
Playback Looks Manually using the AB Fader Pair Channel faders are “mastered” by the AB Fader Pair when two-scene operation is enabled. This means that the top row of channel faders, Scene A, will be active when the A Fader in the AB Fader Pair is at the top of its travel (farthest away from you). Channel faders in the bottom row, Scene B, are active when the B Fader in the AB Fader Pair is at the bottom of its travel (closest to you).
Step 3: Move the channel faders on Scene B to the levels needed in the next look (Cue 2). This will not affect the stage output. Step 4: Press [AB-Rate] [x] [Enter], where [x] is the upfade time. Step 5: Step 6: Note: Two-scene Operation A C D Clear Press [x] [Enter], where [x] is the downfade time. If the downfade time is the same as the upfade time, just press [Enter]. The Rate key will blink to indicate that it is active. Move the AB Faders toward you.
Recording You can record channel levels into submasters, groups and cues in both the Stage and Blind displays. Remember that working in Stage affects the output of the console. Changes made in Blind affect only the stored data. If you modify a cue in Blind, you must play it back in Stage to see the changes in real life. Cues A lighting cue is typically a “look” on stage that can be played by pressing a fader Go key.
Groups A group is a recorded set of channels at specific levels. Groups can be used to select channels and set levels that you use repeatedly through a programming session. Groups are not played back like cues, so they do not have timing associated with them. Record a group: Note: Step 1: Press [Stage] to enter the Stage display. Step 2: Select channels using the procedure Select channels:, page 8. Step 3: Set levels for those channels using the procedure Set Channel Levels, page 8.
Effects (Chases) An effect is a special cue or submaster that can run repetitively in a variety of patterns. Effects are also called chases. Effects consist of a series of steps that contain channels set at levels. You can assign timing conditions to each step and separately to the overall effect. You can record an effect in the Stage or Blind display, but you can only edit effects in Blind. Record an effect in Blind (example): Step 1: Press [Blind] to enter the Blind display.
stays active before fading itself down. A dwell time of “Hold” will keep the effect running until the next cue is played. Step 3: Press [Record] [Enter] to save your changes. Change an effect step’s timing: Step 1: Press [Blind] to enter the Blind display. Step 2: Press {Cue} [#] [Enter] to select the effect cue you want to edit.
Playback Cue playback takes place in the AB and CD Fader pairs in single-scene mode, or just the CD Fader pair in two-scene operation. Playback is controlled by the [Go], [Clear], [Hold], [Back] and [Rate] keys. • Play a cue Press {Stage} [Cue] [#] [Go], using the [Go] key of the AB or CD faders. To playback the cue using the recorded timing, move both fader sliders to level 10 before you press [Go].
Disk Operations When you write to a diskette, both the show programming and the console’s configuration are stored to the diskette. However, you may read show and configuration information separately from a showfile stored on diskette. Reading these two components separately allows you to conveniently keep system configuration preferences the same, such as default settings and hardware setup, even when you run different shows. Insert a 1.
Working wi th Moving Light (ML) Fixtures Patching ML Fixtures Use the Fixture Patch display to patch one or more ML fixtures at a time. When you patch multiple fixtures at once, Start Channels and DMX512 Start addresses will auto-increment to the next available address. Note that resulting Intensity Channels are identified in the table. Moving lights are selected by fixture number for control.
Step 6: Specify the DMX512 Start address by pressing [#] [Enter] [#] [Enter], where the first number entered is 1, 2 or 3 to set the output port, and the second number is 1-512 for the DMX512 Start address for the first (or only) selected fixture. Step 7: If the fixture requires a remote dimmer, press [#] [Enter], where the number is the DMX512 address for that dimmer. If there is no remote dimmer, press [Enter] to skip over this column.
Select ML Fixtures To control a moving light, you must select it. Selecting a moving light is done by the fixture number you set in the patch. You may also use the [And], [Thru] and [Except] keys to select ranges of fixtures. Select fixtures: • Press [S8 - Fixture] [#]. • To select a range of fixtures press [S8 - Fixture] [#] [Thru] [#] [And] [#]. When a range of fixtures is selected, only the last fixture in the range is displayed in the Fixture Box.
encoder assignments refer to the Expression 3 and Insight 3 hardware. On an Express console, use the navigation keys to move among attributes and pages. When pan or tilt is selected, the trackpad can be used to control movement. Setting the intensity directly: Step 1: Select fixtures using the procedure described in Select ML Fixtures, page 20. Step 2: Press [At] [x], where [x] is the intensity level. You can also use the [Full] and [Level] keys.
22 Express v3.
Americas 3030 Laura Lane, P.O. Box 620979, Middleton, Wisconsin 53562-0979 USA Tel: +608 831 4116 +800 688 4116 Fax: +608 836 1736 +800 555 8912 Europe Unit 4, Victoria Industrial Estate, Victoria Road, London W3 6UU, UK Tel: +44 (0)20 8896 1000 Fax: +44 (0)20 8896 2000 Asia Room 605-606, Tower III Enterprise Square, 9 Sheung Yuet Road, Kowloon Bay, Kowloon, Hong Kong Tel: +852 2799 1220 Fax: +852 2799 9325 Web: www.etcconnect.com Email: (US) mail@etcconnect.