infinite prime User Manual - Version 3.00 Catalog Number: 5IN1912 All data is subject to change without prior notice. Hereby, Electronics Line 3000 Ltd. declares that this control panel is in compliance with the essential requirements and other relevant provisions of Directive 1999/5/EC. Copyright © 2012 Electronics Line 3000 Ltd. All rights reserved.
Quick Reference Guide Function Press Additional Information OR SET If “One-Key Setting” is disabled enter your user code when setting. The default Master code is 1234. OR Hold down this key until “Instant Setting OK?” is displayed. Then Press √. INSTANT SET Instant setting cancels the entry delay after Part or Perimeter setting. This feature can be enabled by your engineer. Entering your user code also silences the sounder in the event of an alarm.
Table of Contents Quick Reference Guide ....................................................................................................................... 3 Table of Contents ................................................................................................................................ 4 Chapter One: Introduction and Overview ............................................................................................. 5 1.1: Security System Components ...............................
Chapter One: Introduction and Overview This user manual explains all you need to know about your infinite prime security system and provides step-by-step instructions for all the system’s user functions. In addition to the explanation you will receive from your engineer, we urge you to read this manual so that you can take full advantage of your system’s features. Keep this manual in an accessible location for future reference.
1.2: System Monitoring When an event occurs within the system, the control panel sends a message to your monitoring service describing the exact nature of the event. This enables the monitoring service to take the required action. System monitoring can implement either regular telephone or cellular communication. A sensor detects. The control panel is alerted. An alarm is generated and the monitoring service is notified. Remember that no security system can prevent emergencies.
Chapter Two: The User Interface There are several methods you can use to operate the system. Apart from the keypad on the front panel, your system may include a number of peripheral devices such as keypads and keyfobs. This chapter provides a brief introduction to each of the devices you can use to operate the system. It is important that you familiarize yourself with these devices before reading the following chapters that shall describe system operation in further detail. 2.
Service Call Button The Service Call button enables you to contact the monitoring service and talk to an operator. Press and hold down the Service Call key for a few seconds to initiate a service call. Home Automation and PGM On/Off Keys Pressing one of the Home Automation keys followed by the unit number (01-16, or 30 for PGM) enables you to control lights and appliances in your home, activate and deactivate the PGM output. Pressing both Home Automation keys simultaneously generates an SOS panic alarm.
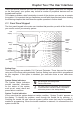
2.4: Wireless Keypad The system supports up to four wireless keypads. You can use the keypad as an setting station, perform basic home automation functions and generate a panic alarm in the event of emergency. Home Auto/PGM. On Key Battery Status LEDs Numeric Keypad Setting Keys Cancel Home Auto/PGM. Off Key Numeric Keypad The numeric keypad allows you to set or unset the system by entering a user code. Setting Keys Three setting keys are available: Full, Part and Perimeter.
Chapter Three: Setting and Unsetting Setting can be defined as activating the system. When the system is set, it monitors the zones that are protected by the sensors. If a sensor detects an intrusion, the system generates an alarm. Certain sensors, such as smoke sensors, are always active regardless of system status. 3.1: Setting the System Three setting modes are available: Full, Part and Perimeter. These modes enable you to set your system accordingly to suit different circumstances.
Setting with a Keyfob To set the system using a keyfob: • Press the relevant button on your keyfob (see 2.3: Keyfobs); the exit delay begins to count down. At the end of the exit delay, the system is armed. Forced Setting Forced setting enables you to set when the system is not ready. For example, if a door protected by a magnetic contact is open, you may set the system on condition that the door will be closed by the end of the Exit delay.
3.3: Set Status Indication The system’s set status is displayed on the front panel only. The following table explains the various set status descriptions that appear on the LCD display. This UNSET FULL ARMED PART ARMED PERIMETER ARMED FULL SETTING PART SETTING PERIMETER SETTING PART ARMED INST PERIM ARMED INST PART SETTING INST PERI SETTING INST ΔΙΣΑΡΜΕΔ 11:22:02 Means The system is unset. The system has been armed using the displayed setting method.
Set Status Reply On receiving an Set Status request message, the system returns a status message to the sender. This message includes the system status and the descriptor of the user or the device used to set/unset the system. The following example shows an Set Status reply where the system has been fully armed by a user named Mark. F U L L A R M E D - M A R K 3.
Chapter Four: Panic Alarms Panic alarms enable you to send a message to the monitoring service in the event of an emergency. There are various types of panic alarm and several methods you can use to generate them. 4.1: Keypad Alarms To activate an SOS Panic alarm from the front panel keypad: • Press and hold down the Home Automation On and Off keys simultaneously. To activate an SOS Panic alarm from the LCD keypad: • Press and hold down the √ and X keys simultaneously.
Chapter Five: Home Automation and PGM Home Automation is an optional feature that requires an add-on expansion module. Home Automation enables you to control up to 16 individual lights and appliances around the home. In this section, we shall refer to these lights and appliances as HA units. HA units and the PGM programable output can be controlled using the keypad and keyfobs, remotely by telephone control (DTMF or SMS), or programmed to react to specific system status conditions.
5.4: SMS Control If your system supports cellular communication, you can control HA units and PGM remotely via your mobile phone using a number of SMS commands. The SMS commands are designed to be entered as templates on your mobile phone.
3. 4. 5. From the HA unit’s sub-menu, select Off Time. Enter a time (HH:MM). Press √ when the desired setting is displayed. Weekly Schedule To program the days of the week that the schedule is active: 1. From the main menu, select HA Schedules [8]. 2. Select an HA unit. 3. From the HA unit’s sub-menu, select Schedule. 4. Use keys 1 to 7 to toggle the days on and off. Press 1 2 3 4 5.
Chapter Six: Telecontrol The infinite prime control panel offers a range of Telecontrol features that provide remote access via the telephone. These features include Two-Way Audio, remote arming/unsetting and sounder cancel. Two-Way Audio You may use the Two-Way Audio features to check your home in the event of an alarm or as an alternative means of communicating with members of your family. For example, you may wish to call an elderly person who has difficulty reaching the phone.
The following commands are available: • Press “2” for Two-Way Audio. o If the TWA mode is defined as “Simplex” (see 6.5: Simplex Mode), the audio channel opens in Listen mode (microphone active/speaker mute). To switch to Speak mode, press “1” on your telephone. To switch back to Listen mode, press “0” on your telephone. • Press “3” to fully set the system.
When the control panel calls, you will hear two short tones when you pick up the phone. Press "2" on your telephone to answer the call. If you press “9” to answer the call, the control panel simultaneously cancels the sounder when you answer the call. If using Simplex mode, the call is connected in Listen mode – see 6.5: Simplex Mode. 6.5: Simplex Mode It is possible that the Two-Way Audio features on your system are programmed to operate in “Simplex” mode.
Chapter Seven: Advanced System Operation Besides the basic functions described in the previous chapters, you can access additional functions via the menu. This chapter describes these functions and the menu navigation procedure. Menu Navigation Using the LCD keypad on the front panel, you can navigate through the menus using the menu navigation keys ( / ) and make simple yes/no decisions using the 3 and 7keys. The availability of menu items depends on the user code that you used to enter Menu mode.
7.2: Zone Bypassing/Unbypassing When a zone is bypassed, its sensor is ignored by the system and does not generate an alarm when triggered. To omit a zone: 1. From the Omit Zones menu, select Omit. [21]. 2. Using the arrow keys, scroll to the zone you want to omit. 3. Press √ to change the omit status. 4. Press X; Save Changes? is displayed. 5. Press √ to confirm the changed omit status. To unbypass all zones: 1. From the Omit Zones menu, select Unbypass All [22]. 2.
Code 29: Telecontrol Code The Telecontrol code is designed to enable the user to perform a number of tasks via their telephone using DTMF commands. Using this code, the user can call their system to set and unset, turn on and off HA units, activate and deactivate the PGM output, cancel the sounder or establish Two-Way Audio communication. This code can only be used for this specific purpose and does not grant access to any additional system functions such as unsetting.
7.4: Follow Me The Follow Me feature is designed to notify you when events have occurred within your security system. This notification may be an SMS message to your mobile phone. Alternatively, the control panel can call you in the event of an alarm so that you may check your family and home using the Two-Way Audio feature. The SMS Follow Me feature requires that you have cellular communication support. You may only access the Follow Me menu item if the feature is enabled in programming.
7.6: Service Menu The Service menu includes various functions that enable you to test your system effectively. You can gain access to the Service menu using the Master code. Set Time & Date To set the time: 1. From the Service menu, select Set Time/Date, Set Time [7011]. 2. Enter the current time. 3. Press √; the time is modified. To set the date: 1. From the Service menu, select Set Time/Date, Set Date [7012]. 2. Enter the current date. 3. Press √; the date is modified.
Sounder Tests To test the external wireless sounder: • From the Service menu, select WL Sounder Test [703]; the wireless sounder is sounded briefly. To test the built-in sounder: • From the Service menu, select Sounder Test [704]; the built-in sounder is sounded briefly. Interface Test The Interface test enables you to check if the speaker, LEDs and LCD are functioning correctly.
The second utility, TX Test enables you to identify transmitters. In TX Test mode, each time a transmission is received, a chime is sounded and the activated transmitter is displayed. To initiate TX Test mode: 1. From the Service menu, select Transmitters, TX Test [7072]. 2. Activate a transmitter; the transmitter’s details are displayed. 3. When you have finished, press X to exit TX Test mode. Audio Volume To adjust the sensitivity of the microphone and the volume of the speaker: 1.
Appendix A: Menu Structure Legend: Engineer code required Master code required -28-
Appendix B: Glossary 24hr Zone A sensor which is always active regardless of whether the system is armed or unset. Armed The state during which the security system is activated. In most cases, when the system is armed, triggering a sensor generates an alarm. Setting Keys The three keys on the front panel or keypad that activate one of the system’s setting options. Bypassed Zone A sensor which is ignored by the system.
G Global Chime A feature that enables/disables the Chime feature for the entire system – see Chime. HA Units Home Automation Units (abbr.). The lights and appliances in the home that are controlled by the optional Home Automation feature. Home Automation An optional feature that enables the user to control electrical appliances and lights via the control panel. Instant Set An setting method that cancels the entry delay after the system has been Part or Perimeter armed.
S Scheduling A Home Automation feature that switches HA units on and off automatically according to pre-set times. Sensors The devices installed around the home that alert the panel in the event of an alarm. Service Call A feature that enables the user to contact the monitoring service and talk to an operator via the control panel. SMS Command An SMS message sent to the control panel that causes the system to perfotm a specific function.
Electronics Line 3000 Ltd.: 14 Hahoma St. Rishon Le Zion 75655 Israel Tel:(+972-3)9637777 Fax:(+972-3)9616584 Electronics Line 3000 Ltd.