Electronics Diversified, Inc. Bijou Plus and Control Console User Manual Revision 4, September 2004 ©2004 Electronics Diversified, Inc.
Bijou Table of Contents About the Manual ………………………………………………………………………………………….. 5 About the Bijou……………………………………………………………………………………………... 5 Section I - System Details and Assembly for Operation Rear Panel………………………………………………………………………………………………….. Assembly……………………………………………………………………………………………………. Front Panel…………………………………………………………………………………………………. Control Keys………………………………………………………………………………………………... Screen Keys………………………………………………………………………………………………... Action Keys………………………………………………………………………………………………….
Bijou Table of Contents Remainder Dim Types of Cues…………………………………….…………………………………...…………………… Preset Track Multistart Preset Multipart Running Cues out of Numerical Sequence………………………………………...…………………… Link Load Cue or Go To Cue Go to in Time/ Sneak Function Running Two Different Prerecorded Cue Stacks Modifying an Existing Cue……………………….…………………………………...…………………… Channel Levels Update Key Cue Preview Screen……………………………...……………………………………………………….. Modifying an Existing Cue's Attributes…………………………………………………………………...
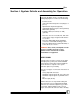
Bijou Table of Contents Setting Up a Device Creating a Position with Multiple Features Home Key Step Key Device Key (F1) Master Key (F2) Jump Key (F3) Action Setup Screen……………………………...…………………………...…………………………... Single Step Special Attribute Timing Loops Running and Stopping an Action Running Positions and Actions as Part of a Show........................................................................... Remote Video……………………………………………………………………………………………….
Bijou ABOUT THE MANUAL This manual, like most operations manuals, is divided into sections. The first section is the boring section and contains the details about what all of the “Parts” are. Unfortunately, if you are new to lighting control and do not learn the parts, their locations, and functions, you will not be able to do the more interesting things, such as create cues and effects.
Bijou So, unpack your Bijou from its shipping box, locate all of the parts and pieces, and you can set it up. It is recommended that you keep the shipping box and materials in storage (if space permits) to use in the unlikely event that the board has to be sent back to the factory for service. The User Manual is supplied with your system. Copies of this manual my be obtained from Electronics Diversified, Inc. for a nominal charge or free via our website www.edionline.com.
Bijou Section I: System Details and Assembly for Operation To operate the Bijou console, carefully open the packing/shipping boxes and locate the following: • • • • • • Control console Universal Power Pack/power cord (may be 2 pieces) Alphanumeric Keyboard (optional) VGA/SVGA display (may be owner provided) DMX cable (optional) Computer disk/s (PC format, 3.5” HD) (optional) 1. Place the console on a stable, flat, and clean surface that is large enough to hold all of the accessories. 2.
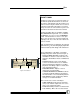
Bijou with no undue force. DO NOT force connectors into position. Since many components use the same style of connector, take the time to familiarize yourself with the location of each connector prior to plugging in each device/accessory to ensure proper operation. 1. DMX OUTPUT (Dimmers 1-512) (5-Pin XLR) 2. DMX OUTPUT (Dimmers 513-1024) (5-Pin XLR) 3. HHR INPUT (Optional accessory) (Hand Held Remote Control) (5-Pin XLR) 4. CONTROL FREAK INPUT (Optional for (5pin XLR) 5.
Bijou switch is in the OFF position. 2. Plug the parallel blade U-Ground end into a surge protected outlet. DO NOT plug the console into the same outlet/circuit with motors or SCR/TRIAC controlled devices. 3. Locate and plug the optional Alphanumeric Keyboard into its jack located on the back of the console. Note: The Bijou is designed to operate with any standard PC/AT keyboard. The console can be shipped with a remote keyboard as optional equipment.
Bijou FRONT PANEL The Bijou is a micro-processor based control system with all operational instruction sets and control routines embedded in read-only memory. The control console front panel allows access to these instructions and routines through key selections. All key selections are echoed on the system command line located at the bottom of the monitor. The Bijou and Bijou Plus are available as MEMORY OPERATION only boards or as a combination MANUAL (2-scene/1-scene) and MEMORY boards.
Bijou nel output instantly to 100% when pressed; returns to 0% when released. Screen Keys XY and AB Fade Control Keys Action Keys CONTROL KEYS Primary access to the control system is via the keypad controls located on the front panel of the console. The keypads are grouped together under common control heading for ease of operation.
Bijou Figure 4-Cue Preview Screen CUE PREVIEW [Cue/List] (first hit) (Figure 4) Preview screen that allows you to view and modify Cues/presets that are not presently active on stage (blind recording). New Cues/presets can be created blindly in this screen.
Bijou Figure 10Profile Screen Figure 11Effect Screen PROFILE [Patch/Profile] (second hit) (Figure 10) Lists the default (1) profile, three Preheat (2-4), a Square Law (5) and a Ballast profile (6) as well as 19 additional user-modifiable profiles for adjusting the turn on curve of individual dimmers. EFFECT [Effect Macro] (first hit) (Figure 11) Creates Effects. To assign channels to steps at levels, set step time, and select Effect type and name.
Bijou [Last] Moves (in numerical order) to the last item in sequence. [Next] Moves (in numerical order) to the next item in sequence. Examples: Next Submaster, next Effect, etc. [Cue] Accesses Cue memories. [Sub-master] Accesses Submaster memories. [Effect] Accesses Effect memories used in assigning memories to Submasters. [Page Up] Changes position of display screen to see the last major full screen block of information.
Bijou [Macro #] Activates Macros. Use with a number between 1 and 2,500 and [Enter] to activate a macro. [Thru] Bridge key between channel selections and level setting. Example: [2] [5] [THRU] [3] [2] [Except] Bridge key between channel selections and level setting. Example: [2] [5] [THRU] [3] [2] [EXCEPT] [2] [8] [Run] Activates RUN commands for intelligent lighting features. The command runs either an action or a position, depending on which screen the command is active in.
Bijou NUMBER KEYS For the following keys refer to Figure 16: NUMBER KEY PAD Number Keys are the primary means of entering values into Cues, times, Submasters, and Effects. Number Keys are always reflected on the system Command Line (lower left screen). NUMBER KEYS [1] through [0] Make a selection by entering the value of the Command Line. Figure 16-Number Keys DECIMAL KEY [.] Inserts additional steps between whole number Cues or to identify tenth seconds in timing operations.
Bijou Faders. [Stop/Rev] Stops the fade in progress on the associated Cross Fader. A second press backs up to the previous Cue (prior to [Go]). Each additional press of this button backs through all of the remaining Cues (prior to [Go]) in the cue stack. [Go] Starts an automated fade loaded to the associated Cross Faders. MAIN MENU The Setup Screen (Figure 18) is divided into two columns.
Bijou processor memory. 3. ONE SCENE: Toggles between 2-scene preset and 1-scene preset manual operation for consoles with 2-scene manual operation features. To change, use [F2] or [F3], then press the [Enter] key. 4. ACTIVE PATCH PAGE: Sets the patch page number. The Bijou can use one of three individual dimmer-to-channel (assignment) patches. Default is one-to-one.
Bijou lock to the wheel, even if there is a null level. As the wheels rotate (clockwise) to increase levels, all selected channels increase output levels. If NO is chosen, any channel selected has a null level, is ignored, and remains at null output. Only the selected channels that have an existing output level of 0 or greater increases when the wheel is moved. 9. LOAD IS GO TO: YES means that any Cue selected by the [Load] key is instantly loaded to the stage when the [Enter] key is pushed.
Bijou 3. 4. 5. 6. 7. 8. 9. tal modification of the wrong preset, the [Update] key cannot be active on both Cross Fader stacks at the same time. 2-SCENE START: Bijou consoles that are configured for 2-scene and 1-scene manual operation have channel Fade Handles with silk screened labels, starting at 1 and progressing upward numerically. In some instances, you may wish to manipulate this section of the board to control channels higher than the numbers silk screened on the console.
Bijou tions. 6. UNITY PATCH 7. FACTORY SETUP: Restores original factory default settings without clearing Cues, Effects, Submasters, etc. To restore, select [7] [Enter], then after the prompt of ARE YOU SURE?, select [Enter] to confirm. 8. DEFAULT PROFILES: Restores all 25 dimmer profiles to the original default settings. 9. CLEAR CF: Clears all moving light functions including device types, devices, positions and actions. 0. CLEAR ALL: Clears all user-recorded information from the system memory.
Bijou user-recorded information to disk. This provides a backup in the event that the board memory is overwritten. 9. FORMAT DISK: Formats a floppy disk so that it can store Bijou shows. LOAD FROM DISK (Figure 23) The Load From Disk Menu is used to transfer prerecorded information from the disk to the memory of the control console. This menu allows the individually listed items to be transferred one at a time. Or, by selecting number 8, all items can be loaded at the same time.
Bijou MATTED DISK error message to appear when attempting to record information to disk. WARNING: Diskettes are sensitive to magnetic fields which may erase or corrupt recorded information. Keep diskettes away from magnetic fields, such as: speakers, telephone bells/ringers, motors, transformers, power supplies (i.e. Little Lights), dimmers, etc. PRINT FUNCTIONS (Figure 24) The Print Functions Menu allows you access to all print features. Figure 24-Print options 1.
Bijou Figure 25-Miscellaneous Functions 1. HHR (Hand Held Remote): If you purchased a system with the optional Hand Held Remote, this position is toggled [F2] to show YES. If your system does not have this option, toggle [F3] to show NO. 2. TIME HOUR: Sets the hour on the system clock (upper right hand corner of all screens). To set the time, enter [2] [the hour of the day] [Enter]. Example: For 9 o’clock, the entry is: [2] [9] [Enter]. For 11 o’clock, the entry is: [2] [1] [1] [Enter]. 3.
Bijou Section II: Bijou Operations INITIAL OPERATION O.K., we are going to actually start operating the machine rather than just looking at it! But, as we have no way of knowing if you just got the console from the factory, or if it has been in use for years and you are just a new user, please complete these steps so that you can follow along: Figure 26-Stage Screen Figure 27-XY & AB Faders Figure 28-Grand Master Fader 1. Turn ON the console and the VGA/SVGA display screen.
Bijou 8. Press [8] (Save All) [Enter] from the Save To Disk screen. 9. Eject the disk once everything is saved. 10. Write the time and date on the disk. 11. Write your name and the date on the new disk and insert it into the disk drive. 12. Use the [Last] key to go the Clear Functions. 13. Hit [0] Clear All [Enter]. This removes any prerecorded show information from the system. PATCH SCREEN Figure 31-Patch Screen To begin, you need to understand what a patch is.
Bijou Neither patch is in use by the board until the patch is an ACTIVE PATCH. To make the patch active: 1. Press [Setup] (Default Settings 1 ) [4] Active Patch [0] for “one to one” patch OR press [1] for PATCH Page 1 OR [2] for PATCH Page 2 2. Press [Enter] to confirm the active patch. If you are just learning the system, leave the default One-To-One patch as the active patch for now. On the Patch Screen, there are ninety dimmers listed at a time with DMR 1-90 listed on the first screen.
Bijou are: [3] [At] [1] [At] [8] [0] [Enter]. Dimmer Channel Maximum Level Profile Figure 34-Patch Screen Sample To make fixtures appear to have equal outputs, assign dimmers different output levels. But, you must keep the same CHN (Channel/Fader) control. This is needed if you are running out of fixtures and have to use a 500 watt 6” fresnel and an old 1,000 watt 8” fresnel to light an area. The 1000 watt is twice as bright as the 500 watt.
Bijou Another way to do this is to use the [F3] (figure 35) Edit key in the sequence to select what you wish to change. Example: If the you want to change the LEV of DMR 6, 7, 8, 9, 10, and 12 to 75% without changing the CHN (channel) assignments, the sequence using the [F3] key ( is: [6] [Thru] [1] [0] [And] [1] [2] [At]] [F3] [7] [5] [Enter].
Bijou PARKING Parking a dimmer allows you to turn the dimmer ON to a specific level that cannot be turned OFF with the Grandmaster Fader, Blackout switch, or with inhibitive Submasters. This is helpful when you need to use a dimmer circuit for backstage work lights that need to stay ON during onstage blackouts. Another use is controlling music stand lights in the orchestra pit.
Bijou tionship between a Fader (automatic or manual control) and how the dimmer turns ON. The first Profile on the screen is the Bijou default profile. Profile 1 is a LINEAR PROFILE that has the output of the dimmer equal to the percentage of travel of the Fader. If you raise a Channel Fader to a level of 65, the dimmer is at 65% of its total output. To navigate to the Profile Screen (Figure 36), push the [Patch/Profile] key twice. The green/ yellow column on the right of the screen lists Profiles 1-25.
Bijou ode, and fluorescent that need a higher starting current to ignite/light. Profiles Number 8-25 are user-configurable to allow you to modify dimmer outputs. To modify a Profile, navigate to it by using the [Next] [Last] keys or use [F3] followed by the desired Profile Number. Example: To modify Profile 17: 1. Select Profile 17 by hitting [F3] [1] [7] [Enter] 2. Enter the percentage of the Fader output from the top row. 3. Press the [At] key. 4. Enter the percentage of the dimmer input desired. 5.
Bijou The Bijou is designed to work in a manual, 2scene, preset mode. As we have already done a Clear All, the system has defaulted to 2-scene Preset operation with a One-To-One patch. So, for the time being, Channel 1 operates Dimmer 1 only, Channel 2 operates Dimmer 2, Channel 3 operates Dimmer 3, etc. All are set at a maximum dimmer output of 100% operating under default Profile 1. All 2-scene and 1-scene operations work from the Stage Screen.
Bijou the operator by letting them know what keystrokes are logical for the present operation. This screen is a dynamic screen and changes as the you input data to reflect the next keystroke choices. Example: If you enter a channel number, the screen changes to tell the operator that the next logical keys are [And], [Thru], [Except], or [At]. This screen works in conjunction with the keystroke command line that appears in white in the lower left portion of the screen.
Bijou To begin operating in 2-scene Manual Mode: 1. Turn the Blackout switch to the OFF position. LED will turn off. 2. Press [F1] (Figure 43) [Enter]. This configures the XY Cross Fader for 2-scene preset operation. Figure 42-Blackout Switch Figure 43-[F1] Key Note that in the Cross Fader Display, the Cue is set for X as Scn1 (Scene 1) and Y as Scn2 (Scene 2) for the Faders. Both the X and Y Fader operate by being physically moved up or down so that the times of the XY Fader are MAN.
Bijou numbers located between the two rows of Faders (below the bottom row are smaller numbers that are their respective Channel numbers when operating in 1-scene mode). The X Fader controls the top row of Fade Handles and the Y Fader controls the bottom row . Figure 44-Fade Handles In Manual mode of operation of a board, if you intend to repeat the same Cues at several performances, it is recommended that the operators make up Cue Sheets.
Bijou tion has and is being used to great affect in all levels of professional and non-professional performing arts world wide. Now, move the XY Cross Fader up to the X side to fade into this first Cue. Now that the XY Cross Fader is in the up position, you can set the next set of Channel levels for the next Cue on the bottom of the Y row of Fade Handles. Set Fade Handles 6-10 at full (10) on the bottom row of Fade Handles.
Bijou OPERATE IN 1-SCENE MANUAL MODE Well, 2-scene preset operation is used primarily for running a sequence of predetermined Cues in a production. 1-scene operation is more often used for creating looks “On The Fly.” By switching to 1-scene operation, you double the number of manual Fade Handles that you have at your finger tips. This allows for greater flexibility of control.
Bijou to 1-scene. 3. Press [Stage] to return to the Stage Screen. The XY Cross Fader is now configured for 1scene preset operation. Note that in the Cross Fader Display the CUE has been set for X as Scn 1 (Scene 1). The X Fader will operate by physically sliding it up or down, so the fade times are MAN (manual). Manual Cue action does not have a TYPE and cannot be assigned a screen NAME, so their slots remain blank.
Bijou 1. Set Channels/Faders, numbers 1-10, at full. The X or XY Cross Fader is in the down (OFF) position. There is no output and you cannot see any associated levels on the display screen. 2. Move the X or XY Cross Fader to the (full) position. The display screen indicates the X LEV is at full and the Channels 1-10 have faded to full. WARNING: If you accidentally lean on a bump button (Figure 47), lights may turn on.
Bijou MEMORY OR AUTOMATED PRESET OPERATION Ok, you bought this Memory console so that you would not have to write down channel levels and recreate them night after night. All you really want to do is push the [Go] button at the right time and the rest is the stage manager’s problem, right? So, how do you record a set of Cues and play them back? It is time to learn.
Bijou 3. Press [Record] (Figure 48) . The command line states RECORD CUE. 4. Press [1]. 5. Press [Enter]. 6. Cue 1 has just been recorded. Figure 48-Record Key Repeat these steps over and over to achieve a desired show. Note: Anytime you record a Cue on the Stage Screen, you will be recording all levels that are sent to the dimmers. This includes all Fader handles, Manually entered, Effect, and Submaster output levels and can include the levels of Cues active on the other Cross Fader.
Bijou LOADING THE CUE TO A CROSS FADER Figure 49-[Load] and [Fade Take] Keys Example: To load Cue 1 to a Cross Fader: 1. Press [Stage] to return to the Stage Screen. 2. Pull Channel/ Faders 1-10 down to OFF. This clears the screen. 3. Press [Load] above the AB Faders (Figure 49). The command lines says LOAD CUE. This allows you to see Cue 1 on stage. 4. Press [1] [Enter]. Cue 1 is loaded to either the A or the B side of the AB Cross Fader.
Bijou either the A or B, is an arrow pointing up. This indicates which side of the Cross Fader is fading up. As you fade from one side to the other, the LEV windows changes at the rate of the Cross Fades that are assigned up and down times. Different Fade Times To record a Cue with a fade time that differs from the Default time, add the use of the [Time] key (Figure 51) followed by the [#] key(s). The [#] key (s) represent the number of seconds into the record sequence.
Bijou the rest of the stage slowly fades out, the audience’s eyes are given an easier transition and adjust faster to the change in the stage picture. Example: To create a Cue with different up and down times: 1. Press [Stage] to go to the Stage Screen. 2. Push Fade Handles numbers 11 through 15 up to an output of 50%. 3. Press [Record] [2] [Time]. The command line now reads RECORD CUE 2 with an up and down arrow next to the command line. This indicates that you may now enter the time for the cross fade.
Bijou Example: You may want a fully lit stage to fade to almost blackout on an 8 count and then have a bright special POP on a character on stage. To do this: 1. Create Cue 3 with just the special. 2. Clear the AB Cross Fader by pressing [Load] [Enter]. 3. Make sure that all Fade Handles are down and OFF. 4. Push Channel/Fader 26 up to full. 5. Press [Record] [3] [Time] [1] [Time] [8] [Time] [7] [Time] [0] [Enter].
Bijou Example: To create Cue 2 with an up time of 6 seconds, a down time of 10 seconds, a delay on the up of 8 seconds, and a delay on the down of 7 seconds, enter: [Record] [2] [Enter] [Time] [6] [Time] [1] [0] [Time] [8] [Time] [7] [Enter]. SETTING LEVELS VIA THE KEYPAD (DATA ENTRY) & THE ENCODER WHEEL Channel levels do not have to be set via the Fade Handles. All 512 channels can be addressed through the Action and Number Keys (Figures 53 and 54).
Bijou Screen, you enter: [5] [At] [5] [Enter]. To set channel 7 thru 10 at a level of 25% from the Stage Screen, you enter: [7] [Thru] [1] [0] [At] [2] [5] [Enter]. To set channel 19 at a level 0f 5% from the Stage Screen, you enter: [1] [9] [At] [0] [5] [Enter]. Figure 55-Encoder Wheel To return the levels to their previous settings, press [At]. [At] addresses the channels again.
Bijou TO CLEAR CHANNEL LEVELS TO 0% To set all channel levels to 0%, press [1] [Thru] [5] [1] [2] [At] [0] [Enter]. This sets all channel levels to 0%. Next, go to the Cue 0 using the [Load] key. Cue 0 is a default Blackout Cue and can not be user-modified. If you plan to return to a Blackout look on stage repeatedly in your Cue process, you may wish to record this look as a Cue.
Bijou Example: 1. Press [Stage] to go to the Stage Screen. 2. Set the levels for Channels 6-10 at a level of 55% with the Remainder Dim. To do this, press [6] [Thru] [1] [0] [At] [5] [5] [F2] [Enter]. Every channel except 6-10 now has a brown level of 0. Hit [Enter] twice to restore levels. TYPES OF CUES In the Cross Fader information window of the Stage and Preview Screens there is a window labeled TYPE. It is possible to run five different types of Cues on the Bijou.
Bijou To make the Bijou a Tracking board all of the time, change to this mode as the default in the Setup Screen (see Figure 58) To do this, press [Setup] [5] [F2] [Enter]. Figure 58-Default Settings1 Figure 59-Cue Type Window Example: To track a new cue only, 1. Press [Stage] to go to the Stage Screen. 2. Press [1] [Thru] [1] [0] [At] [5] [0] [Enter] to record channels 1-10 at 50% (channel levels currently appear in brown). 3. Press [Record] [1] [Enter] to record channels 1-10 at level 50% to Cue 1.
Bijou Example: 1. Press [Stage] to go to the Stage Screen. 2. Create Cues 1-4 ([Record] [#] [Enter]). 3. Press [Cue/List] to go to the Cue Preview Screen. 4. Press: [Cue] [3] [Enter] [F3] [F3] [F3] [Enter] [Cue] [4] [Enter] [F3] [F3] [F3] [Enter] There are now two Cues that are Type AP (Autofollow Preset). 5. Return to the Stage Screen. Make sure MAN is off. If MAN is in the time colum, press the [Fade Take] key. 6. Press [Load] (above XY Cross Faders) [1] [Enter]. 7.
Bijou 10. Press [Load] [6] (Cue) [Enter] to the AB Cross Faders. 11. Press [Go] to fade into the Cue. When you press [Go], Cue 6 is faded into and, at the same time, Cues 7, 8, 9, and 10 are also faded into. You now see Cue 5 loaded and ready to fade into. You also see a new set of dialogs to the left of the help screen. It reads: AB LEV PARTS CUE 7 8 9 10 This shows that you have a multipart Cue ready to run. As soon as you press [Go], all of the Cues that are part of the set begin.
Bijou through the Cues, they load in strict numerical order. This is the preferred way of operating in most theatrical productions. But there are times when you may need to run a production out of sequence. Example: The production is a dance concert and each dance number has it’s own sequence of Cues using Cues 1-100. On the third night of the performance, a soloist breaks a toe and cannot perform a number. The dance number uses Cues 34-46.
Bijou as a “Go to Cue” Key, you do not have to use the [Go] key. [Load] [#] [Enter] will immediately bring Cue # up on stage. Example: An actor is nervous on opening night. In the middle of the second act, the actor skips 5 pages of dialogue and 2 lighting Cues. In response, the operator can immediately go out of sequence to the Cue that corresponds to where the actor has advanced. To make the [Load] key a Go-To-Cue key: 1. Press [Setup] to go to the Setup Screen. 2. Press [9] [F2] [Enter]. 3.
Bijou 1. Press [Load] [1] [Enter] on the XY Fader. 2. Press [Load] [1] [0] [Enter] on the AB Fader. 3. Press [Fade Take] on the AB and XY Cross Faders to set the Faders to automatic operation . With both Cross Faders loaded, you can now press both or either [Go] buttons and run through the Cues with each Cross Fader maintaining its proper numeric Cue sequence. A good use of this ability is running the basic show Cues (say Cues 0.
Bijou brown 4. Hit [Update]. Screen will read “Update Cue 1” 5. Hit [Update] again to confirm. Channel 5’s level will turn from brown to white. THE CUE PREVIEW SCREEN To access the Cue Preview Screen (Figure 65), press the [Cue/List] key once. This screen allows you to modify any and all prerecorded Cues and to create new Cues. This can be done in what is known as a BLIND RECORD method of operation because this screen can record or modify Cues that are not outputting levels to dimmers.
Bijou sequence of keystrokes used in the Stage Screen to enter times or types. The Cue Preview Screen always opens to the same Cue that is live onstage (Stage Screen). To change to a different Cue, press [Cue] [#] [Enter] OR use the [Next] [Last] keys to sequence through all of the Cues. After accessing the desired Cue ([Cue] [#]), modification of the following Cues is allowed: LINKING: To link the present Cue to any other Cue out of numerical sequence.
Bijou LINKING: To link the present Cue to any other Cue out of numerical sequence. To link the two Cues, press: [Cue] [#] (present Cue) [Enter] [F2] [#] (Cue being linked to) [Enter]. From the Cue List Screen (Figure 66), look at the present Cue and under the column titled LINK, you now see the number of the Cue that the present Cue is linked to. TYPE: Press [Cue] [#] [Enter] to select a Cue. Press [F3] to select a Cue type operation followed by [Enter] to confirm selection.
Bijou Figure 69-[Last], [Next], [Page Up], [Page Down] and Keys Channel numbers appear in blue across the top of the screen with the channel output level listed below it for each Cue. Channel output levels are shown in either white or gray. Gray indicates that the Cue associated with that level is a Tracking Cue and that the level for the channel is TRACKING IN from the previous Cue(s).
Bijou you give a group a physical handle to manually manipulate as well as digitally enter (addressed via keystrokes), it is a Submaster. The Bijou has 24 Submasters with associated tricolored LEDs and Bump Buttons located on the right end of the console. There are 12 pages of these Submasters for a total of 288 groups of memories. Submaster memories are addressable via the keyboard (for use in creating Cues) or via the Submaster, Fader, and bump buttons for manual control.
Bijou SOLO Bright Red Effect loaded to Sub Yellow Orange SUB PREVIEW SCREEN To get to this screen, press the [Sub-master/List] (Figure 74) key one time. The majority of the screen is devoted to blue channel numbers. These are the same channels as on the Stage Screen. Use these channels in the same manner. To record a Submaster, enter channel levels using the number keys [0] through [9] in combination with [Thru] [And] [Except] [At] and [Enter] keys to set the output levels.
Bijou Submaster when working/viewing it on the Sub Preview Screen. Example: To enter a Submaster name: 1. For Submaster Pg 1 Sub 1, type in the name WORK LIGHTS. 2. Press [Sub-master/List]. This returns to the Sub List Screen and the name has been entered. Figure 75-[Sub-master] Key Example: To record a Submaster on Pg (page) 2: 1. Press [Sub-master/List] to go to the Sub Preview Screen. 2. Press [F2] [2] [Enter]. The page number in the lower part of the screen is now Pg 2. 3.
Bijou dles: 1. Press (action key) [Sub-master] [F2]. This brings up SUB PAGE in the command line at the bottom of the screen, then the page number [1] though [1] [2] that you want active on the stage. Then, [Enter] when finished. This puts a green 2 above all Sub numbers, indicating that page 2 of Submaster memories is active on the Submaster fade handles. 2. Repeat the process to go back to page 1 by pressing [Sub-master] [F2] [1] [Enter].
Bijou Example: To record a Submaster: 1. Press [Stage] to go to the Stage Screen. 2. Press [Sub-master] [F2] [#] (page) [Enter]. This takes you to the page number. 3. Press [Record] [Sub-master] [#] (Submaster) [Enter]. Now the Submaster is recorded on a specific page. Example: To record Submaster 3 on page 4: 1. Press [Stage] to go to the Stage Screen. 2. Press [Sub-master] [F2] [4] [Enter]. This takes you to page 4. 3. Press [Record] [Sub-master] [3] [Enter]. This records Submaster 3 on page 4.
Bijou Figure 77-Submaster Type Window of the Sub Preview Screen erate a Submaster, either use the Submaster Fader handle or the associated bump button (Figure 76). Pressing the bump button or pushing the Submaster fade handle up raises the output levels to the maximum output recorded in the Submaster memory. But, this is not the only type of Submaster available for use. Return to the Sub Preview Screen and use the [Last] or [Next] keys to go back to Pg: 1 Sub: 1.
Bijou with that Submaster go on to the maximum recorded output and all other channels from all other sources go to OFF. This is a LAST ACTION mode of operation. OFF: When a Submaster is set to OFF, both its fade handle and bump button are disabled. TIMED SUBMASTERS At the bottom of the Sub Preview Screen, are three windows: Time Up, Hold, and Time Down (see Figure 78). The time features work with either the NORM or INHB modes of operation and are activated by the Submaster’s bump button.
Bijou MERGING A SUBMASTER INTO A CUE As stated at the beginning of this section, a Submaster is a GROUP of channels that are controllable from one Fader/handle. Many times, you can speed the Cue recording process by calling up a GROUP at a level rather than all of the individual channels. The Bijou is capable of storing 288 different groups of looks to Submaster Fader/ handles. This is seen in the Cue building process.
Bijou EFFECTS Effects are sequential, automated lighting changes. Effects can be as simple as a repeated ON/OFF or so complex that the Effects involve all 512 channels of dimmers that the Bijou controls. CREATING AN EFFECT The Effect Screen [Effect/Macro] (Figure 79) is used to create an Effect. In the lower left of the screen you see the Effect number. To change to a different Effect, press [Effect] (see Figure 80) [#] [Enter]. This takes you to the desired Effect.
Bijou four steps created stays at FULL for a half second. WARNING: You cannot have more than 10 effects loaded onto the submasters at one time. WARNING: Many theatrical lighting fixtures have large filaments that take time to heat up and start to glow. The filaments also takes time to cool off and stop glowing once the power is turned off. If the steps of an Effect run too fast, the filaments may not have time to go ON and OFF. INSERTING AND DELETING STEPS To insert a step: 1. Go back to the Effect Screen.
Bijou BOUNCE: In a bounce Effect, the sequence starts at the lowest step and progresses to the highest number step and then reverses, going to the lowest number step. Next, the sequence again reverses and goes back up to the highest number. Example: For a 4-step Effect, the sequence is: 1,2,3,4,3,2,1,1,2,3,4,3,2,1. REVERSE: This is the exact reverse of Forward. Reverse starts at the highest and progresses to the lowest. Example: For a 4-step Effect, the sequence is: 4,3,2,1,4,3,2,1,4,3,2,1.
Bijou Example: To load an Effect, select an Effect to run (in this case, Effect #1), and the Submaster to control it (for this demonstration, use Sub 24). To load Effect #1 onto Sub 24, press: [Sub-master] [2] [4] [Effect] [1] [Enter]. This loads a yellow 01 on the E/Pg: line, directly above a yellow 24 on the Sub: line of the Submaster control section of the Stage Screen. Any yellow numbers in this section indicates that an Effect has been loaded to operate with that Submaster.
Bijou MACROS A macro is a way to reduce the number of key strokes it takes to do a repetitive operation. The Bijou has a Macro Screen (Figure 81) [Effect/ Macro] that allows you to see the keystrokes that make up a macro. To look at a different macro, use the [Next] [Last] keys to step through all recorded Macros. Or, if you know which macro you want to see, press [Macro#] (see Figure 82) [#] [Enter]. This takes you to the desired screen. CREATING A MACRO You can create a macro from any screen.
Bijou Example: To run and save the macro just created: 1. Press [Macro#] [1] [Enter]. This runs macro 1. 2. Press [Setup]. The setup screen is shown 3. Press [next] 3 times. “Save To Disk” is highlighted. (make sure that a disk is inserted. 4. Choose SAVE ALL. 5. Press [Enter] at the ARE YOU SURE? Command prompt. All the work is saved to disk. TO DELETE A MACRO From the Stage or Macro Screen, you can delete any macro by pressing [Delete] [Macro] [#] (number of the macro) [Enter].
Bijou Section III: Intelligent Lighting Controls INTELLIGENT LIGHTING DEVICE CONTROLS (for Control Freak and Bijou Plus models) Intelligent Lighting Devices all use DMX address and output levels to control them. A moving light can have 10 or more DMX address that control their attributes which can include; color, up/down (tilt), left/right (pan), type of gobo, etc. Each attribute is assigned its own DMX address and by changing the DMX output level the attribute is manipulated.
Bijou But you will find that if you are attempting to control a lot of Intelligent Lighting Fixtures that it can be easier to have dedicated controls designed specifically for that purpose. To provide that EDI’s Bijou control console can be upgraded with the addition of the Control Freak outrigger or, the Bijou Plus comes with the Control Freak built in. The following items and control commands are for Bijou Plus consoles and Control Freak outrigger and are not applicable to the standard Bijou console.
Bijou in the fixture’s documentation or on the web. 2. Enter the screen. The yellow pointer is pointing to the Type number and name. Position the yellow arrow by using the [Next] and [Last] keys. 3. Naming the Type. Type in the fixture’s name. Hit next and the arrow will point to attribute 1 Example: > Number: 1 > Name: Scan 250 4. Naming the Attribute. Type in the attribute type’s name using the keyboard. 5. Enter the attribute names in order with the optional computer keyboard. (see Table 1) 6.
Bijou Figure 84-Type Setup Screen with Assigned Attributes Wheels Example: 1. Group the attributes in pages (since there are more attributes than wheels). It does not have to be sequential. 2. Put Pan and Tilt on X and Y. 3. Put Focus, Dimmer, and Shutter on one page. 4. Put Colors on another page. 5. Put Gobos on another page. 6. Press [F3] to select the source from the source options column. 7. Select the desired wheel and page by using the table on the right hand of the screen.
Bijou Figure 87– Position Setup Screen using the [Next] and [Last] keys. 2. Type in the device name with the computer keyboard (see example in Figure 85. 3. Move the yellow pointer to the next location and type in the next name. Repeat until all of the device names are entered. 4. Add the start address of each device. Addresses 1-512 comes out of the first DMX out and addresses 513-1024 come out of the second DMX out.
Bijou • Figure 88-Device Window • • Figure 89-Type Window Bottom Left: This is the Device Window (see Figure 88). In this window, enter the desired device number. Right: This is the Type Window (see Figure 88). When you select a device, this window displays the device’s type and attributes. When you move the wheels, the values are shown in this window. You can also JUMP to this window and manually enter the values. Bottom: Shows what Source Page you are in.
Bijou CREATING A POSITION FOR MULTIPLE DEVICES Figure 90-Run Key as an Action Key Example: To create a position for multiple devices: 1. Go through the above steps to setup a position for a device. 2. Move the yellow pointer down the line using the [Next] key. 3. Select another device and position it 4. Record the position after positioning all of the devices: [Record] [#] [Enter]. CALLING UP A RECORDED POSITION Figure 91-Run Key Moving Lights Keypad Example: To call up a recorded position: 1.
Bijou THE STEP KEY (Figure 93) This key changes the resolution. This is mainly used for 16-bit values. There are two choices: Coarse and Fine. COARSE: allows for large changes in the levels. FINE: allows you to zero in on a specific spot. THE SHIFT RIGHT KEY (Figure 94) Figure 93-[Step] Key This key activates the hold function. The hold function allows you to hold an attribute. You have three choices of attributes: none, X, and Y.
Bijou Select which attributes follows in the Type Setup Screen (see Figure 95) in the mastering column by pressing [F3]. Afterwards, select either [F1] or [F2] for straight or [F3] for inverted. If no selection is made the mastering is removed from that attribute. Then press [Enter}. After the master has moved a device, you can still go to the device (by the yellow pointer) and change any of its values. When you are familiar with recording positions one by one, mastering can be used.
Bijou to master off of Device 1. 12. Press [Next]. The cursor will drop to the next line 13. Place the cursor on the first device and move the wheels. The devices should synchronously move with each other. THE JUMP KEY (F3) This key moves the yellow pointer from the Device Window on the right to the Type Window (Figure 97) on the left and back. Now, the [Next] and [Last] keys can be used to move through the attributes of the selected device.
Bijou the heading POSTION. 6. Press [1], This will select Position 1 as the first position. 7. Press [Time] [5] [Time] [5] [Enter]. The fade time is set for 5 seconds to go to position 1 and wait for 5 seconds. 8. Repeat sequence for positions 2, 3, and 4. This is the series of positions you want to chain together. SINGLE STEP Single step is a way to override the times. If single step is YES, then press the [Step] button to move from position to position.
Bijou 13. Fades to position 10 in 6 seconds. 14. Waits 0 seconds before going to position 4 (loop). 15. Fades to position 4 in 1 second. Many devices have a built-in fade delay. So even when the device is told to move in 0 seconds, the device slows the fade automatically. SPECIAL ATTRIBUTE TIMING There is a way to have one (or more) attribute(s) fade faster than the rest. Example: The user wants to have the color change at zero time while the device pans in 10 seconds.
Bijou To run an action: Press [Run] [Enter]. This runs the action shown. Example: To stop an action: Press [Run] [0] [Enter]. RUNNING POSITIONS AND ACTIONS AS PART OF A SHOW FROM THE STAGE SCREEN By Keyboard: • Action: Press [Run] (command shows RUN ACTION) (see Figure 99). Then press [5] [Enter]. • Position: Press [Run] [F2] (command shows RUN POSITION) [8] [Enter]. • Number (e.g. [Run] [Enter]). Loading Positions on a Submaster Handle: Example: 1. Press [Sub-master] [5] [Run] [3] [Enter].
Bijou the Cue. For this example, create macro 4 that says RUN POSITION 5. 2. Go to Cue list and put macro 4 on Cue 3. When Cue 3 starts, position 5 comes up. To clear the position, make another position macro and add that into the next Cue. Actions work in the same way. Positions and actions are LAST ACTION. If a position is started with a Cue (macro), press a Submaster button (which has a position loaded). The first position stops and the new position starts.
Bijou PRINTERS The Bijou Console is equipped with a parallel printer output port configured for Epson Standard protocol. Printers tested: Citizen GSX-190 Panasonic KX-P1124 Citizen 200GX Panasonic KX-P2023 Epson FX-870 SET UP PRINTER: Load paper and test printer functions as identified in printer manual. Configure printer for standard Epson protocol. Set switch for line-feed on carrige return. Turn off power to printer. Connect printer cable to console printer port. Connect printer cable to printer output.
Bijou SERVICE EDI offers a 24 hour Service/Support Network. For technical questions about this product or operational assistance, ask for Customer Service at: Telephone:…………………………………………………………………………….1-800-547-2690 FAX:…………………………………………………………………………………...1-503-629-9877 Internet………………………………………………………………………………..www.edionline.com Internet E-Mail:……………………………………………………………………….service@edi.org If your Bijou Console needs repair, call: 1-503-645-5533 for a Return Materials Authorization number.