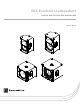
EKX Powered Loudspeakers EKX-12P, EKX-15P, EKX-15SP, and EKX-18SP en | User Manual
en 3 Table of contents 1 Safety 4 1.1 Important Safety Instructions 4 1.2 Suspension 5 1.3 FCC Information 6 1.4 Precautions 6 1.5 Notices 7 2 Description 8 2.1 System features 2.2 Quick Setup 10 3 System overview 12 3.1 Dimensions 12 4 Tripod and floor monitor operation 13 4.1 Tripod or pole mount 13 4.2 Floor monitor 15 5 Suspension 16 6 Amplifier DSP 20 6.1 Amplifier DSP controls 20 6.2 System status 22 6.3 DSP controls 23 6.3.
EKX Powered Loudspeakers 1 Safety 1.1 Important Safety Instructions The lightening flash with arrowhead symbol, within an equilateral triangle is intended to alert the user to the WARNING: TO REDUCE THE RISK OF presence of uninsulated “dangerous FIRE OR ELECTRIC SHOCK, DO NOT voltage” within the product’s enclosure OVEREXPOSE THIS APPLIANCE TO RAIN that may be sufficient magnitude to OR MOISTURE constitute a risk of electric shock to AVIS: RISQUE DE CHOC ELECTRIQUE, persons. NE PAS OUVRIR.
en 5 14. Refer all servicing to qualified service personnel. Servicing is required when the apparatus has been damaged in any way, such as power-supply cord or plug is damaged, liquid has been spilled or objects have fallen into the apparatus, the apparatus has been exposed to rain or moisture, does not operate normally, or has been dropped. 15. No naked flame sources, such as lighted candles, should be placed on the apparatus. 16.
EKX Powered Loudspeakers 1.3 FCC Information IMPORTANT: Do not modify this unit! Changes or modifications not expressly approved by the manufacturer could void the user’s authority, granted by the FCC, to operate the equipment. Notice! This equipment has been tested and found to comply with the limits for a Class B digital device, pursuant to Part 15 of the FCC Rules. These limits are designed to provide reasonable protection against harmful interference in a residential installation.
en 1.5 7 Notices Old electrical and electronic appliances Electrical or electronic devices that are no longer serviceable must be collected separately and sent for environmentally compatible recycling (in accordance with the European Waste Electrical and Electronic Equipment Directive). To dispose of old electrical or electronic devices, you should use the return and collection systems put in place in the country concerned. Electro-Voice User Manual 2017.01 | 06 | F.01U.318.
EKX Powered Loudspeakers 2 Description Thank you for choosing an Electro-Voice powered loudspeaker system. Please take time to consult the manual to understand all the features built into your EV system and fully utilize its performance capabilities.
en 2.1 9 System features EKX-12P – 12-inch two-way powered loudspeaker system ▪ QuickSmartDSP features best-in-class processing, EV's signature single-knob user interface, and intuitive menu navigation via LCD. ▪ High-efficiency 1500 W Class-D power amplifier delivers up to 132 dB SPL via highsensitivity transducers designed and engineered by EV. ▪ Intelligent thermal management with a variable-speed fan controlled by multiple onboard sensors.
EKX Powered Loudspeakers ▪ Two XLR outputs for easy system expansion to additional loudspeakers or subwoofers. Large slot ports for low distortion and excellent bass extension. Two metal grille reinforcement bar. M20 threaded pole mount plate. 2.2 Quick Setup The EKX powered loudspeakers from Electro-Voice with carefully matched electronics and transducers. These products make it easy to set up a high quality system quickly with a minimum amount of cables and external electronics.
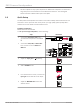
en 11 Subwoofer Models: EKX-15SP and EKX-18SP To set up a subwoofer, do the following: Step 1. Illustration Connect the AC power cord from a grounded line receptacle to the MAINS IN. 2. Connect the XLR or TRS cable from an audio source to INPUT 1 or INPUT 2. 3. Switch POWER to ON. 4. Adjust the MASTER VOL knob to the desired volume. Electro-Voice User Manual 2017.01 | 06 | F.01U.318.
EKX Powered Loudspeakers 3 System overview 3.1 Dimensions Figure 3.1: EKX-12P dimensions Figure 3.2: EKX-15P dimensions Figure 3.3: EKX-15SP dimensions Figure 3.4: EKX-18SP dimensions 2017.01 | 06 | F.01U.318.
en 4 Tripod and floor monitor operation 4.1 Tripod or pole mount 13 EKX-12P and EKX-15P loudspeakers mount on a tripod stand or on a pole above a subwoofer. Mounting a loudspeaker on a tripod stand Figure 4.1: Full-Range models on a tripod stand Caution! ! Tripod is not evaluated for safety with this loudspeaker. Check the specifications of the tripod stand to be certain it is capable of supporting the weight of the loudspeaker.
EKX Powered Loudspeakers Mounting a loudspeaker on a pole Figure 4.2: Full-Range/subwoofer stack with pole mount Caution! ! Two person lift and placement is recommended for the heavier loudspeakers. Single person lift and placement of heavier loudspeakers could cause injury. To mount a loudspeaker on a pole, do the following: 1. Place the subwoofer on a level stable surface. 2. Insert the M20 threaded pole into the combo pole cup on the top of the subwoofer. 3.
en 4.2 15 Floor monitor EKX-12P and EKX-15P loudspeakers may be used as a floor monitor by placing the loudspeaker on the integral monitor angle. To set up a loudspeaker as a floor monitor, do the following: 1. Place the loudspeaker on a level stable surface. 2. Safely route cables to prevent injury to performers, production crew, and audience members. Notice! Secure cables with wire ties or tape whenever possible. Figure 4.3: Optimum coverage in monitor position Electro-Voice User Manual 2017.
EKX Powered Loudspeakers 5 Suspension The EKX-12P and EKX-15P enclosures have eight (8) M10 threaded points; six (6) points on top of the enclosure and two (2) points on the bottom. Forged shoulder eyebolts rated for overhead suspension may be used to suspend an individual loudspeaker, such as the EBK-M10 accessory.
en 17 Installing the eyebolts To install the eyebolts, do the following: 1. Remove the M10 screws from the suspension points. 2. Replace the M10 screw with the fender washer and eyebolts. Notice! If the eyebolts are removed reinstall the screws. If the screws are not reinstalled air leaks occur in the enclosure, resulting in undesirable performance. Electro-Voice User Manual 2017.01 | 06 | F.01U.318.
EKX Powered Loudspeakers Warning! ! Eyebolts must be fully seated and oriented in the plane of pull. Always use fender washers at least 1.5 inch in diameter and 1/16 inch thick under the eyebolt to distribute the load on the enclosure. Figure 5.2: Eyebolt shown with and without washer Figure 5.3: Eyebolts shown oriented in the plane of pull 2017.01 | 06 | F.01U.318.
en 19 Warning! ! Never exceed the limitations or maximum recommended working load for Electro-Voice loudspeakers. Disregarding this warning could result in serious injury or death. Figure 5.4: Maximum working load - vertical orientation Warning! ! Never suspend EKX Series loudspeakers in a vertical column array. Disregarding this warning could result in serious injury or death. Figure 5.5: Loudspeaker vertical suspension Electro-Voice User Manual 2017.01 | 06 | F.01U.318.
EKX Powered Loudspeakers 6 Amplifier DSP 6.1 Amplifier DSP controls The amplifier has a combination of controls and connectors to ensure the most versatile loudspeaker system. Full-Range loudspeaker control and monitoring interface The full-range loudspeaker DSP control menu selections are available for the EKX-12P and EKX-15P. Figure 6.1: Full-Range loudspeaker amplifier panel 1. 2. LCD – DSP control and monitoring interface. MASTER VOL – Adjusts the sound level.
en 8. 21 RCA INPUT – Stereo unbalanced RCA inputs for connecting external audio media devices, such as MP3 players. Both RCA inputs are summed and can be controlled with INPUT 1 level. The inputs can be used simultaneously with XLR/TRS INPUT 1. Subwoofer control and monitoring interface The subwoofer DSP control menu selections are available for the EKX-15SP and EKX-18SP. Figure 6.2: Subwoofer amplifier panel 1. LCD – DSP control and monitoring interface. 2. MASTER VOL – Adjusts the sound level.
EKX Powered Loudspeakers 6.2 System status Normal Figure 6.3: Normal system status home screen 1. LEVEL – Indicates the master gain of the system in dB. The range is from mute to +10 dB, in 1 dB increments. 2. IN1 – VU meter displays the signal level of INPUT 1 into the amplifier INPUT 1 XLR connector. IN1 and IN2 are independent of each other. 3. IN2 – VU meter displays the signal level of INPUT 2 into the amplifier INPUT 2 XLR connector. IN1 and IN2 are independent of each other. 4.
en 6.3 23 DSP controls An integrated DSP control menu allows the user to select multiple DSP system settings on the loudspeaker. To access the DSP controls menu, do the following: 1. Push the MASTER VOL knob. The DSP Control menu appears. 2. 3. Using the MASTER VOL knob, scroll through the menu items. Push the MASTER VOL knob to select the menu item you want to modify. The focus moves to the parameters on the right side of the DSP menu. 4. Using the MASTER VOL knob, scroll through the parameters.
EKX Powered Loudspeakers 6.3.1 Full-Range loudspeaker DSP control menu The full-range loudspeaker DSP control menu selections are available for the EKX-12P and EKX-15P loudspeakers.
en CONTRAST 25 5 (Default) 1 to 10 STORE EXIT, 1, 2, 3, 4, 5, EXIT RECALL EXIT, 1, 2, 3, 4, 5, EXIT LOCK NO (Default) YES RESET NO (Default) YES INFO [PRODUCT NAME] [FIRMWARE VERSION] EXIT Table 6.1: Full-Range Loudspeaker DSP Control Menu EXIT Menu The Exit menu is used to return to the home screen. Notice! The display returns to the home screen after two minutes of inactivity. MODE Menu Available options for this selection are: MUSIC, LIVE, SPEECH and CLUB.
EKX Powered Loudspeakers SUB Menu The Sub menu is used to select a high pass frequency for use with a subwoofer or a matched subwoofer. Available options for this selection are: OFF, 80Hz, 100Hz, 120Hz, 150Hz, EKX-15SP, EKX-18SP, and ELX118P . The high passes are 24 dB/octave Linkwitz/Riley crossovers. The 80 Hz, 100 Hz, 120 Hz, and 150 Hz choices are generic high pass settings for use with other subwoofers.
en 27 CONTRAST Menu The Contrast menu is used to determine the contrast on the LCD. The range is 1 to 10. The default is five (5). STORE Menu The Store menu allows you create up to five customized user settings. Available options for this selection are: EXIT, 1, 2, 3, 4, and 5. Notice! The customized user setting name can contain a combination of alphanumeric characters including spaces. The alphanumeric character range is A to Z and 0-9. The name field length is 12 characters.
EKX Powered Loudspeakers 3. Push the MASTER VOL knob to select 1. The selected item is loaded. 4. Select EXIT to return to the home screen. LOCK Menu The Lock menu is designed to prevent users from inadvertently changing settings. Available options for this selection are: ON or OFF. The default is OFF. To lock the DSP menu, do the following: 1. From the DSP menu, scroll to LOCK. 2. Select ON. The Menu lock message appears. 3. Select YES.
en 6.3.2 29 Subwoofer DSP control menu The subwoofer DSP control menu selections are available for the EKX-15SP and EKX-18SP subwoofers.
EKX Powered Loudspeakers INFO [PRODUCT NAME] [FIRMWARE VERSION] EXIT Table 6.2: Subwoofer DSP Control Menu EXIT Menu The Exit menu is used to return to the home screen. Notice! The display returns to the home screen after two minutes of inactivity. MODE Menu The Mode menu is used to configure the type of sound the subwoofer delivers. Available options for this selection are: MUSIC, LIVE, and CLUB. ▪ MUSIC – is used for recorded music playback and EDM applications.
en ▪ 31 LIMIT – turns the LED off under normal operation. The LED brief blinking indicates the limiter is activating. Short-term blinking is not critical because the integrated limiter keeps distortion under control. Constant lighting of the LED indicates the sound is negatively affected. If the LED is constantly lit, check the rear LCD for more information. Reducing the output volume is strongly recommended.
EKX Powered Loudspeakers 8. Push the MASTER VOL knob to select SAVE. 9. Repeat steps 3 through 8 to store additional customized user settings. 10. Select EXIT to return to the home screen. RECALL Menu The Recall menu allows you retrieve up to five customized user settings. Available options for this selection are: EXIT, 1, 2, 3, 4, and 5. To recall customized user settings, do the following: 1. From the DSP menu, scroll to RECALL. 2. Push the MASTER VOL knob to select RECALL.
en 2. 33 Select YES. The loudspeaker restarts and resets the system to the original factory settings. Notice! Performing a reset erases the user customized settings saved under the STORE menu. The five user customized settings in the STORE and RECALL menus return to . INFO Menu The Information menu is used to display the product name and firmware version. Electro-Voice User Manual 2017.01 | 06 | F.01U.318.
EKX Powered Loudspeakers 7 Recommended configurations 7.1 Daisy-chaining full-range systems Notice! The direction of the arrow indicates the signal path. Mode: Speech Location: Tripod Sub: Off Table 7.1: DSP settings loudspeaker on a tripod 2017.01 | 06 | F.01U.318.
en 7.2 35 MP3 player MONO configuration Notice! The direction of the arrow indicates the signal path. Mode: Music Location: Tripod Sub: Off Table 7.2: DSP settings loudspeaker on a tripod Electro-Voice User Manual 2017.01 | 06 | F.01U.318.
EKX Powered Loudspeakers 7.3 MP3 player STEREO configuration Notice! The direction of the arrow indicates the signal path. Mode: Music Location: Tripod Sub: Off Table 7.3: DSP settings loudspeaker on a tripod 2017.01 | 06 | F.01U.318.
en 7.4 37 Using full-range systems as monitors Notice! The direction of the arrow indicates the signal path. Mode: Live Location: Monitor Sub: Off Table 7.4: DSP settings loudspeakers as monitors Electro-Voice User Manual 2017.01 | 06 | F.01U.318.
EKX Powered Loudspeakers 7.5 Stacking full-range systems with subwoofers Notice! The direction of the arrow indicates the signal path. EKX-15P Mode: Live Location: Tripod Sub: EKX-18SP EKX-18SP Mode: Live Location: Normal Low Pass: EKX-15P Table 7.5: DSP settings loudspeaker and subwoofer stacked 2017.01 | 06 | F.01U.318.
en 7.6 39 Cardioid Control Technology The EKX-15SP and EKX-18SP subwoofers have cardioid array processing originally developed for Electro-Voice concert subwoofer systems. Cardioid subwoofer arrays can be used to direct the output of an array of subwoofers in order to limit excessive amounts of bass in undesired areas. These arrays can be used to keep bass off of a stage, provide more consistent bass coverage in the audience, and reduces bass in the surrounding area.
EKX Powered Loudspeakers Figure 7.2: Cardioid physical alignment Cardioid option A: Either two EKX-15SP or two EKX-18SP subwoofers orientated vertically. Direct the top subwoofer towards the audience and the bottom subwoofer away from the audience (Rejection direction). Cardioid option B: Either three EKX-15SP or three EKX-18SP subwoofers orientated vertically. Direct the top two subwoofers towards the audience and the bottom subwoofer away from the audience (Rejection direction).
en 8 41 Troubleshooting Problem Possible Cause(s) Action 1. Amplifier Connect a known working test loudspeaker to the No sound amplifier outputs. If there is no sound, verify all the electronics are on, the signal routing is correct, the source is active; the volume is turned up, etc. Correct/repair/replace as necessary. If there is sound, the problem is wiring. Wiring Verify you have connected the correct cables to the amplifier. Play something at a low level through the amplifier.
EKX Powered Loudspeakers Problem Possible Cause(s) Action Incorrect gain Verify level controls of the source are properly structured structure or source by using the VU meter indicator on the LCD screen. If the input (mixing VU meter bar is solid or the system indicates LIMIT, the console/preamp) is input or source level is too high. overdriven 7. Microphone Incorrect gain Reduce the microphone levels at the mixing console or produces acoustic structure input source.
en 9 43 Technical data EKX-12P and EKX-15P EKX-12P EKX-15P Freq. Response (-3 dB): 60 Hz - 18 kHz1 55 Hz - 18 kHz11 Freq. Range (-10 dB): 50 Hz - 20 kHz11 48 Hz - 20 kHz1 Maximum SPL: 132 dB2 134 dB2 Coverage (H x V): 90˚ x 60˚ Power Rating: 1500 W LF Transducer: EVS-12M 300 mm (12 in) HF Transducer: DH-1M 1-inch titanium compression driver Crossover Freq.: Connectors: EVS-15M 381 mm (15 in) 1.
EKX Powered Loudspeakers EKX-15SP and EKX-18SP EKX-15SP EKX-18SP Freq. Response (-3 dB): 45 Hz - 150 Hz1 40 Hz - 150 Hz1 Freq.
en 9.1 45 Frequency response Figure 9.1: EKX-12P Frequency response graph: live, music, speech, and club modes Figure 9.2: EKX-15P Frequency response graph: live, music, speech, and club modes Electro-Voice User Manual 2017.01 | 06 | F.01U.318.
EKX Powered Loudspeakers Figure 9.3: EKX-15SP Frequency response graph: live, music, and club modes Figure 9.4: EKX-18SP Frequency response graph: live, music, and club modes 2017.01 | 06 | F.01U.318.
Bosch Sicherheitssysteme GmbH Bosch Security Systems, Inc Robert-Bosch-Ring 5 12000 Portland Avenue South 85630 Grasbrunn Burnsville MN 55337 Germany USA www.boschsecurity.com www.electrovoice.