Installation manual for 1713D12LAB, 1713D12PN Dimensions : 13 Collection : EDEN Bulb Type : E12 (Candelabra) bulb not included Lamp Frame Weight : 3.4 LBS Total Weight : 6.5 LBS Thank you for choosing our product(s). Our Company is actively involved in every step of the production. Our product(s) are designed to be utilized for every application that graces your home or business. We pride ourselves in providing the most prompt and courtesy service to all of the valued customers.
1713D12 p12*ems” 13 SAFETY Warning: MAKE SURE THE ELECTRICITY TO THE WIRES YOU ARE WORKING ON IS SHUT OFF, BY EITHER REMOVING THE FUSE OR TURN OFF THE CIRCUIT BREAKER. CAUTION — Before assembling the lighting fixture, please read all instructions carefully. = All frame & crystal components are fragile, pleasantness with care. = Required supply circuit : 110 — 130V/60Hz — Labeled wires are “L” for live wire, “N” for neutral wire, “E” for ground wire.
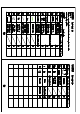
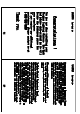
1713D12 p12*sm13” 13 1713D12 p12*sms’ 13 Step 1 Please use the parts list to ensure you are not missing any parts. Part | Picture | Description (Parts number |Qty (Check list, 1713p12 PARTS LIST P04 U Lan arm 2 Part Picture | Description |Parts number Qty Check list| D2, 4°41, Canopy cover 5° 1 POSE [1 | jan housing 1 (Canopy part) —” pose [] DL. Crossbar 4” 1 lamp cup ¢ pert) CPA0R51L2LAB 2 p—— . POOP fH [E12 leaseholder 3 EEE | (Canopy part) Canopy Lock .
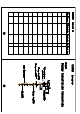
1713D12 pi2"n13” 13 Part Picture Description (Parts Check list 1713D12 p12*sms’ 13 Step 2 Canopy Installation Instruction Power Cord (ZH)
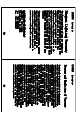
1713D12 p12*em13” 13 IMPORTANT: Test sockets with bulb before dressing the fixture. 1 . Attach the crossbar to the electrical box. 2 .Pass the lamp wire and ground wire through the loop, canopy ring and center hole of canopy cover. 3 .Screw's” threaded pipe into the crossbar and fasten with hex-nut. 4 Pull wires up through the nipple. 5 . Screw loop only onto threaded pipe. 6 .Hang the fixture on chain. 7 .Make the electrical connections as detailed in the drawing above. 8 .
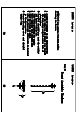
1713D12 p12*em13” 13 Frame Assembly Instructions Installation: Please read all instructions carefully. Before you proceed to install, make sure that the power supply is turned off and remains off until installation is complete. Please note that each part has been assigned a number. Please proceed in a numerical order. 1. Hang the canopy parts (01) on the Ceiling Plate. 2. Hasten the fixture loop to hang the whole fixture(02). 3. Screw the Bulb on the Lamp Holder.
1713D12 p12*em13” 13 Congratulations ! You are now done installing your Elegant Lighting fixture. Sit back and admire each crystal as it will become the statement piece for your room/house. If you require any additional assistance, please contact us at 1-888-388-3390. Thank you. 1713D12 p1z*sma’ 13 Cleaning and Maintenance of Chandelier Frame The finish on our chandelier frames and fixture frames is protected by a durable coating of lacquer. To clean, use a clean soft, dry cloth.
1713D12 p12*em13” 13 Elegant Lighting Warranty The finish and frame of your new chandelier or fixture are warranted for a period of two (2) years from the date of purchase. Our company will, at its option, repair or replace any frame that has a defect in the materials or workmanship during the warranty period. All crystals are guaranteed for their original quality during the life of the chandelier. Breakage is not covered by this warranty.