
User Manual


118
/
223
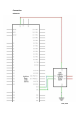
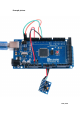
Next, we need to set up the I2C lines. For this connect the pin labelled as SDA on the
GY-521 to the Arduino’s analog pin 4 (SDA). And the pin labelled as SCL on the
GY-521 to the Arduino’s analog pin 5 (SCL). And that’s it, you have finished wiring
up
the Arduino GY-521.
Libraries needed
MPU-6050
The Code
The short example sketch is a very short sketch and it shows all the raw values
(accelerometer, gyro and temperature). It should work on Arduino MEGA2560,
Nano, Leonardo, and also Due.
After wiring, please open the program in the code folder- Lesson 16 GY-521
Module and click UPLOAD to upload the program. See Lesson 2 for details about
program uploading if there are any errors.
Before you can run this, make sure that you have installed the < GY-521 > library
or
re-install it, if necessary. Otherwise, your code won't work.
For details about loading the library file, see Lesson 1.