A0151IVZ.fm BAS 316G DNB / BAS 316G WNB 115 166 9103 / 4802 - 1.1 Betriebsanleitung . . . . . . . . . . . . . . . . . . . . .3 Operating Instruction . . . . . . . . . . . . . . . . .15 Instructions d'utilisation . . . . . . . . . . . . . . .27 Manuale d’istruzioni . . . . . . . . . . . . . . . . . .39 Manual de uso . . . . . . . . . . . . . . . . . . . . . .
D DEUTSCH ENG ENGLISH KONFORMITÄTSERKLÄRUNG Wir erklären in alleiniger Verantwortlichkeit, dass dieses Produkt mit den folgenden Normen übereinstimmt* gemäß den Bestimmungen der Richtlinien** EG-Baumusterprüfung *** durchgeführt von **** DECLARATION OF CONFORMITY We herewith declare in our sole repsonsibility that this product complies with the following standards* in accordance with the regulations of the undermentioned Directives** EC type examination *** conducted by **** F FRANÇAIS NL NEDERLANDS D
XA0027E2.fm Operating Instruction ENGLISH ENGLISH 1.
ENGLISH experience whatsoever, we strongly recommend to seek the advise of an experienced person. When sawing thin stock layed on edge, a suitable guide must be used for firm support. − Keep all documents supplied with this machine for future reference. Retain proof of purchase in case of warranty claims. Any other use is not as specified. The manufacturer is not liable for any damage caused by unspecified use.
ENGLISH Prevent body contact with earthed objects such as radiators, pipes, cooking stoves, refrigerators when operating this tool. • • Ensure that no parts of the body or clothing can be caught and drawn in by rotating components (no neckties, no gloves, no loose-fitting clothes; contain long hair with hairnet). • Never saw workpieces containing the following materials: − ropes − strings − cords − cables − wires. Do not use the power cable for any purpose it is not intended for.
ENGLISH 23 • To stop = press red switch button (26) or cover (27) of the ON/OFF switch. 29 25 27 26 24 Both housing doors must be closed while the machine is in use. Electronic motor brake The wear-free electronic motor brake (inside the saw, not illustrated) causes the band saw blade to stop within 10 seconds after the saw is turned OFF. If the time to standstill exceeds 10 seconds the ON/OFF switch is faulty and needs to be replaced by a qualified electrician without delay. 4.
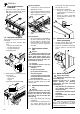
ENGLISH 31 312 mm 32 342 mm 458 mm 36 428 mm 2. Rip fence The rip fence (33) is clamped to the front. The rip fence can be used on both sides of the blade. Put fixing bolts through the base plate and secure with nuts. Optimal working height and stability is provided by the workstand (optional accessory), which is already prepared for mounting the saw. 7.2 Saw table installation Aligning the saw table at right angles to the band saw blade 1. Raise upper blade guide fully (see “Operation”). 1.
ENGLISH 7.4 • Fence guide extrusion installation Fasten the fence guide extrusion (40) with four each thumb screws and washers to the saw table. Rip fence alignment 1. Loosen the two small knurled nuts (43) approx. one turn. 2. of the blade. The blade should flex not more than 1-2 mm. 3. Turn the large knurled thumb screw (44) as required to set the rip fence square against the saw table. 43 Correct tension if necessary: − turning the setting knob (46) counter-clockwise increases the blade tension.
ENGLISH Position power supply cable so it does not interfere with the work and is not damaged. − an appropriate jig when cutting round stock, to keep it from turning; Protect power supply cable from heat, aggressive liquids and sharp edges. Use only rubber jacketed cable of sufficient lead cross section. A Danger! Before adjusting the upper blade guide and saw table tilt: − switch machine OFF. − Wait until the band saw blade has come to a complete stop. 1. Loosen locking screw (49).
ENGLISH 8.1 1. − align band saw blade (see “Care and maintenance”); − align blade guides (see “Care and maintenance”); − let saw test run for at least one minute; − stop saw, unplug and recheck settings. Sawing Choose and install a table insert extrusion suitable for the type of cut to be performed: − table insert extrusion with a narrow slot for standard cross cuts only; − table insert extrusion with bevelled slot for bevel cuts also. 2. Adjust the band saw blade speed. 3.
ENGLISH should just touch the band saw blade. 60 8. Tighten screws (64) again. 9. Adjust thrust bearing position (67) so it just touches the band saw blade. 3. Raise upper blade guide fully. 4. Loosen screw (72) so the thrust bearing will slide back and forth easily. 10. Tighten the ratchet lock lever (66) again. 72 67 59 66 5. 2. Loosen screw (73). Loosen screws (61). 9.
ENGLISH 12. Adjust thrust bearing position (78) so it just touches the band saw blade. 80 10. Tips and tricks • Keep surfaces of the saw table clean – in particular, remove resin residue with a suitable cleaning and maintenance spray (optional accessory). • Afterwards, apply a light coat of sliding compound (e.g. Waxilit). 13. Tighten screw (79) again. 79 78 2. Fit new table insert. 9.7 Saw Cleaning 1. Open the lower housing door. 2. Remove the chip case (81) and empty it. 14.
ENGLISH 12. Repairs A Danger! Repairs to power tools must be carried out by qualified electricians only! Power tools in need of repair can be sent to the service centre of your country. Refer to the spare parts list for the address. Please attach a description of the fault to the power tool. Band saw blade wanders off the line of cut or runs off the band saw wheels Band saw blade is not running dead centre on the band saw wheels: − correct tracking (see “Care and maintenance”).
ENGLISH 15. Technical specifications Model BAS 316G DNB BAS 316G WNB 400 (3~ 50 Hz) 230 (1~ 50 Hz) kW kW 0.74 0.55 0.74 0.55 Nominal current A 1.5 3.
U3a0151.
www.elektra-beckum.de ZINDEL - Technische Dokumentation und Multimedia, www.zindel.de U4BA_EB3.