
Operation Manual


E61
Instructions For Use. Page 7
BEFORE YOU SWITCH ON
Follow this routine before you
listen for the first time, and each time
you change any connections.
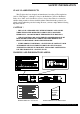
1 Check all the connections
to the E61 and your audio system.
2 Then check again.
3 Turn the volume control of
your amplifier to zero ( Fully anti-
clockwise).
4 Select “CD/AUX” input
via your amplifier.
5 Now you can switch on the
power, insert your CD, and carefully
advance the volume control of your
amplifier to the level you desire.
6 Enjoy the music.
INSTALLATION
Place your set on a stable, horizontal,
vibration-free surface where there is no risk
of the set falling over or being subjected to
vibrations. This could otherwise damage the
sensitive electronics inside.
Any heat generated by the set must be
free to escape. Any heat build up may cause
the electronic components to malfunction or
fail.
Therefore, if you place your set in a
cabinet or on a shelf, make sure that there
is enough room for heat to dissipate and
air to circulate around the set. If in doubt,
ask your dealer.
Avoid placing your set next to ra-
diators or in sunlight where additional
heat could affect the set.
Protect your set from humidity. Do
not place your set under a window, oth-
erwise, in the worst case, rain could fall
onto the set. Do not place any containers
filled with water on the set, e.g. flower vases,
potted plants, etc. If the container should
fall over and water enters the set, damage is
unavoidable.
However, if water does enter the set,
immediately pull out the power plug and
inform your dealer, who should then check
the set before you use it again.
- Liquid entering the set could
cause dangerous short-circuits which,
in the worst case, could cause a fire.
If you move your set from a cold
place to a warm place, leave the set
switched off for a few hours. Condensa-
tion could form inside the set.
CLEANING
Before cleaning the set, switch off
the main switch on the set and remove the
mains plug from the wall outlet. Clean the
housing and the remote control unit using a
moist cloth. Do not use any solvents, white
spirits, thinners, etc. as they could damage
the surface finish of the unit.
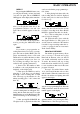
AUDIO CONNECTION
The CD player should be connected
to an amplifier (CD or Aux input) by an in-
terconnect cable with RCA/phono type
connectors. This is connected to the LINE
OUTPUT sockets on the rear face of the
CD player. Alternatively, you can use the
DIGITAL OUTPUTS (Co-axial or Opti-
cal) for connection to an outboard Digital-
to-Analogue converter or digital amplifier.
NOTES ON USING COMPACT
DISCS
Always hold discs by the edges and
make sure they remain clean. Do not touch
the surface. Do not stick any paper or ad-
hesive tape on the side of disc with the la-
bel. Keep discs away from direct sunlight
and heat sources, such as radiators. Do not
leave discs in a car which is parked in direct
sunlight, since the temperature inside the car
can become extremely high. Clean discs with
a cloth before playing them. Do not use
any solvents such as benzene, thinners, com-
mercially available cleaners or antistatic
spray intended for analogue discs, to clean
your compact discs. After playing, store a
INSTALLATION