MY 575.3 USER MANUAL (V1.
For your own safety, please read this user manual carefully before installing MY575. Every person involved with the installation, operation and maintenance of MY575 has to: -be qualified -follow carefully the instructions of this manual Introduction: Thank you for choosing MY575. When you unpack MY575, there should be in the box the fixture, a power cable, a DMX XLR cable, a safety cable and a CD. Please check carefully that there is no damage caused in shipping.
Safety Instructions. This device has left the factory in perfect condition. In order to maintain this condition and to ensure a safe operation, it is absolutely necessary for the user to follow the safety instructions and warning notes written in this user manual. MY575 is a high voltage fixture. Be careful when dealing with high voltages. Please read this manual. If you do not read this manual and damages occur to MY575, then it could void the warranty.
Installation Instructions. a) Installing or replacing the lamp Only install the lamp when MY575 is unplugged from 120 volts. The lamps must be replaced when it has reached the end of its lamp life or if it is damaged or deformed. Before replacing the lamp let the lamp cool down. During operation, the lamp can reach very high temperature. During the installation of the lamp do not touch the glass bulbs with bare hands. Always use a cloth to handle the lamps during insertion and removal.
b) Mounting MY575 The installation of MY575 has to be built and constructed in a way that it can hold 10 times the weight for 1 hour without any deformation. The installation must always be secured with a secondary safety device (a safety cable). Never stand directly below MY575 when mounting, removing or servicing MY575. The installer should make sure that MY575 is installed correctly and that the installation is checked by an expert on a regular basis.
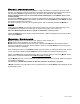
DMX-512 Control Connection Connect the provided XLR cable to the female 3-pin XLR output of your Elektralite CP20 or other DMX controller. The other end should be connected to the male 3-pin XLR input of MY575. You then daisy-chain out of the first MY575 to the next MY575. Never “Y” split the DMX connection. If you need more cable, then it should be two core, screened cable fitted with a 3 pin XLR input and output connectors. Please refer to the diagram below.
The Display Panel: The Display Panel offers several features: you can set the starting address, switch on and off the lamp, run the pre-programmed program or make a reset. It has been updated so if you have earlier my575 beware of the changes! These updates are a direct result of customer feedback. Probably the most important changes are:1. To change DMX address you must enter the Mode menu. You cannot just press the up and down buttons to change the address. 2.
Default settings shaded.
Main functions - Main menu 0 1. Press [ENTER] for 3 seconds to enter the main menu "MODE" (display flashing) 2. Press [ENTER] and select "ADDR", “RUN” or "DISP" by pressing the [UP] button. 3. Press [ENTER] to select the desired sub menu. - DMX address setting, Slave setting - DMX address setting With this function, you can adjust the desired DMX-address via the Display Panel. 1. Select “VALU” by pressing the [UP] button. 2. Press [ENTER], adjust the DMX address by pressing the [UP] or the [DN]. 3.
1. 2. 3. 4. 5. Select "AUTO" or "SOUN" by pressing [UP]. Press [ENTER] for selecting the desired extension menu. Select "ALON" or "MAST" by pressing [UP]. Press [ENTER] to confirm. Press [EXIT/DN] to return to the main menu. - Display the DMX-value, Reverse display, Shut off LED display - Display the DMX 512 value of each channel With this function you can display the DMX 512 value of each channel. 1. Select "VALU" by pressing [UP]. 2. Press [ENTER] to confirm; the display shows“D-00”.
- Main menu 1 1. Press [ENTER] for 3 seconds to enter the main menu (display flashing). 2. Press [UP] to select “LAMP”. - Lamp on/off With this function you can switch the lamp on or off via the Display Panel. 1. Select "OPEN" by pressing [UP] button. 2. Press [ENTER], the display shows “ON” or “OFF”. 3. Press [UP] to select “ON” if you wish to switch on the lamp or “OFF” if you wish to switch off the lamp. 4. Press [ENTER] to confirm. 5. Press [EXIT/DN] in order to return to the main menu.
- Main menu 2 1. Press [ENTER] for 3 seconds to enter the main menu (display flashing). 2. Press [UP] to select “SET”. - Pan Reverse With this function you can reverse the Pan-movement. 1. Select “rPAN” by pressing [UP] button. 2. Press [ENTER], the display shows “ON” or “OFF”. 3. Press [UP] to select “ON” if you wish to enable this function or “OFF” if you don’t. 4. Press [ENTER] or [EXIT/DN] to exit. - Tilt Reverse With this function you can reverse the Tilt-movement. 1.
4. 5. Press [ENTER] to confirm. Press [EXIT/DN] in order to return to the main menu. - Software version With this function you can display the software version of MY575. 1. Select “VER” by pressing [UP] button. 2. Press [ENTER], the display shows “V-X.X”, “X.X“ stands for the version number, e.g. “V-1.0”, “V-2.6”. 3. Press [ENTER] or [EXIT/DN] in order to return to the main menu. - Main menu 3 1. Press [ENTER] for 3 seconds to enter the main menu (display flashing). 2. Press [UP] to select “ADJU”.
- Main menu 4 1. Press [ENTER] for 3 seconds to enter the main menu (display flashing). 2. Press [UP] to select “TIME”. - Fixture running time With this function you can display the running time of MY575. 1. Select “MATI” by pressing [UP] button. 2. Press [ENTER], the display shows “XXXX”, “X“ stands for the number of hours. 3. Press [ENTER] or [EXIT/DN] to exit. - Lamp running time With this function you can display the running time of the lamp. 1. Select “LATI” by pressing [UP] button. 2.
- Main menu 5 1. Press [ENTER] for 3 seconds to enter the main menu (display flashing). 2. Press [UP] to select “EDIT”. - Define the number of steps in Run With this function you can define the number of steps in the Program Run. 1. Select “STEP” by pressing [UP] button. 2. Press [ENTER], the display shows “S-XX”, “X” stands for the total amount of steps you want to save, so you can call up to 48 scenes in “RUN”.
b) Editing via an Elektralite CP20 or other DMX controller Call up the first scene in your controller now. 1. Select “SC01” by pressing [UP] button. 2. Press [ENTER], the display shows “SC01”. 3. Press [ENTER], the display shows “C-01”. 4. Select "CNIN" by pressing [DOWN]. 5. Press [ENTER], the display shows "OFF". 6. Press [UP], the display shows "ON". 7. Press [ENTER], the display shows "SC02". You successfully downloaded the first scene. 8. Adjust the Step-time as described above under point 12. 9.
Channel Functions: CHANNEL 1 : color wheel 1: 7 colors plus white, color cycle or rainbow effect CHANNEL 2 : rotating gobo wheel 1: 6 rotating gobos plus open , gobo cycle, gobo shaking CHANNEL 3 : gobo rotation speed adjustment in both directions , gobo indexing CHANNEL 4 : rotating gobo wheel 2: 6 rotating gobos plus open , gobo cycle, gobo shaking CHANNEL 5 : pan movement (max. 630°) CHANNEL 6 : tilt movement (max.
DMX Channel Function & Values: Channel 1 0-15 - Color Wheel 1: Open / white 16-31 Color 1 32-47 Color 2 48-63 Color 3 64-79 Color 4 80-95 Color 5 96-111 Color 6 112-127 Color 7 128-187 Forwards rainbow effect from fast to slow 188-193 No rotation 194-255 Backwards rainbow effect from slow to fast Channel 2 - Rotating gobos, cont. rotation : 0-9 Open 10-19 Rot. gobo 1 20-29 Rot. gobo 2 30-39 Rot. gobo 3 40-49 Rot. gobo 4 50-59 Rot. gobo 5 60-69 Rot.
Channel 4 - Rotating gobos, cont. rotation : 0-9 Open 10-19 Rot. gobo 1 20-29 Rot. gobo 2 30-39 Rot. gobo 3 40-49 Rot. gobo 4 50-59 Rot. gobo 5 60-69 Rot. gobo 6 70-89 Gobo 1 shake slow to fast 90-109 Gobo 2 shake slow to fast 110-129 Gobo 3 shake slow to fast 130-149 Gobo 4 shake slow to fast 150-169 Gobo 5 shake slow to fast 170-189 Gobo 6 shake slow to fast 190-255 Rot. gobo wheel cont.
Channel 8 - 3 facet rotating prism, Prism / Gobo macros: 0-3 open 4-63 Forwards rotation from fast to slow 64-67 No rotation 68-127 Backwards rotation from slow to fast 128-135 Macro 1 136-143 Macro 2 144-151 Macro 3 152-159 Macro 4 160-167 Macro 5 168-175 Macro 6 176-183 Macro 7 184-191 Macro 8 192-199 Macro 9 200-207 Macro 10 208-215 Macro 11 216-223 Macro 12 224-231 Macro 13 232-239 Macro 14 240-247 Macro 15 248-255 Macro 16 Channel 9 – Focus: 0-255 Continuous adjustment from far to near Channel 10 - S
Channel 12 – Iris 0-191 Maximum. diameter to minimum diameter 192-223 Iris pulsing from Minimum diameter to max. As dmx value increases the pulse gets slower. 224-255 Iris pulsing from Maximum to min. As dmx value increases the pulse gets faster. Channel 13 – Frost 0-191 No frost – Minimum frost – Maximum frost 192-223 Pulse from max frost to no frost starting fast and getting slower 224-255 Pulse from no frost to full frost starting slow and getting faster.
Channel 16 – Lamp on/off, reset, internal programs: 0-19 colour change normal by direction depend on distance 20-39 colour change to any position by direction depend on distance 40-59 Lamp on 60-79 Lamp switch off 80-99 Motor reset 100-119 Internal program 1 120-139 Internal program 2 140-159 Internal program 3 160-179 Internal program 4 180-199 Internal program 5 200-219 Internal program 6 220-239 Internal program 7 240-255 Internal program 8 Channel 17 – Pan fine 16bit Channel 18 – Tilt fine 16bit ERROR
03Er: (Rotating gobo indexing error 1) This message will appear after the reset of MY575 and if the magnetic-indexing circuit malfunctions (sensor failed or magnet missing) or the stepping-motor is defective (or its driver circuit on the main circuit card). The rotating gobo will not be located in the default position after the reset.
CLEANING AND MAINTENANCE The following points have to be considered during the inspection: 1) All screws, clamps etc. used to install MY575 have to be tight and must not be corroded. Check them regularly because, remember, MY575 moves and so it will have an effect on whatever you are using to hang the fixture. 2) There must not be any deformations on MY575’s housing and internal parts.
Other Elektralite Products include : [Also check out our website at www.myelektralite.com] CP-3 Controller. CP-10xt Controller. CP-16 /24 Controller.
CP-20xt Controller. TurboFog + Fog Machine.
Turbohazer Haze Machine.