Libretto istruzioni Instruction booklet Manual de instrucciones Lavastoviglie Dishwasher Lavavajillas E 60 L S - E
Contents For the user For the installer Important safety information 25 Description of the appliance 26 The control panel 26 Before use Setting the water softener Rinse aid 28 28 30 Using your appliance Loading your appliance Adjusting the height of the upper basket Use of detergent 31 31 33 34 Hints and tips 35 Washing programmes 36 Operating sequence 37 Maintenance and cleaning Internal cleaning Cleaning the filters External cleaning Prolonged periods of non-operation Frost precautions M
Important safety information It is most important that this instruction book should be retained with the appliance for future reference. Should the appliance be sold or transferred to another owner, or should you move house and leave the appliance, always ensure that the book is left with the appliance in order that the new owner can get to know the functioning of the appliance and the relevant safety information. This information has been provided in the interest of your safety.
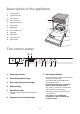
Description of the appliance 1. Levelling spacers 2. Upper basket stop 3. Salt container 4. Lower spray arm 1 12 2 5. Detergent dispenser 6. Control panel 7. Rating plate 3 8. Rinse aid dispenser 4 10 9. Large filter 5 9 11 10. Central filter 8 11. Upper spray arm 7 12. Upper basket 6 IN86 The control panel 3 4 1 2 5 1. On/Off push button 2. Salt refilling indicator light 3. Rinse aid refilling indicator light 4. Digital display 5. SID indicator light 6 7 7.
8. Audible signals Eco drying push button By pressing this push button you can opt to shorten (eco dry) or completely eliminate (no dry) the heating phase during the last rinse, so making a considerable energy saving. The indicator light corresponding to the selection will come on. Audible signals have been introduced to help indicate which operations the dishwasher is performing.
Before use Before using your dishwasher for the first time: 1. Ensure that the electrical and water connections comply with the installation instructions 2. Remove all packaging from inside the appliance 3. Set the water softener 4. Pour 1 litre of water inside the salt container and then fill with salt 5. Fill the rinse aid dispenser. Water hardness 6. Run a "Rinse and Hold" programme.
Filling with salt Only use salt specifically designed for use in dishwashers. All other types of salt not specifically designed for use in a dishwasher, especially table salt, will damage the water softener. Only fill with salt just before starting one of the complete washing programmes. This will prevent any grains of salt or salty water, which may have been spilled, remaining on the bottom of the machine for any period of time, which may cause corrosion. To fill: 1.
Rinse aid Rinse aid is automatically added during the last rinse, ensuring thorough rinsing, and spot and streak free drying. The dispenser, which is positioned inside the door, holds about 110 ml of rinse aid, which is sufficient for 16 - 40 dishwashing programmes, depending upon the dosage setting. Filling with rinse aid 1. Open the container by turning the lid (A) anticlockwise. 2. Add the rinse aid until the container is completely full. The indicator (B) will be completely dark. A 3.
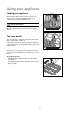
Using your appliance Loading your appliance Before placing dishes in the machine, remove any scraps of food, to avoid clogging the filters and consequently reducing the performance. Do not load very small items which can fall through the baskets. Open the door and slide out the baskets to load the dishes. UI49 The lower basket The lower basket is designed to take saucepans, lids, plates, salad bowls, cutlery etc.
The cutlery basket Long bladed knives stored in an upright position are a potential hazard. These items should only be placed in the removable knife basket. Take care when loading or unloading sharp items such as knives. Removable knife basket Long and/or sharp items of cutlery such as carving knives must be placed horizontally in the removable knife basket, which is positioned at the rear of the upper basket. UI53 Cutlery should be placed in the removable cutlery basket with the handles facing downwards.
The upper basket The upper basket is designed for plates (dessert plates, saucers, dinner plates of up to 24 cm in diameter), salad bowls, cups and glasses. If dishes are loaded in the upper basket, tilt them forwards. Arrange items on and underneath the fold-down cup racks so that water can reach all surfaces. Light items (plastic bowls etc.) should be loaded in the upper basket and arranged so they do not move. US29 Before closing the door, ensure that the spray arms can rotate freely.
Use of detergent Only use detergents specifically designed for use in dishwashers. Min = 15 g Max = 30 g D If using powder detergents proceed as follows: 1. Open the dispenser lid by pulling the catch (D). 2. Add the detergent according to the recommended quantity given in the "Washing programmes" chart. As all detergents are not the same, you should consult the instructions on the packet. M M IN AX 3. Always close the lid. 4.
Hints and tips To save energy Items not suitable for dishwashers Place dishes in the machine immediately after every meal and wait until the dishwasher is full before washing. If necessary run the Rinse and Hold programme (see "Washing Programmes" chart) so that any food scraps do not become caked on the dishes while you are waiting to run the complete wash programme. Do not prewash dishes under running water.
Washing programmes Programme 1. Rinse and Hold Any. Partial load (to be completed later in the day). 2. Intensive 70°C Heavy soil. Crockery, cutlery, pots and pans 3. Normal Plus 65°C with prewash Normal soil. Crockery, cutlery, pots and pans 4. Normal 65°C with prewash Normal soil. Crockery and cutlery 5. Economy 50°C with prewash * 6. Bio 50°C with prewash 7. Bio 50°C no prewash ** 8. Light soil. Delicate china and glassware / / 1 cold rinse (to avoid food scraps from sticking together).
Operating sequence 1. Check the filters 7a. Setting and starting the programme without "delay start" Ensure they are clean and properly positioned (see "Maintenance and cleaning"). 2. The selection of the programme occurs with the door partially opened. Press the On/Off push button Press the "programme selector" push button until the required programme number appears in the digital display. If a programme with prewash is selected the SID indicator light will illuminate.
7b. Setting and starting the programme with "delay start" 9. Once a programme and required options have been selected (see point 7a.) to use DELAY proceed as follows: Press the DELAY push button. The digital display will show "h 0". If other options have been selected the corresponding indicator lights will turn off, but this will not modify the settings made previously. Press the button again to select the number of hours by which you wish to delay the programme start (up to a maximum of 12 hours).
Maintenance and cleaning Internal cleaning Ensure that the seals around the door, the detergent and rinse aid dispensers are cleaned regularly with a damp cloth. We recommend every 3 months to run a 65°C wash programme without dishes using detergent. Cleaning the central filter (After each wash) Scraps of food may accumulate in the drain filter (A) and should be removed by rinsing the filter under running water. To remove the drain filter - simply pull it out by the handle.
External cleaning Clean the external surfaces of the machine and control panel with a damp soft cloth. If necessary use only neutral detergents. Never use abrasive products, scouring pads or solvent (acetone, trichloroethylene etc....). Prolonged periods of non-operation If you are not using the machine for any period of time you are advised to: 1. Unplug the appliance and then turn off the water. 2. Fill the rinse aid dispenser. 3. Leave the door ajar to prevent the formation of any unpleasant smells. 4.
Something not working Certain problems are due to lack of simple maintenance or oversights, which can be solved easily without calling out an engineer. The dishwasher is fitted with a number of alarm systems which can help you to quickly determine the cause of any problems. The dishwasher will not start or stops during operation, all push buttons are inoperative except for the On/Off push button. All indicator lights turn off.
If after all these checks, the problem persists, contact your local Service Force Centre, quoting the model and serial number. This information can be found on the rating plate located on the right hand side of the dishwasher door (see picture). Service and spare parts Prod.No. ........ Ser. No. ......... This product should be serviced by an authorised Service engineer, and only genuine spare parts should be used. Under no circumstances should you attempt to repair the machine yourself.
Hints for test centres Before starting any test it is necessary to fill completely with salt the salt container and with rinse aid the rinse aid dispenser.
Installation instructions Remove all packaging before positioning the machine. If possible, position the machine next to a water tap and a drain. Any electrical work required to install this appliance should be carried out by a qualified electrician or competent person. Any plumbing work required to install this appliance should be carried out by a qualified plumber or competent person. Water supply connections This dishwasher may be fed with either hot (max. 60°) or cold water.
Water outlet hose connection The end of the drain hose can be connected in the following ways: 2 Ø Ø 18 21 min 4 cm 1 1. To the sink outlet siphon, securing it if necessary with a clip. min 30 cm max 100 cm Attention! Our appliances are supplied with a security device to protect against the return of dirty water back into the machine. If the siphon of your sink has a "no return valve" incorporated this can prevent the correct draining of your dishwasher. We advise you therefore to remove it.
I GB E 152980 19/1