
Use and Care Manual


ASSEMBLY INSTRUCTIONS
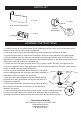
PARTS LIST
1. Carefully remove all four glass panels from the packaging and lay them out on a flat surface with a
blanket or some sort of cloth to prevent scratching.
2. Next remove the 8 corner brackets. Make sure each bracket has 2 screws per bracket.
3. Loosen the set screws on each of the 8 brackets to allow for easy installation of the glass panels.
4. Slide the bracket onto one glass panel and stand the glass panel vertical (as it will sit once fully
assembled). This position allows the brackets to be tightened properly so the glass guard will sit evenly
around the burner pan lip and lay completely flat.
5. Tighten the set screw onto the glass panel until it is firmly in place. DO NOT over tighten the set
screw as the glass will crack. Only hand tighten with a flat head screwdrivers. DO NOT tighten with an
electric or battery operated power screwdriver.
6. Once you have fastened the bottom brackets on one panel,
continue adding panels and connecting the bottom brackets on
each panel until all four panels are connected.
7. After all of the bottom brackets have been added, add the
top brackets on each glass panel making sure that each one
is tightened completely.
8. Once the 8 brackets are installed properly, continue adding
the 4 support mechanisms on the bottom of four panels as
showed in the picture.
9. Upon assembling all brackets onto the wind screen, set the complete apparatus
over the burner pan. Make sure it lays flush to the burner pan or fire table top.
If needed loosen and re-tighten bracket set screws until the wind screen sits flat.
Ocean Rock USA INC
692 Parkridge Ave Norco, CA 92860, USA
www.elementifire.com
info@elementifire.com
Tel: 800-678-7294
Wind Screen Glass Panel
X 4 pcs
X 8 pcs
X 4 pcs
Brackets
Screw
Support
Mechanisms
Screw
Support
Mechanism
Top Brackets
Bottom
Brackets
Rubber Pads were
attached on the
bottom.