BURGLAR ALARM KIT MODEL K-23 Assembly and Instruction Manual ELENCO ® Copyright © 2013, 1989 ELENCO® Electronics, Inc. Revised 2011 REV-Q No part of this book shall be reproduced by any means; electronic, photocopying, or otherwise without written permission from the publisher.
PARTS LIST If you are a student, and any parts are missing or damaged, please see instructor or bookstore. If you purchased this kit from a distributor, catalog, etc., please contact ELENCO® (address/phone/e-mail is at the back of this manual) for additional assistance, if needed. DO NOT contact your place of purchase as they will not be able to help you. RESISTORS Qty. r 2 Symbol R1, R2 Value 39kΩ 5% 1/4W Color Code orange-white-orange-gold Part # 153900 CAPACITORS Qty.
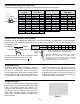
IDENTIFYING RESISTOR VALUES Use the following information as a guide in properly identifying the value of resistors. BAND 1 1st Digit Bands 1 2 Multiplier Tolerance Color Black Brown Red Orange Yellow Green Blue Violet Gray White Digit 0 1 2 3 4 5 6 7 8 9 Multiplier BAND 2 2nd Digit Color Black Brown Red Orange Yellow Green Blue Violet Gray White Resistance Tolerance Color Multiplier Black 1 Brown 10 Red 100 Orange 1,000 Yellow 10,000 Green 100,000 Blue 1,000,000 Silver 0.01 Gold 0.
When we place a voltage to the gate, a current will flow between the anode and cathode turning ON the alarm buzzer. If we remove the voltage on the gate, the current will continue to flow in the SCR. Thus, if a burglar opens the door, the alarm will go off. Closing that door will not turn off the alarm, it will continue to sound. The only way to turn it off is to remove the power to the SCR. ACTIVATING SWITCHES There are two types of activating switches, the normally open (N.O.
CONSTRUCTION ● Turn off iron when not in use or reduce temperature setting when using a soldering station. Introduction The most important factor in assembling your K-23 Burglar Alarm Kit is good soldering techniques. Using the proper soldering iron is of prime importance. A small pencil type soldering iron of 25 watts is recommended. The tip of the iron must be kept clean at all times and well-tinned. ● Tips should be cleaned frequently to remove oxidation before it becomes impossible to remove.
ASSEMBLE COMPONENTS TO THE PC BOARD Red Black A1 - Buzzer Blue C1 - 47µF Electrolytic Cap. (see Figure A) B1 - Battery Snap - Insert the red and black wire through the hole in the PC board as shown. Install the red wire into the positive (+) hole and the black wire into the negative (–) hole. Solder and cut off the excess leads.
TESTING INSTRUCTIONS 1. Connect a 9V type battery to the battery snap (battery not included). 4. Turn S1 on (up position). Disconnect the wires from S2 and the buzzer should activate. Reconnect the wires to S2, the buzzer should still be on. Turn off S1 to reset the alarm. 2. Switch S1, power switch, on (up position). 3. Short two wires connected to S3 together, buzzer should activate. Disconnect the wires from S3, the buzzer should still be on. Turn off S1 (down position) to reset the alarm. 5.
AUTO ALARM You will not mount parts A1, B1 or S1. When someone opens a door or tries to remove the radio, the alarm is activated and the car horn will sound (see schematic diagram below). Connect to your car as follows. See diagram below. Connect P4 to the wire running from the door switch to the dome light. Connect P1 to the wire running from the horn relay to the horn switch, which is located in the steering wheel.