
Installation Instruction


10
Controls
Use the high suction speed in cases of concentrated kitchen
vapours. It is recommended that the cooker hood suction is
switched on for 5 minutes prior to cooking and to leave in
operation during cooking and for another 15 minutes
approximately after terminating cooking.
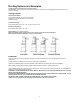
Description of control panel
Maintenance
ATTENTION! Before performing any maintenance operation, isolate the hood from the electrical supply by switching off at the
connector and removing the connector fuse.
Or if the appliance has been connected through a plug and socket, then the plug must be removed from the socket.
Cleaning
Do not spray cleaners directly to the control while
cleaning the Hood.The cooker hood should be cleaned
regularly (at least with the same frequency with which you
carry out maintenance of the fat filters) internally and
externally. Clean using the cloth dampened with neutral
liquid detergent. Do not use abrasive products. DO NOT
USE ALCOHOL!
WARNING:
Failure to carry out the basic cleaning recommendations of
the cooker hood and replacement of the filters may cause
fire risks.
Therefore, we recommend oserving these instructions.
The manufacturer declines all responsibility for any damage
to the motor or any fire damage
linked to inappropriate
maintenance or failure to observe the above safety
recommendations.
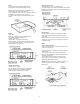
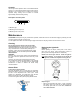
Grease Filter
Traps cooking grease particles.
This must be cleaned once a month using non aggressive
detergents, either by hand or in the dishwasher, which must
be set to a low temperature and a short cycle. When
washed in a dishwasher, the grease filter may discolour
slightly, but this does not affect its filtering capacity.
To remove the grease filter, pull the spring release handle.
Replacing the light bulb
CAUTION
Before replacing the lamps, switch power off at service
panel and lock service panel disconnecting means to
prevent power from being switched on accidentally.
NOTE: Turn off the lights and fan. Allow the lights to
cool
before handling. If new lights do not operate be
sure lights are inserted correctly before calling service.
Replace Lights
• Remove the damaged light (twist counter clockwise)
and replace with a new 120 Volt, 50 Watt (maximum)
50° halogen light made for a GU10 base, suitable for
use in open luminarie.
1. ON/OFF Light
2. ON/OFF general and speed1.
3. ON/OFF, speed 2 and speed 3.