
Installation Sheet


8
4 Flip the blower base to the rear face of the range hood.
5 Insert the two blower springs to the top of the range hood
housing, Secure it with the four mounting screws
previously released.
Wall Installation
I WARNING
USE TWO OR MORE PEOPLE TO MOVE AND INSTALL RANGE
HOOD. FAILURE TO DO SO CAN RESULT IN BACK OR OTHER
INJURY.
IMPORTANT: Framing must be capable of supporting up to
150 lbs.
The hood is attached to the wall with the wood support that is
attached to the back of the hood.
• Determine and mark the centerline on the wall where the
canopy hood will be installed.
• Select a mounting height “X”.
For gas cooktop & range installations: Mount the hood so
the bottom is at least 30” (76.2 cm) above the cooking
surface.
For electric/induction cooktop & range installations: Mount
the hood so the bottom is at least 24” (61 cm) above the
cooking surface.
• Mark a horizontal reference line on the wall.
• Remove the wood support from the back of the range
hood by loosening the 2 screws from the inside. Locate
and level the top of the wood support 15⁄” (39.1 cm)
above the marked horizontal line and centered on the ver-
tical centerline. Using 2 of the 4 of the 6 x 80 mm screws,
install wood support so that it is screwed into at least 2
vertical studs.
• Leave a
1
⁄4” (6.4 mm) gap between the wall and the back of
the screw head to slide range hood into place
1
⁄4” (6.4 mm).
1
⁄4”
(6,4 mm)
C
A
“x”
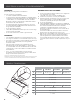
15
3
⁄8”
(39 cm)
D
B
A. Wood support
B. Bottom of range hood
C. Centerline
D. Dimension “X” = range hood mounting height
NOTE: The screws provided for mounting this range hood must
be fastened into solid wood; do not fasten into sheetrock only.
Complete Preparation
1 Determine and make all necessary cuts in the wall or roof
for the vent system. Install the vent system before insta-
lling the range hood. See the “Venting Methods” section.
2 Determine the location where the power supply cable will
be run through the wall.
3 Drill a 1⁄” (3.2 cm) hole at this location.
4 Pull enough power supply cable through the wall to allow
for easy connection to the terminal box.
5 Remove terminal box cover and set aside.
6 Remove knockout from the back of the range hood and
install a UL listed or CSA approved ⁄” (1.3 cm) strain relief.
7 Place the range hood near its mounting position and run
the power supply cable through the strain relief into terminal
box (enough to make connection).
8 Tighten the strain relief screws.
Mounting the Hood
The range hood attaches to the wall by the 2 mounting screws
in the wood support mounted to the wall.
1 Using 2 or more people, hang the range hood on the wall
by placing the slotted holes in the range hood back over
the 2 screws mounted to the wood support mounted to
the wall.
NOTE: If your installation uses the optional duct cover, the
vent system needs to be connected to the range hood and
the duct cover mounted to the top of the range hood before
tightening the mounting screws.