
Installation Sheet


9
2 Push the range hood up into the narrow slots, align the
bottom of the hood to the horizontal line, level the hood,
and tighten the 2 mounting screws.
3 Mark 2 lower mounting hole center point locations.
Drill ⁄” (0.32 cm) pilot holes if the holes are located into
wood. If holes are not located into wood, drill two ⁄”
(0.95 cm) pilot holes and insert 10 x 50 mm wall anchors.
Install 2 - 6 x 80 mm screws with D5.3 x 20 mm washers
into the lower mounting anchors and tighten.
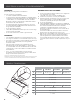
A
B
B
C
D
A. Mounting screws
B. 4 screws - 4.2 x 19 mm
C. 2 D5.3 x 20 mm washers
D. 2 screws - 6 x 80 mm
4 Install 4 - 4.2 x 19 mm screws through the back of the
hood into the wood support and tighten.
5 Connect vent system to hood. Seal all joints with clamps.
Install Transition
• Install the 10” (25.4 cm) square x 10” (25.4 cm) round
vent transition with damper to top or rear side of the
range hood (depending on your installation), using
4 - 3.5 x 9.5 mm screws.
NOTE: The exhaust adaptor/damper can be installed up to 1
inch on either side of the hood center to accommodate ocen-
ter ductwork. In extreme ocenter installations, one end of the
duct connector may need to be trimmed to clear the electrical
cable clamp.
Install Range Hood Internal Blower Motor
1 Remove grease filters from range hood. See the
“Maintenance” section in the Use and Care Guide.
2 Install the range hood blower motor assembly inside the
range hood canopy with the wiring connection to the left
for the single motor system and to the front or top for the
dual motor system.
Single blower motor assembly
A
A. Wiring connection
Dual blower motor assembly
A
A. Wiring connection
3 Slide the left mounting plate flange under the motor
mounting bracket.
A
B
A. Motor mounting bracket
B. Mounting plate left flange
4 Run the power supply wires and connector from the
range hood through the hole in the right end of the motor
mounting plate.
B
A
A. Motor mounting plate hole
B. Power supply wires and connector