
Installation Guide


12
Installation - Ductless (Recirculating) version
CAUTION
To install the hood in this version, first purchase the
Ductless Recirculating Kit.
includes: charcoal filter and deflector
• If possible, disconnect and move freestanding or slide-in
range from cabinet opening to provide easier access to
rear wall. Otherwise put a thick, protective covering over
countertop, cooktop or range to protect from damage
and debris. Select a flat surface for assembling the unit.
Cover that surface with a protective covering and place
all canopy hood parts and hardware in it.
• Determine and mark the centerline on the wall where the
canopy hood will be installed.
• Select a mounting height comfortable for the user and
mark on wall.
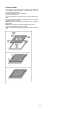
• Tape template, matching center-line and hood bottom.
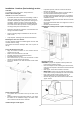
Mounting the duct cover bracket
The duct bracket should be installed against the back wall
and flush with the ceiling.
This bracket will hold the telescopic duct cover in place at
the top.
Secure the bracket to the wall:
• Align the marked centerline on the bracket with the
centerline on the wall.
• Mark 2 screw hole locations in the wall.
• Drill 5/16" pilot holes in the marked locations.
• Install wall fastener anchors.
• Drive wood screws, by hand, into the fastener to allow
anchors to expand. Remove the screws.
• Secure the bracket to the wall with wood screws and/or
fasteners.
House wiring location
• The junction box is located on the top left side of the
hood.
• Wiring should enter the back wall at least 20 - 1/4" above
the bottom of the installation height, and within 7-5/8"
and 4-7/8"of the left side of the centerline.
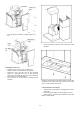
Install framing for hood support
• If drywall is present, mark the screw hole locations.
Remove the template.
• Cut away enough drywall to expose 2 vertical studs at
the holes location indicated by the template.
Install two horizontal supports at least 4" X 2" between
two wall studs at the bottom and upper mounting holes
installation location.
• The horizontal support must be flush with the room side
of the studs.
Use cleats behind both sides of the support to secure to
wall studs.
• Reinstall drywall and refinish.
IMPORTANT- Framing must be capable of supporting
100 lbs.
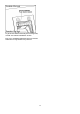
Mounting the hood
WARNING: 2 people are required to lift and position the
hood onto the mounting screws.
• Place the template on the wall along the horizontal line,
make sure the template is leveled and centered with the
centerline.
• Mark “upper” screw holes locations in the wall.
• IMPORTANT. Check to be sure that hole locations are
leveled and correctly centered by the vertical centerline.
• Drive “upper” wood screws by hand. Leave ¼ “ of
distance between the screw head and the wall.
• Remove the grease filter and mount the hood onto the
“upper” screws.