
Installation Guide


9
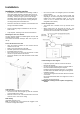
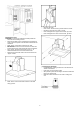
Mounting the hood
WARNING: 2 people are required to lift and position the
hood onto the mounting screws.
• Place the template on the wall along the horizontal line,
make sure the template is leveled and centered with the
centerline.
• Mark “upper” screw holes locations in the wall.
• IMPORTANT. Check to be sure that hole locations are
leveled and correctly centered by the vertical centerline.
• Drive “upper” wood screws by hand. Leave ¼ “ of
distance between the screw head and the wall.
• Remove the grease filter and mount the hood onto the
“upper” screws.
• Mark “lower” wood screw holes locations in the wall
using a pencil.
• Remove the hood.
• Drive “lower” wood screws, by hand. Remove screws.
• Mount the hood onto the “upper” screws.
• Drive and tighten the “upper” wood screws, by hand.
• Drive and tighten the “lower” wood screws, by hand.
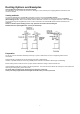
Connecting the ductwork
• Install ductwork, making connections in the direction of
airflow as illustrated.
• Push duct over the exhaust outlet.
• Wrap all duct joints and the flange connections with duct
tape for an airtight seal.
• Make the same connection in the wall or ceiling vent
exit.