
Installation Instructions


10
Electrical Connection
1 Disconnect power.
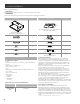
2 Remove the bracket and then the terminal box cover.
A
B
D
C
B
A. Bracket
B. Terminal box screws
C. Terminal box cover
D. Terminal box
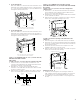
3 Remove the knockout in the terminal box cover and install
a UL listed or CSA approved
1
⁄2” strain relief.
E
F
A
B
C
D
A. White wires
B. Black wires
C. UL listed wire connectors
D. Green (or bare) and yellow-green ground
wire
E. Home power supply cable
F. UL listed or CSA approved ½” strain relief
4 Use UL listed wire connectors and connect the black wires
(B) together. Use UL listed wire connectors and connect
the white wires (A) together.
I WARNING:
ELECTRICAL SHOCK HAZARD. ELECTRICALLY GROUND
BLOWER. CONNECT THE GROUND WIRE TO THE GREEN AND
YELLOW GROUND WIRE IN THE TERMINAL BOX. FAILURE
TO DO SO CAN RESULT IN DEATH OR ELECTRICAL SHOCK.
5 Connect the green (or bare) ground wire from the home
power supply to the yellow-green ground wire (D) in the
terminal box using UL listed wire connectors.
6 Install the terminal box cover.
7 Reconnect the power.
Complete Installation
Replace filters. Check operation of the hood.
If range hood does not operate:
• Check that the circuit breaker is not tripped or the house
fuse blown.
• Disconnect power supply. Check that wiring is correct.
To get the most ecient use from your new range hood, read
the “Maintenance” section. Keep your Installation Instructions
and Use and Care Guide close to range hood for easy reference.
Description of the Hood
2
4
1
3
1. Blower and light controls
2. LED lamps
3. Grease filter handle
4. Grease filter
Control
1 2 3 4 5 6
1. Button ON/OFF motor (stand by)
2. Button for low speed (suction power) selection
When flashing, it indicates that you must wash the grease filter.
3. Button for medium speed (suction power) selection
4. Button for high speed (suction power) selection
5. Button for intensive speed (suction power) selection
It lasts 5 minutes then it returns to medium speed (suction power).
6. Button ON/OFF lighting
Press briefly to switch on or o the lighting of the hood.
Press and hold to adjust the intensity of the light.
Indicators of filter saturation:
At regular time intervals, the hood indicates the need of
performing filter maintenance.
Button on with steady light:
Perform grease filter maintenance.
Button flashing:
Perform activated charcoal filter maintenance.
NOTE: Filter saturation signal is visible within the first minute
after switching off the hood; within this time, the reset of
saturation indicators must be performed.
Reset of filter saturation indicators:
Press and hold the button
Activation of saturation indicator activated charcoal filter:
NOTE: This operation must be performed with the hood off.
This indicator is normally deactivated; press and hold the
button to activate the function: the button lights up with
steady light.
To deactivate the function, press and hold the button ,
the button lights up flashing.