
Installation Instructions


6
Cold weather installations
An additional back draft damper non return valve should be
installed to minimize backward cold air flow and a thermal
break should be installed to minimize conduction of outside
temperatures as part of the vent system. The damper non
return valve should be on the cold air side of the thermal
break.
The break should be as close as possible to where the vent
system enters the heated portion of the house.
Makeup air
Local building codes may require the use of makeup air
systems when using ventilation systems with greater than
specified CFM of air movement. The specified CFM varies
from locale to locale.
Consult your HVAC professional for specific requirements in
your area.
Venting methods
Vent system can terminate either through the roof or wall.
Use 3
1
⁄4” x 10” (8.3 x 25.4 cm) with a maximum vent length
of 35 ft (10.7 m) or 6” (15.2 cm) or larger round vent with a
maximum length of 50 ft (15.2 m) for vent system.
In cases where it should not be possible to discharge cooking
fumes and vapour to the outside, purchase Charcoal Filter
Replacement Kit.
NOTE: Flexible vent is not recommended. Flexible vent
creates back pressure and air turbulence that gently reduces
performance.
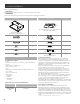
Vertical Discharge
C
B
A
B
D
A
A. 6” (15.2 cm) round transition
B. 6”(15.2 cm) duct
C. Cabinet
D. 90° elbow
Horizontal Discharge Recirculating
B
A
C
A. 3
1
⁄4” x 10” (8.3 x 25.4 cm)
rectangular transition
B. 3
1
⁄4” x 10” (8.3 x 25.4 cm) duct
C. Cabinet
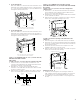
A
B
A. Cabinet
B. Charcoal filters
Preparation
We recommend that a qualified technician install the range
hood. It is the installer’s responsibility to ensure the range
hood complies with the installation clearances specified for
the product.
Preparing the location
• We recommend you install the vent system before you
install the hood.
• Before making cutouts, make sure there is proper clearance
within the ceiling or wall for vent fittings.
• Making the cutout to the bottom of the cabinet may be
easier to do prior to mounting the cabinet to the wall.
1 Disconnect power.
2 Determine which venting method to use: roof, wall or non
vented.
3 Select a flat surface for assembling the range hood.
Place a covering over that surface.
I WARNING:
EXCESSIVE WEIGHT HAZARD
USE TWO OR MORE PEOPLE TO MOVE AND INSTALL
RANGE HOOD. FAILURE TO DO SO CAN RESULT IN BACK
OR OTHER INJURY.
4 Using 2 or more people, lift the range hood onto covered
surface.
5 If cabinet has recessed bottom, add wood filler strips on
each side. Install screws to attach filler strips in locations
shown.
Wood filler strips
(recessed cabinet
bottoms only)
Cabinet
bottom
Wall
3” (7.6 cm)
CL
30”model: 13⁄”(35cm)
36”model: 16⁄”(42.5cm)
30”model: 13⁄”(35cm)
36”model: 16⁄”(42.5cm)
3” (7.6 cm)
Determine wiring hole location
Cut only one 1
1
⁄4” (3.2 cm) diameter wiring access hole. See
Step 2 for wiring hole location instructions.
1 Determine and clearly mark a vertical centerline on the
wall and cabinet in the area the vent opening will be
made.
A
A. Centerline