
Installation Instructions


8
Installation of the Range Hood
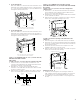
1 Remove the grease filters. See the “Maintenance” section.
2 Remove foam shipping pad from behind the blower motor.
3 Remove the left stainless piece, see image below.
A
A. Left stainless piece screws (2)
4 Lift the range hood up under cabinet and determine it´s final
location by centering beneath cabinet. Mark on the underside
of cabinet the location of the 4 keyhole mounting slots on
the range hood. Set range hood aside on a covered surface.
A
A. Keyhole slot
5 Use
1
⁄8” (3 mm) drill bit and drill 4 pilot holes as shown.
A
A. Drill pilot hole
6 Install the 4 - 4.5 x 13 mm mounting screws in pilot holes.
Leave about
1
⁄4” (6.4 mm) space between screw heads and
cabinet to slide range hood into place.
1
⁄4” (6.4 cm)
7 Replace the left stainless piece removed previously in step 3.
Vent connector installation
Determine whether the range hood will be installed using
either a top or rear vent connection.
Rear vent transition installation
NOTE: For rear venting, the blower motor position must be
changed. It will need the rear motor mounting bracket that is
included with the range hood.
1 Place range hood on its back. Fit the vent system over the
exhaust outlet.
2 Disconnect the blower motor electrical connector from the
electrical box connector.
3 Using a T20® adapter, remove the 4 screws holding the
blower motor in place. Push up on the blower motor to
disengage the tabs from range hood cavity back. Remove
the blower motor and set it aside.
C
B
A
A. Range hood canopy
(inside top)
B. Blower motor
C. Blower motor mounting
screws
4 Install the rear blower mounting bracket into the range
hood and secure it with the (4) 4 x 8 mm screws.
A
B
C
B
A. Range hood canopy (inside back)
B. 4 x 8 mm screws (4)
C. Rear blower motor mounting bracket assembly
5 Install the blower motor onto the rear motor mounting
bracket (included with the range hood). Engage the motor
mounting tabs with the keyhole slots in the rear mounting
bracket and push down to secure. Install the 4 screws
removed previously and tighten to secure motor bracket.
A
B
C
D
A. Rear motor mounting bracket
B. Motor mounting tabs (2)
C. Blower motor
D. Blower motor mounting screws (4)
6 Reconnect blower motor electrical connector to the electrical
box connector.
7 Remove the rear vent knockout.
8 Attach the 3
1
⁄4” x 10” (8.3 cm x 25.4 cm) rectangular vent
damper using 3- 3.5 x 95 mm vent transition mounting
screws.