
Use, Care, and Installation Guide


6
Ducting Options
Closely follow the instructions set out in this manual.
All responsability, for any eventual inconveniences, damages or fires caused by not complying with the instructions in this manual,
is declined.
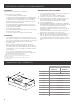
Ducting version Ductless (Recirculating)
a) 3
⁄4” x 10” (8.3 x 25.4 cm) rectangular vent through the roof/wall (purchased
separately).
b) Roof/wall cap (purchased separately)
A
B
A
B
Roof Venting Wall Venting
In cases where it should not
be possible to discharge
cooking fumes and vapour
to the outside, purchase
the Ductless Recirculating
Kit.
For ductless (Recirculating)
version only.
a) Charcoal filter
b) Recirculation cover plate
c) Cabinet
A
B
C
Preparation
Do not cut a joist or stud unless absolutely necessary. If a joist
or stud must be cut, then a supporting frame must be
constructed.
Fittings material is provided to secure the hood to most types
of walls/ceilings.
However, a qualified technician must verify suitability of the
materials in accordance with the type of wall/ceiling.
Before making cutouts, make sure there is proper clearance
within the ceiling or wall for exhaust vent.
Recommended installation height:
Hood installation height above cooktop is the users preference.
The lower the hood is above the cooktop, the more ecient
the capturing of cooking odors, grease and smoke.
I CAUTION
FOR GAS RANGES INSTALLATION: MOUNT THIS HOOD SO
THAT THE BOTTOM IS NOT LESS THAN 27” (68.6 CM).
FOR ELECTRIC RANGES INSTALLATION: MOUNT THIS HOOD
SO THAT THE BOTTOM IS NOT LESS THAN 24” (61 CM)
AND NOT MORE THAT 30” (76.2 CM) ABOVE THE COOKING
SURFACE.
Check your ceiling height and the hood height maximum
before you select your hood.
Prepare Location
NOTE: It is recommended that the vent system be installed
before hood is installed. Before making cutouts, make sure
there is proper clearance within the ceiling or wall for exhaust
vent.
1 Disconnect power.
2 Depending on your model, determine which venting
method to use: roof, wall or recirculating.
3 Select a flat surface for assembling the range hood. Place
covering over that surface.
Lift the range hood and set it upside down onto covered
surface.
For recessed bottom cabinet only
1 If the cabinets have front, side or back trim, make 2 wood
shims the width of the trim and attach them to the cabinet
bottom recess on both sides. See the diagramas for marking
locations.
IMPORTANT: Align the wood filler strips so that they
completely cover the recessed bottom cabinet.
Wood shims
Determine Wiring Hole Location
Cut only one 1
1
⁄4” (3.2 cm) diameter wiring access hole.
1 Determine and clearly mark a vertical centerline on the
wall and cabinet in the area the vent opening will be made.
A. Centerline
A