
Use, Care, and Installation Guide


7
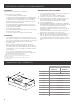
To wire through top:
2 Mark a line 8
3
⁄8” (21.3 cm) from the right of the centerline
on the underside of the cabinet. For 12” (30.5 cm) deep
cabinets, mark the point on this line that is 2” (5.1 cm)
from the back wall. For 15” (38.1 cm) deep cabinets, mark
the point on this line that is 5” (12.7 cm) from the back
wall. Drill a 1¼” (3.2 cm) diameter hole through the cabinet
at this point.
8
3
⁄8” (21.3 cm)
Centerline
*2” (5.1 cm) for 12”
(30.5 cm) deep cabinets
*5” (12.7 cm) for 15”
(38.1 cm) deep cabinets
*from wall, not cabinet frame
To wire through wall:
1 Mark a line 8
3
⁄8” (21.3 cm) from the right of the centerline
on the underside of the wall. Mark the point on this line that
is
7
⁄8” (2.2 cm) from the underside of the cabinet. Drill a 1
1
⁄4”
(3.2 cm) diameter hole through the rear wall at this point.
8
3
⁄8”
(21.3 cm)
7
⁄8” (2.2 cm)
Centerline
Cut Openings for 3¼” x 10” (8.3 cm x 25.4 cm)
Rectangular Vent System
Roof Venting
To make a 4
1
⁄4” x 10½” (10.8 cm x 26.7 cm) rectangular cutout
on the underside of cabinet top and bottom:
1 Mark lines
1
⁄2” (1.3 cm) and 4
3
⁄4” (12.1 cm) from the back wall
on the centerline of the underside of cabinet.
2 Mark lines 5¼” (13.3 cm) to the right and left of the center-
line on the underside of cabinet.
3 Use saber or keyhole saw to cut a rectangular opening for
vent.
4 Repeat steps 1-3 for the underside of the top of the cabinet.
Cabinet cutouts
1” (2.5 cm)
*From wall, not cabinet frame
5”
(12.7 cm)
5
1
⁄4”
(13.3 cm)
5
1
⁄4”
(13.3 cm)
Wall Venting
To make a 4
1
⁄4” x 10½” (10.8 cm x 26.7 cm) rectangle in the wall:
1 Make 2 lines by measuring
1
⁄8” (0.3 cm) and 4
1
⁄16” (10.3 cm)
down from underside of cabinet and mark on the centerline
on the back wall.
2 Mark lines 5¼” (13.3 cm) to the right and left of the centerline
on the wall.
3 Use saber or keyhole saw to cut a rectangular opening in
the wall for the vent.
Cabinet
front
4
1
⁄4”
(10.8 cm)
1
⁄8”
(0.3 cm)
Centerline
5
1
⁄4”
(13.3 cm)
5
1
⁄4”
(13.3 cm)
Installation
• Lift the range hood up under cabinet and determine final
location by centering beneath cabinet. Mark on the
underside of cabinet the location of the 4 keyhole
mounting slots on the range hood. Set range hood aside
on a covered surface.
A
A. Keyhole slot
• Use ⁄8” (3 mm) drill bit and drill 4 pilot holes as shown.
A
A. Drill pilot hole
• Install the 4 - 4.5 mm x 13 mm mounting screws in pilot
holes. Leave about ⁄4” (6.4 mm) space between screw
heads and cabinet to slide range hood into place.
1
⁄4″
(6.4 mm)
• Remove transition knockouts depending on the selected
venting method.
C
D
A
B
A. Top rectangular vent knockout
B. Rear rectangular vent knockout
C. Round vent knockout
D. Recirculation cover plate
Top venting outlet (exit through the wall or the roof):
For rectangular vent system installations, remove the top
rectangular knockout.
NOTE: For round vent system installations, remove the top
round knockout.
Rear venting outlet (exit through the wall):
Remove the rear rectangular knockout.
Non-ducted (recirculating) installations - No vent attachments.
Remove the two screws from the recirculation cover plate and
set it aside. See the Recirculating installations section.
• Remove metal grease filters. See the “Range Hood Care”
section. First remove the bracket and then the lateral panels.
NOTE: You will have 3
1
⁄4” x 10” (8.3 x 25.4 cm) rectangular
vent transition inside your range hood. Remove the 3-
1
⁄4” x
10” (8.3 x 25.4 cm) rectangular vent transition inside your
range hood.