Use, Care and Installation Guide Guide d’utilisation, d’entretien et d’installation Guía de instalación, uso y mantenimiento Wall Range Hoods Models SUM1 – SUM6 *** BEFORE INSTALLATION *** ENSURE THERE IS NO VISIBLE OR HIDDEN DAMAGE SUSTAINED DURING SHIPPING *** AVANT DE L’UTILISATION *** VÉRIFIEZ QUE L’APPAREIL N'A SUBI AUCUN DOMMAGE VISIBLE OU CACHÉ PENDANT LE TRANSPORT *** ANTES DE LA INSTALACIÓN *** ASEGURARSE DE QUE EL PRODUCTO NO HAYA SUFRIDO DAÑOS VISIBLES O NO VISIBLES DURANTE EL TRANSPORTE *** S
IMPORTANT SAFETY INSTRUCTIONS WARNING: TO REDUCE THE RISK OF FIRE, ELECTRIC SHOCK, OR INJURY TO PERSONS, OBSERVE THE FOLLOWING: ■ Use this unit only in the manner intended by the manufacturer. If you have questions, contact the manufacturer. ■ Before servicing or cleaning the unit, switch power off at service panel and lock the service disconnecting means to prevent power from being switched on accidentally.
WARNING Thank you for purchasing a Elica Range Hood. Please read all the instructions in this manual before installing the appliance. Save these instructions for future reference. Only use this appliance as an exhaust ventilation system for the removal of cooking vapors. DO NOT use to expel flammable substances or any other materials or vapors. The installation procedures in this manual are intended for qualified installers, service technicians or persons with similar qualified background.
TABLE OF CONTENTS Warnings 6 Useful warnings 6 Warnings 6 SUM1 7 Types of installation 7 Installation of the appliance 8 Connection of the pipes 8 Electrical connection of the hood SEM1 8 SUM6 9 Warning 9 Installation 9 Connection of the pipes 10 Electrical connection to the hood 10 Installation of the external carter 10 WARRANTY 11 5
Warnings! The air outlet of the appliance must not be connected to a flue which is used for exhausting other fumes from appliances, such as a central heating, boilers etc.. For the external exhausting of the fumes, comply with the regulations in force. Ventilate the room suitably according to the laws in force when the appliance is working together with gas, oil or coal burning appliances, at the same time. The motor of the peripheral exhausting group is powered by the cooker hood placed in the kitchen.
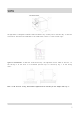
SUM1 The appliance is designed to exhaust fumes and odours very silently and in the best way. It must be installed in the house and connected to the cooker:hood, which is in the kitchen fig.1. Types of installation: to make the installation easy, the appliance can be fixed on the wall, on the ceiling or on the floor in a horizontal position fig.2 or vertically fig. 3 to the fixing level. Note: in the vertical fixing, the brackets supplied can be used only on the longest side fig. 4.
Installation of the appliance: after deciding the position and the type of installation, insert the anti:vibration rubber caps in the holes of the brackets supplied fig. 5C. The rubber caps must be put on the sides which are in contact with the wall. Put the brackets (fig. 5A) on the remote fitted extraction motor by matching its holes with those of the brackets. Fix with the screws supplied (fig. 5B).
SUM6 Warning! The remote fitted exhausting group (external motor) is built in class I plate, therefore it needs the earth connection. The appliance was designed to exhaust odors and vapors in the best way. The appliance is to be installed on the outside wall of the house and connected to the cooker:hood which is in the kitchen (fig. 1). Installation: the mounting of the appliance is to be made by qualified technicians. Using the appropriate drilling jig. (fig.
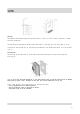
Before leaning the appliance against the wall, please remove the stainless steel carter using the 8 perimetrical screws (fig. 3), then insert the supply cord in the plastic pipe. Fix the appliance without the stainless steel external body, which was previously removed from the motor block, by matching the holes of the motor block with the holes on the wall. Tighten with the screws supplied.
Warranty ELICA North America TWO-YEARS LIMITED WARRANTY TO OBTAIN SERVICE UNDER WARRANTY Owner must present proof of original purchase date. Please keep a copy of your dated proof of purchase (sales slip) in order to obtain service under warranty. PARTS AND SERVICE WARRANTY For the period of two (2) years from the date of the original purchase, Elica will provide free of charge, non consumable parts or components that failed due to manufacturing defects.
IMPORTANTES INSTRUCTIONS DE SÉCURITÉ AVERTISSEMENT : POUR RÉDUIRE LE RISQUE D'INCENDIE, CHOC ÉLECTRIQUE OU DOMMAGES CORPORELS, RESPECTER LES INSTRUCTIONS SUIVANTES : ■ Utiliser cet appareil uniquement dans les applications envisagées par le fabricant. Pour toute question, contacter le fabricant.
AVERTISSEMENTS Nous vous remercions d'avoir acheté une hotte Elica. Veuillez respecter attentivement toutes les instructions indiquées dans cette notice avant de procéder avec l’installation de la hotte. Veuillez conserver ces instructions pour un usage ultérieur. Utilisez cet appareil exclusivement comme un système d’aspiration pour l’élimination de la vapeur se formant lors de la cuisson.
INDEX Avertissements 16 Avertissements utiles 16 Avertissements 16 SUM1 17 Modes d’installation 17 Installation de l’appareil 18 Montage des tuyaux 18 Branchement électrique SEM1 à la hotte 18 SUM6 19 Avertissements 19 Installation 19 Montage des tuyaux 20 Branchement électrique à la hotte 20 Installation du carter externe 20 GARANTIE 21 15
Avertissements ! La sortie d’air ne doit pas être reliée à un conduit utilisé pour évacuer les fumées produites par d’autres appareils, tel qu’un chauffage central, radiateurs, etc. Pour l’évacuation des fumées vers l’extérieur, veuillez suivre les réglementations en vigueur.
SUM1 L’appareil a été conçu pour aspirer les vapeurs et les odeurs de façon optimale et extrêmement silencieuse. L’appareil doit être installé dans l’habitation et relié à la hotte située dans la cuisine, Fig.1. Modes d’installation : Pour faciliter les opérations d’installation, fixez l’appareil à la paroi, au plafond ou sur le sol en position horizontale (Fig.2) ou verticale (Fig.3) par rapport au plan de fixation.
Installation de l’appareil : Après avoir établie la position et le mode de fixation, insérez les bouchons en caoutchouc anti-vibration dans les trous des étriers fournis (Fig.5C). Insérez les bouchons en caoutchouc sur les côtés en contact avec la paroi. Placez les étriers (Fig.5) sur le groupe d’aspiration extérieur en faisant coïncider les trous de ce dernier avec ceux des étriers. Fixez avec les vis fournies (Fig.5B).
SUM6 Avertissements ! Le groupe d’aspiration extérieur (moteur extérieur) est en classe I et par conséquent nécessite d’une mise à la terre. L’appareil a été conçu pour aspirer les vapeurs et les odeurs de façon optimale et extrêmement silencieuse. L’appareil doit être installé dans l’habitation et relié à la hotte située dans la cuisine (Fig.1) Installation : L’installation de l’appareil doit être effectuée par un technicien qualifié. Utilisez le gabarit de perçage approprié. (Fig.
Avant de placer l’appareil sur la paroi, enlevez le carter en acier en dévissant les 8 vis périmétrales (Fig.3). Puis insérez le câble d’alimentation dans le tuyau en plastique. Fixez l’appareil sans son carter en acier, préalablement enlevé du bloc moteur, en faisant coïncider les trous du bloc moteur avec ceux de la paroi. Fixez en utilisant les vis fournies. Montage des tuyaux : L’appareil est pourvu d’une entrée d’air pour le montage des tuyaux télescopiques, et d’une sortie.
Garantie GARANTIE DE DEUX ANS ELICA North America POUR OBTENIR UN DEPANNAGE SOUS GARANTIE Le propriétaire doit présenter une preuve de la date d’achat. Garder une copie de votre preuve d’achat datée (ticket de caisse) de façon à pouvoir bénéficier du service après-vente sous garantie.
INSTRUCCIONES DE SEGURIDAD IMPORTANTES ATENCIÓN: RESPETAR ESTAS INSTRUCCIONES PARA REDUCIR EL RIESGO DE INCENDIOS, DESCARGAS ELÉCTRICAS O LESIONES PERSONALES : ■ Utilizar este dispositivo sólo como aconseja el productor. Póngase en contacto con el productor en caso de dudas o preguntas. ■ Antes de iniciar cualquier operación de mantenimiento o limpieza, desconecte la alimentación del panel general y bloqueelo con el fin de evitar que se vuelva a conectar accidentalmente.
ADVERTENCIAS Gracias por haber comprado una campana Elica. Leer atentamente todas las instrucciones de este manual antes de proceder con la instalación de la campana. Guarde estas instrucciones para futuras consultas. Utilizar este aparato exclusivamente como un sistema de aspiración para la eliminación de los vapores generados durante la cocción. Evite el uso del aparato para evacuar sustancias inflamables o cualquier otro material u otros vapores.
ÍNDICE Advertencias 26 Advertencias Útiles 26 Advertencias 26 SUM1 27 Tipos de instalación 27 Instalación del aparato 28 Conexión de los tubos 28 Conexión eléctrica SEM1 a la campana 28 SUM6 29 Advertencias 29 Instalación 29 Conexión de los tubos 30 Conexión eléctrica 30 a la campana Instalación del carter exterior GARANTÍA 30 31 25
¡Advertencias! La salida de aire del aparato no tiene que estar conectada a un conducto utilizado para la descarga de humos procedentes de otros sistemas, como los de la calefacción centralizada, de las calderas, etc .. Para la descarga de humos hacia el exterior, respete la normativa vigente.
SUM1 El aparato está diseñado para aspirar óptimamente los vapores y los olores sin que se sientan ruidos. El aparato tendrá que instalarse dentro de la habitación conectándolo a la campana que se encuentra en la cocina, fig.1 Tipos de instalación:: para facilitar las operaciones de instalación, el aparato se puede fijar a una pared, al techo o en el suelo en posición horizontal (fig.2) o vertical (Fig. 3) con respecto al plano de fijación.
Instalación del aparato: una vez estblecida la ubicación y el modo de fijación, hay que introducir la goma anti:vibración en los orificios de los soportes ya suministrados, Fig. 5C . Las gomitas tienen que colocarse en la superficie lateral que va a estar en contacto con la pared. Colocar los soportes (Fig. 5A) en el grupo de aspiración exterior, haciendo coincidir los orificios de este último con los de los soportes. Fijarlos con los tornillos suministrados. (Fig. 5B).
SUM6 ¡Advertencia! El grupo de aspiración exterior (motor externo) está en clase I, por lo tanto necesita de una conexión a tierra. El aparato está diseñado para aspirar óptimamente los vapores y los olores sin que se sientan ruidos. El aparato tendrá que instalarse dentro de la habitación conectándolo a la campana que se encuentra en la cocina, fig.1 Instalación: La instalación tiene que realizarse por técnicos calificados. Utilizar la plantilla de perforación especial. (Fig.
Antes de apoyar el aparato en la pared, saque el cárter de acero mediante la eliminación de los 8 tornillos perimetrales (Fig. 3), Después, conecte el cable de alimentación en el tubo de plástico. Fijar el aparto sin el cárter estético de acero, retirado previamente del bloque motor, haciendo coincidir los orificios del mismo bloque motor con los orificios en la pared. Apretar usando los tornillos suministrados.
Garantía ELICA North America GARANTIA LIMITADA DE DOS AÑOS. PARA OBTENER SERVICIO DENTRO DE GARANTIA. El propietario debe presentar su recibo original de la compra. Guarde por favor una copia de su recibo de compra como prueba, para recibir el servicio dentro del periodo de garantía. PARTES Y GARANTIA DE SERVICIO. Por el periodo de (2) dos años desde la fecha original de la compra, Elica proveerá, gratuitamente, partes no-consumibles o componentes que hayan fallado debido a defectos de fabricación.
LIB0116552 Ed.