
Installation Guide


7
Ducting Options
Closely follow the instructions set out in this manual.
All responsability, for any eventual inconveniences, damages or fires caused by not complying with the instructions in this
manual, is declined.
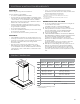
Ducting version Ductless (Recirculating)
The hood is equipped with a 6” (15.2 cm) round transition
for discharge of fumes to the outside.
Roof Venting Wall Venting
A
B
A
B
A. Roof cap
B. 6” (15.2 cm) round vent
A. Wall cap
B. 6” (15.2 cm) round vent
In cases where it should not
be possible to discharge
cooking fumes and vapour
to the outside.
Attach a charcoal filter and
the deflector on the duct
cover support bracket.
Fumes and vapours are
recycled through the top
grille by means of a duct
connected to the transition
and the transition mounted
on the deflector.
For this version only:
purchase the Ductless
Recirculating Kit.
Minimum Duct Size:
6” Round Pipe.
B
A
A. Deflector
B. 6” (15.2 cm) round vent
Preparation
Do not cut a joist or stud unless absolutely necessary. If a joist
or stud must be cut, then a supporting frame must be
constructed.
Fittings material is provided to secure the hood to most types
of walls/ceilings.
However, a qualified technician must verify suitability of the
materials in accordance with the type of wall/ceiling.
Before making cutouts, make sure there is proper clearance
within the ceiling or wall for exhaust vent.
Recommended installation height:
Hood installation height above cooktop is the users preference.
The lower the hood is above the cooktop, the more efficient
the capturing of cooking odors, grease and smoke.
I CAUTION
For gas cooktop & range installations: Mount the hood so the
bottom is at least 30” (76.2 cm) above the cooking surface.
For electric/induction cooktop & range installations: Mount the
hood so the bottom is at least 24” (61 cm) above the cooking
surface.
There is no maximum mounting height, however, we recom-
mend mounting the hood no greater than 36” (91.4 cm) above
the cooking surface. For every inch (2.54 cm) above 36” (91.4
cm), fume and moisture capture eciency diminishes at an in-
creasing rate and may not deliver an acceptable level of venti-
lating performance.
This hood is intended for household use.
PLEASE READ THE INSTALLATION MANUAL FOR SPECIFIC
APPLICATION. Check your ceiling height and hood height
before selecting your hood.
Installation
Prepare location
• It is recommended that the vent system be installed before
hood is installed.
• Before making cutouts, make sure there is proper clearance
within the ceiling or wall for exhaust vent.
• Check your ceiling height and the hood height maximum
before you select your hood.
1 Disconnect power.
2 Determine which venting method to use: roof, wall, or
nonvented.
3 Select a flat surface for assembling the range hood.
Place covering over that surface.
I WARNING
TO REDUCE THE RISK OF FIRE, ELECTRIC SHOCK, OR
INJURY TO PERSONS, OBSERVE THE FOLLOWING.
4 Using 2 or more people, lift range hood onto covered
surface.
Mounting the duct cover bracket
1 Determine and mark the centerline on the wall where the
canopy hood will be installed. Disconnect power.
2 Select a mounting height between a minimum of 24”
(61 cm) for an electric cooking surface, a minimum of
30” (76.2 cm) for a gas cooking surface, and a suggested
maximum of 36” (91.4 cm) above the range to the bottom
of the hood.
Mark a reference line on the wall.