
Installation instructions


8
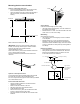
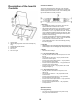
Install framing for hood support
If drywall is present, mark the screw hole locations.
Remove the template.
Cut away enough drywall to expose 2 vertical studs at
the holes location indicated by the template.
Installtwohorizontalsupportsatleast4X2”between
two wall studs at the bottom and upper mounting holes
installation location.
Thehorizontalsupportmustbeushwiththeroomside
of the studs.
Use cleats behind both sides of the support to secure to
wall studs.
Reinstallldrywallandrenish
IMPORTANT-Framingmustbecapableofsupporting100lbs.
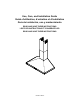
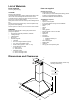
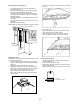
Mounting the hood
WARNING:2peoplearerequiredtoliftandpositionthehood
onto the mounting screws.
Placethetemplateonthewallalongthehorizontalline,
make sure the template is leveled and centered with the
centerline.
Mark“upper”screwholeslocationsinthewall.
IMPORTANT.Checktobesurethatholelocationsare
leveled and correctly centered by the vertical centerline.
Drive“upper”woodscrewsbyhand.Leave¼“of
distance between the screw head and the wall.
Removethegreaselterandmountthehoodontothe
“upper”screws.
•
•
•
•
•
•
•
•
•
•
6-1/2”min.openingforductwork
Viewfromrear
cleats
1”x6”min
Mounting Support
Centerline of
installation
space
Mark“lower”woodscrewholeslocationsinthewallusing
a pencil.
Remove the hood.
Drive“lower”woodscrews,byhand.Removescrews.
Mountthehoodontothe“upper”screws.
Driveandtightenthe“upper”woodscrews,byhand.
Driveandtightenthe“lower”woodscrews,byhand.
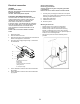
Connecting the ductwork
Install ductwork, making connections in the direction of
airowasillustrated.
Push duct over the exhaust outlet.
Wrapallductjointsandtheangeconnectionswithduct
tape for an airtight seal.
Make the same connection in the wall or ceiling vent exit.
•
•
•
•
•
•
•
•
•
•
A.Airow
B. Duct tape over seam
A
B
C