EN Instruction on mounting and use
EN - Instruction on mounting and use Consult the designs in the front pages referenced in the text by alphabet letters. Closely follow the instructions set out in this manual. All responsibility, for any eventual inconveniences, damages or fires caused by not complying with the instructions in this manual, is declined. environment and human health, which could otherwise be caused by inappropriate waste handling of this product.
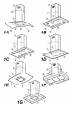
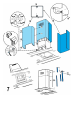
instructions. Warning! Before re-connecting the hood circuit to the mains supply and checking the efficient function, always check that the mains cable is correctly assembled. 13. For extractor versions (13A), connect the other end of the exhaust pipe to the flue. For filter versions (13F), fit deflector F to the truss and secure it to the bracket supplied using 4 screws, then connect the exhaust pipe to the connection ring located on the deflector. 14.
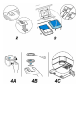
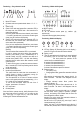
Functioning - 5-key electronic model O 1 2 3 Functioning – Model with Keyboard O I F C 1 1. 2. 3. 4. 5. 6. 7. 8. 9. 2 3 4 5 6 7 8 9 Motor OFF button ON button and motor speed selection button 1 - 2 - 3 - 1 2-.... Speed 1 LED Speed 2 LED and metal grease filter saturation LED (in this latter case, the LED will flash - See instructions on grease filter cleaning).
indicating that the carbon filter saturation control system is active. To switch off the system, re-press the same two buttons: letter C appear on display and after 3 seconds letter it disappear and the device will be switched off. E. Knob to decrease the speed. F. Knob to increase the speed. G. Timed intensive speed button: the hood operates at this speed for 5 minutes and than returns to the previus settings. The display will show P and a blinking dot. This function can be cancelled by pressing button A.