
manual


15
indicating that the carbon filter saturation control system is
active.
To switch off the system, re-press the same two buttons:
letter C appear on display and after 3 seconds letter it
disappear and the device will be switched off.
E. Knob to decrease the speed.
F. Knob to increase the speed.
G. Timed intensive speed button: the hood operates at this
speed for 5 minutes and than returns to the previus
settings. The display will show P and a blinking dot. This
function can be cancelled by pressing button A.
If the hood fails to operate correctly, briefly disconnect it from
the mains power supply for almost 5 sec. by pulling out the
plug. Then plug it in again and try once more before
contacting the Technical Assistance Service.
Warning! Always press the fan off button A before
disconnecting the hood from the mains supply.
Maintenance
ATTENTION! Before performing any maintenance operation,
isolate the hood from the electrical supply by switching off at
the connector and removing the connector fuse.
Or if the appliance has been connected through a plug and
socket, then the plug must be removed from the socket.
Cleaning
The cooker hood should be cleaned regularly (at least with the
same frequency with which you carry out maintenance of the
fat filters) internally and externally. Clean using the cloth
dampened with neutral liquid detergent. Do not use abrasive
products. DO NOT USE ALCOHOL!
WARNING: Failure to carry out the basic cleaning
recommendations of the cooker hood and replacement of the
filters may cause fire risks.
Therefore, we recommend oserving these instructions.
The manufacturer declines all responsibility for any damage to
the motor or any fire damage linked to inappropriate
maintenance or failure to observe the above safety
recommendations.
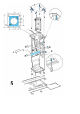
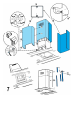
Grease filter
Fig. 2
This must be cleaned once a month (or when the filter
saturation indication system – if envisaged on the model in
possession – indicates this necessity) using non aggressive
detergents, either by hand or in the dishwasher, which must
be set to a low temperature and a short cycle.
When washed in a dishwasher, the grease filter may discolour
slightly, but this does not affect its filtering capacity.
To remove the grease filter B, pull the spring release handle.
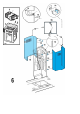
Charcoal filter (filter version only)
Fig. 3
It absorbs unpleasant odours caused by cooking.
The charcoal filter can be washed once every two months (or
when the filter saturation indication system – if envisaged on
the model in possession – indicates this necessity) using hot
water and a suitable detergent, or in a dishwasher at 65°C (if
the dishwasher is used, select the full cycle function and leave
dishes out).
Eliminate excess water without damaging the filter, then
remove the mattress located inside the plastic frame and put it
in the oven for 10 minutes at 100° C to dry completely.
Replace the mattress every 3 years and when the cloth is
damaged.
Remove the filter holder frame by turning the knobs (g) 90°
that affix the chimney to the cooker hood.
Insert the pad (i) of activated carbon into the frame (h) and fit
the whole back into its housing (j).
It is possible to use a traditional carbon filter, neither
washable nor regenerable, to be replaced every 3 - 4 months.
The filter holder frame of the carbon filter is welded together;
the eventual frame supplied with the hood is not, therefore, to
be used.
Insert it into its housing and fix it turning the 2 plastic knobs.
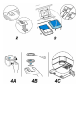
Replacing lamps
Fig. 4
Disconnect the hood from the electricity.
Warning! Prior to touching the light bulbs ensure they are
cooled down.
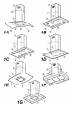
For models shown in Fig. 1A:
1. press on the lamp cover and release to open. (fig. 4A).
2. Replace the damaged light bulb.
Only use halogen bulbs of 20W max (G4), making sure
you do not touch them with your hands.
3. Close the lamp cover (it will snap shut).
For models shown in Fig. 1B-1C-1D-1G-1H:
1. Extract the guard by levering it off with a small screwdriver
or similar tool.. (fig. 4B).
2. Replace the damaged light bulb.
Only use halogen bulbs of 20W max (G4), making sure
you do not touch them with your hands.
3. Close the lamp cover (it will snap shut).
For models shown in Fig. 1E:
1. Use a small screwdriver as a lever on the borders of the
lamp in order to remove the lightbulb. (fig. 4C).
2. Slide out the lightbulb to be replaced and replace with a
new 12V 20W 30° Ø35 12V GU4 PHILIPS STANDARD
LINE code 425409.
If the lights do not work, make sure that the lamps are fitted
properly into their housings before you call for technical
assistance.