Table of Contents Elicom Electronic Ltd. PAGE 1. Warranty Card..................................... 3 2. Brief Description ................................ 4 3. Main Functions ................................... 4 4. Technical Data .................................... 4 Electronic Price Computing 5. Operating Instructions ...................... 5 Label Printing Scale 6. Scale Overview ................................... 6 7. Preparing For Use .............................. 7 8. Operation Modes .......
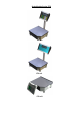
Scale Models Series ETS ETS xx L ETS xx S ETS xx B
Elicom Electronic Ltd. 1. Warranty Card MODEL NAME: Electronic Scale Model: ETS DATE OF PURCHASE:……………………..… SERIAL №………………………………… LIMITED WARRANTY The warranty period for the Electronic Scale ETS is 12 months from the day of the purchase. To obtain and receive warranty service, you need to present the original Owner’s Manual along with Warranty Card in any authorized dealers and services.
2. Brief Description The information in the present instruction is given for electronic scales series ETS xx L1, L2, B1, B2, and S.
Electronic Scales –models ETS хх L1, L2, B1, B2, S1, S2 4.2.
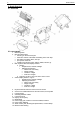
Owner’s Manual 6. Scale Overview 6.1 Overview 6.2. Description 1. Measuring block 2. Barcode Label Printer: Printer type: direct thermal print Automatic unstuck of the label and winding of the main tape мах width of the label: 56mm ,203 dpi print speed: 75mm/sec 5 build in barcode print types: EAN13, EAN8, UPCA и др. 3. Main keyboard with User Display Window a.
Electronic Scales –models ETS хх L1, L2, B1, B2, S1, S2 6.3.
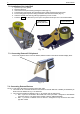
Owner’s Manual 7.2. Installation of the Label Roll 1. 2. 3. 4. 5. 6. 7. Open the top cover (platter) Place the label roll Unlock the thermal print head by pushing the button (Fig.7.2) Feed the paper tape through the slot between the 2 shafts and the thermal print head Fix the caring paper tape to the rolling mechanism with the Press Bracket (Fig.7.2) Close the thermal print head by pushing it against till you hear “CLICK” Press the PRN key with the top cover open.
Electronic Scales –models ETS хх L1, L2, B1, B2, S1, S2 8. Operation Mode The scale works in 2 major modes: “WEIGHING” and “SERVICE”. Both modes are managed by the main keyboard. 8.1. WEIGHING MODE 8.1.1 Operation of the keyboard buttons 1. Turn On the scale using the ON/OFF switch – located on the bottom part of the scale (13) Fig. 8.1 2. Key ZERO SETTING >0< – it is used for setting zero to the load indicator.
Owner’s Manual 8.1.2. Turn On the Scale After the scale is turned on, an automatic self-check of all modules is started. Information about the software version and the IP address is shown on the display. During the self-check process no objects should be placed on the scale’s platter. START … VERSION 0.03 WEIGHING MODULE TEST=A1/100 PC connection IP= 192.168.44.202 PRINTER VER=2.22F After all self-check processes are completed the scale is switching to WEIGHING MODE.
Electronic Scales –models ETS хх L1, L2, B1, B2, S1, S2 Note: When the load is less than the minimal load (see the Min symbol on the front panel) the scale doesn’t calculate total price Work with TARE kg 09.12.08 16:23:20 EUR/kg EUR To remember the current weight as a TARE press the Т . key. 2.000| 1.20| 2.40 NET 09.12.08 16:23:20 kg EUR/kg EUR 0.000| 0.00| >0< ТАРЕ 09.12.08 16:23:20 kg EUR/kg EUR - 2.000| 0.00| >0< NET kg 09.12.08 16:23:20 EUR/kg Now the weight is set to Zero.
Owner’s Manual LEAN PORK 80% kg EUR/kg EUR 2.284|20.70| 47.28 >0< 09.12.08 16:23:20 kg EUR/kg EUR In the price per unit field is displayed the price. The total price is re-calculated. On the top part of the display is shown the name of the article (LEAN PORK 80%). After the load is removed the price per unit field is set to Zero. The total price field is blank. 0.000| 0.00| LEAN PORK 80% NET kg EUR/kg EUR 2.170|20.70| 44.92 LEAN PORK 80% kg EUR/kg EUR - 0.150| >0< kg 09.12.
Electronic Scales –models ETS хх L1, L2, B1, B2, S1, S2 The design of the label and the information on it is determined by previously set form. A detailed description of the software “Label editor” is enclosed in the SERVICE MANUAL. 8.2.3. Label printing with manually set QUANTITY of articles You can enter PRINT MODE QUANTITY of articles by pressing the * key in WEIGHING MODE. QTY SELECT ARTICLE/PLU: The scale is in PRINT MODE QUANTITY of articles and you should enter PLU № or Article №.
Owner’s Manual PARAMETERS: Batch numbers Р1, Р2, Р3 are used to enter numeric information onto the printed labels. They are used for applying batch numbers to the produced goods. PARAMETER: LABEL – determines the number of the active label, which is in use at the moment and is about to enter the printer. Use the arrows to change the position of the desired parameter and to change its value. Label related data P1=000000 P2=000000 P3=000000 LABEL=00 To go to the next parameters press the key.
Electronic Scales –models ETS хх L1, L2, B1, B2, S1, S2 GENERAL VIEW of the functions of the SERVICE MODE Firmware=0, 3 Select function 1. 2. 3. 4. SELECT REPORT1. BY PLU 2. BY GROUP 3. BY DEPARTAMENT 4. TOTALS SELECT PLU SETUP 1. PLU EDIT 2. FAST KEY MODE 3. PLU HANDLING 4. COMMON SETUP PLU EDIT – setup parameters PLU – name 1..6, price, expiration date, article (barcode) number FAST KESY MODE 1. ENABLE/DISABLE SELFSERVICE KBD 2.
Owner’s Manual 1.REPORTS – REPORTS MODE SELECT REPORT – 1. BY PLU 2. BY GROUP 3. BY DEPARTAMENT 4. TOTALS Choose the desired mode by pressing the keys from 1 to 4. To exit the mode press CP . 1.1. BY PLU – report by PLU (articles) – TOT.PLU N.ART=00016 PLU.NR=1; ART=GERMAN HAM WEIGHT=00012.880 SUM =000080.20 The scale displays the Article №, PLU № and the name of the article. On the last 2 lines are displayed the accumulated weigh and total price for the chosen article.
Electronic Scales –models ETS хх L1, L2, B1, B2, S1, S2 TOT.GROUP GROUP=5; =Group 5 WEIGHT=00009.900 SUM =000010.10 The scale displays information about the new group number. To exit the mode at any time press the CP key. 1.3. BY DEPARTAMENT – Reports by department TOT.DEPART. DEPT=0; =Department 0 WEIGHT=00002.440 SUM =000009.80 The scale displays the number and the name of the department. On the last 2 line are shown the accumulated article’s weigh and total price. TOT.DEPART.
Owner’s Manual 2. PLU SETUP – programming mode PLU(articles) 2.1. PLU EDIT – editing information about the articles. Entering the text information is done by the use of external PC keyboard. Saving the changes and going to the NEXT/PREVIOUS article is done by using the + / - .keys. Moving the pointer through the list of parameters is done by using the arrows of the PC keyboard or using the 2 4 5 6 keys from the main keyboard. EDIT PLU#1 ENG Rep PRICE=003.00 TARE=00.000/01.
Electronic Scales –models ETS хх L1, L2, B1, B2, S1, S2 PRICE=03.00 NAME1=CHICKEN WINGS NAME2=PORK, SEASONING NAME3= (Bulgarian phonetic) Rep press the Shift+Alt keys. To exit the mode press the ESC key from the РС keyboard or CP from the main keyboard. 2.2. FAST KEYS MODE FAST KEYS 1.ENABLED/DISABLE SELFSERVICE KBD 2.EDIT SELFSERVICE KBD LAYOUT 1.Activating the Self-service mode of the keyboard 2.
Owner’s Manual 2.4.1. EDIT DEPARTAMENT NAMES DEPARTAMENT=00 NAME=Department 0 Enter the desired name of the corresponding department number. You need external PC keyboard to perform this task. To change to NEXT/PREVIOUS department number use the + / - keys. DEPARTAMENT=11 (00..20) To go directly to other department number, press the PLU key. The scale will display a field to enter the number. Enter the desired department number. For example: 11 and press the PLU key.
Electronic Scales –models ETS хх L1, L2, B1, B2, S1, S2 2.4.4. EDIT PREDEFINED TARES – Editing 50 previously saved Tares, independently those set to the PLU numbers. EDIT PREDEFINED TARE 01. TARE=00.000/01.284 The scale will show Tare number 0 and the current value of the weight on the right part. The 2 numbers are divided by the symbol: „ / „ To change to NEXT/PREVIOUS saved Tare use the + / - keys. EDIT PREDEFINED TARE 01. TARE=01.284/01.284 Place the desired load you wish save as a Tare.
Owner’s Manual 3.1.4. WEIGH MODULE – Calibration of the scale – Detailed calibration instructions are attached in separate CALIBRATION INSTRUCTION 3.2. PRINTING – print setup – labels, automatic print, print density PRINTING SETUP MEDIA -LABELS DISPENSER - ENABLED AUTOPRINT – DISABLED DENSITY – 00% MEDIA –LABELS – by using the + key choose the print type on labels or thermal paper (LABELS/PAPER) DISPENSER – ENABLED AUTOPRINT –DISABLED – auto prints labels when the weight is defined.
Electronic Scales –models ETS хх L1, L2, B1, B2, S1, S2 9. Error Mode 9.1. PRIMARY SELF-CHECK: With the initial start the display shows: START ….. VERSION 0..7 WEIGH MODULE TEST = A1/100 PC CONNECTION IP=192.168.0.202 PRINTER VER=2.
Owner’s Manual Declaration of conformity The non-automatic weighing instrument class: Elicom electronic Ltd, Bulgaria, Silistra 7500 5th Saedinenie sq.
Electronic Scales –models ETS хх L1, L2, B1, B2, S1, S2 HEAD OFFICE 7500 Silistra, Bulgaria 5, Saidinenie sq. PO Box 188 Tel.: +359/ 86 /820 200, 882 255 Fax: +359/ 86 /820 555 e-mail: info@elicom-bg.com OFFICE AND SERVICE 1784 Sofia, Bulgaria 131, Tsarigradsko shosse, "ATM Center", fl. 4, office 403 Tel.: +359/ 2 / 974 4391 Fax: +359/ 2 / 974 4391 e-mail: elicomsf@elicom-bg.com www.elicom-bg.