
Installation Guide


Aiandi 13/1 | Tallinn 12918 | Estonia
Tel: +372 6599 881 | support@eliko.ee | www.eliko.ee
13
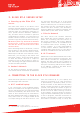
Figure 8. Plan conguration page.
Add a oorplan (optional) of your tracking
area by clicking “Upload”. Next, go to “Con-
gure the axes” to match the X- and Y-axes
on the plan with the actual zero coordinate
and axes. The positive direction of an axis
can be changed by clicking on the “Invert
X (Y)” button. Also, you can switch axes
by clicking the “Switch axes” button. Click
and hold down left mouse button to drag
oorplan to the position that you want.
Click and hold the resizing icon on the top
right corner of the oorplan to resize the
plan. Another option is to adjust the plan
coordinates. Plan coordinates enable you
to resize the image and move it around to
match the anchor placement. Click “Save
changes” button to save the changes.
Next, go to the list of anchors by clicking
the “Anchors” menu button.
Figure 9. oorplan resizing icon
b. Anchors list
Under the “Anchors” tab you should see
all of the anchors with their S/N that are
connected to the server. The green or red
dot in front of each anchor indicates if it
is on- or ofine.
You can also adjust anchor coordinates
under the “Anchors” tab. To save the coor-
dinates click the “Save new anchor coordi-
nates” button.