
Installation guide


5
Changing Protocol Information
English
3. CHANGING PROTOCOL INFORMATION
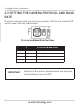
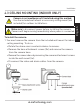
The DIP switches on the bottom of the camera control 3 values:
1. The ID of the camera, which allows the DVR/keyboard controller to
identify different PTZ cameras.
2. The pr
otocol, which is the language that allows the camera and DVR/
keyboard controller to speak to each other (e.g. Pelco D).
3. The baud r
ate, which is the frequency of communications.
The illustration below shows the default values of the DIP switches.
Default ID: 1
Default Baud Rate: 2400
Default Protocol: Pelco-D
6
Changing Protocol Information
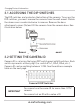
3.1 ACCESSING THE DIP SWITCHES
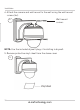
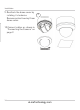
The DIP switches are located on the bottom of the camera. To access the
DIP switches, you must remove the camera from the wall mount. Rotate
the dome cover counterclockwise to remove. Remove the base
attachment screws (3x) and lift the camera from the camera base. See
illustration below.
Removing the camera from the wall mount
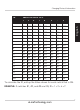
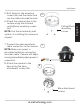
3.2 SETTING THE CAMERA ID
Camera ID is set using the larger DIP switch panel with 8 switches. Each
switch represents a binary digit (i.e. switch #1=1, #2=2, #3=4, etc.).
Camera ID can be anything between 1-255. See the address example
table on the next page.
Camera ID DIP Switches
You cannot use the same ID for more than 1 PTZ
camera.
You cannot set an ID with a value of 0.
IMPORTANT
eLineTechnology.com