Ez-Electric Screen Spectrum/Vmax(Plus) Series Ver. 1 .5 Users Guide *Also available in Black casing www.elitescreens.com / eliteinfo@elitescreens.
Important safety and warning precautions 1. Be sure to read this manual before use and follow the procedures specified: ☆ Please retain this manual for future reference. ☆ To avoid any damage, do not use any accessories not recommended by the manufacturer. ☆ Handle the device carefully during transportation to avoid impact. ☆ Do not put the device on uneven or inclined surfaces. ☆ Do not put heavy objects on the power cord; affix the power cord properly to avoid someone tripping over it.
Warning Individual modifications to this product are prohibited and will void the user’s warranty. Please contact the Service Department for any questions. NOTE: This equipment has been tested and found to comply with the limits for a Class B digital device, pursuant to Part 15 of the FCC Rules. These limits are designed to provide reasonable protection against harmful interference in a residential installation.
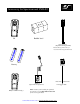
Accessory for Spectrum and VMAX2 IR Bubble level E ye receiver (Optional for Spectrum) Please always point to the eye receiver when using the IR remote Battery Red 12V Wall box (Opt ional for Spectrum) RF(for VMAX2 only) Note: Contact your reseller for optional accessories or visit shop.elitescreens.com for accessory purchase. www.elitescreens.com / eliteinfo@elitescreens.
VMAX2 & Spectrum Series IM PORTAN T S AF ETY INS TRUC TIONS 1. 2. Position the power cord so it will not be; near a hot surface, pulled at or tripped over. To avoid suffering an electric shock, do not attempt to disassemble this appliance yourself. In the event of technical trouble, please contact Elite Screens service dept. for help with repairing your screen. 3.
1. Select the location for your screen within a reasonable angle of projection for your home projector and access to a good power source. 2. For the best support of your screen, it is ideal to secure your screen into the studs of your house's internal framework. If studs are not available, use hollow anchors for mounting your wallscrews in drywall or if you are installing in a concrete structure, use the concrete bolts for securing your screen into concrete walls.
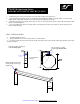
1. Using a tape measure, mark the keyholes that are located at the back of the screen's case end cap. 2. After marking the area and predrilled hole, insert the screw and leave about 1/8” of an inch from the wall to mount the screen. (Fig. 1) Fig. 1 Optional installation using a chain to hang the screen from the ceiling. Fig. 2. 3. You can also hang the screen from a ceiling by using a chain with s-hooks (not included) and hang it by the keyholes located on each end of the case as shown on (Fig. 2). www.
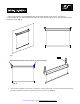
Wood/Dry Wall installation: Use “B” wood screws provided for installation on wood studs on wall. Or use “E” hollow wall anchors provided in conjunction with the wood screws for drywall installation as shown on Fig. 1 Fig. 1 Fig. 2 Can be slide free Masonry/Cement wall installation: Use “D” bolts provided for installing your screen on a cement wall as shown o n Fig. 2. Two options for your installation *Once the L-brackets are in place, the screen can be hung from the vertical hooks.
12-V Trigger The VMAX2 and Spectrum Screens have the capability of using a 12-Volt Trigger. This accessory is optional for Spectrum Screens and can be purchased separately. Connection pins in side of case To Projector Wall-mounted Receiver (Extension Sensor) Red DC12V Green 0V Video Projection Interface 12-Volt Trigger Assembly Diagram A Wa l l B o x w it h I R R e mo t e C o n t r o l 1.
FAQ’S 1. Q: Why does my screen no longer function? A: There are a few possible things you could check: A.) Make sure your wall plug has power and that the screen is properly plugged in. B.) Please check the fuse to y our screen. (Call Tech support for location of fuse) C.) If screen works well with the line switch but not with the remote control, make sure the remote control has good batteries in it. D.) Our electric screens with a tubular motor installed are equipped with a Thermal relay.
Warranty Policy -Electric Screens ● ● ● ● ● ● Two (2) year warranty parts and labor from purchase date as follows (except for refurbished units as specified below): Refurbished units carry a 90-day parts and labor warranty. Demo units or open box items are AS IS items and do not carry a warranty. Each party will be responsible for one way shipping during the warranty period. DOA (Defective On Arrival): Must be reported within 7 business days of receipt.
Two ways to register your warranty with Elite Screens A. On Line (Faster and Easier) www.elitescreens.co m/register.html B. Fill out & Fax to (562) 483-8498, Attn: Customer Service Dept.