ezCinema Series Portable Floor Pull-Up Screen USER’S GUIDE Rev.062510-JA www.elitescreens.com info@elitescreens.
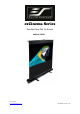
PARTS IDENTIFICATION: Pull hook Note: Second telescoping Front Upper scroll bar rod available on 150” models only. Bracket Hook Black Masking Border Edge Small support rod Locking sleeve White projection surface Big support rod Bottom Black Masking Box Cover Lock Note: Middle foot available on 120” models and above only.
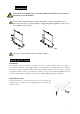
Precautions: Warning! Screen damage can result from product mishandling if the enclosed precautions are not followed. In accordance with practicing home fire safety and to avoid screen damage, do not place the screen near or beside a fireplace or high temperature appliances such as a gas stove, BBQ or heater. (Fig. 1) Fig.1 Fig.2 Place the screen beyond the reach of children. (Fig.
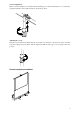
Open the box cover: Unlatch the buckles on both ends of the box and open the box cover. Next, secure the box with one hand while removing the telescopic support rod with your other hand. Installing the support rod: First, make sure that the hanging hook is pointing toward the front facing the same direction as the screen, then insert the square end of the telescopic support rod into the support plate as shown below.
Vertical Adjustment: First loosen the locking sleeve, and then hold the small support rod with the left hand so as to slowly raise it upwards until the screen is fully stretched to the desired position. Adjusting the screen: Hold the screen with the left hand when the screen has been stretched to the desired position, and then rotate the locking sleeve clockwise with the right hand until the telescopic rod is properly locked into position.
Preparing screen for storage 1. Pulling down the screen: First, hold the telescopic support rod with the left hand and loosen the locking sleeve counter-clockwise with the right hand. Then shorten the telescoping support rod slowly into the full retracted position and tighten the locking sleeve to secure it in place. 2. Retract the screen: Remove the pull hook from the support bracket by lifting it about 2 cm up and then hold on to the pull hook and lower the screen gently into the box. 3.
4. Storing the telescopic support rod: Properly center the supporting rod in the middle to maintain the weight balance in the box when carrying. 5. Draw the base feet back: Slightly lift each end of the box in turn rotating the two base feet underneath until they are back into alignment with the box. 6. Storing the screen: The recommended place for storage would be a corner of the room or in a closet, but the ultimate choice is up to you.
ezCinema Series Dimensions Table Unit: mm Screen View Upper Scroll Overall Screen View Width Width Bar Length Height Height Height (A1) (A2) (A3) (B) (B1) (B2) Case Case Height Width (D) (C) Case Model N.W. B3 Length (A) (KGS) F60NWV 1410.0 1295.0 1219.0 1379.0 1990.2 1854.2 914.4 878.0 95.0 118.0 6.2 F72NWV 1661.0 1539.0 1463.0 1631.0 1944.5 1808.5 1097.3 700.0 95.0 118.0 6.9 F84NWV 1891.0 1783.0 1707.0 1861.0 2102.0 1966.0 1280.2 675.0 95.
Warranty Policy Two (2) year parts and labor warranty from defects in workmanship from purchase date as follows (except for refurbished units as specified below): Each party will be responsible for one way shipping during the warranty period. Elite Screens is not responsible for applicable International tariffs such as broker fees and custom duties. A RMA (Return Merchandise Authorization) number must be issued in order to process a replacement or to authorize a return for warranty repair.
Contact Info: US & Canada Tech Support & Warranty Claim Please contact us at service@elitescreens.com or call +1 877-511-1211 #3 Service Europe Tech Support & Warranty Claim Please contact us at service@elitescreens.eu or call +49-(0) 40-30392958 Asia Tech Support & Warranty Claim Please contact us at service@elitescreens.com.cn or call +86-(0) 755-8461-7989 Taiwan Tech Support & Warranty Claim Please contact us at service@elitescreens.com.