Home Theater Fixed Frame Curved Projection Screen Lunette Series 1 Rev.052611‐AS www.elitescreens.com info@elitescreens.
Important Safety & Warning Precautions Please follow these instructions carefully to ensure proper maintenance and safety with your screen. 1. Please make sure that no other objects such as power switches, outlets, furniture, ladders, windows, etc. occupy the space designated to hang the screen. 2.
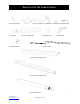
Parts List for the Lunette Series Please make sure all parts listed below are included before proceeding with the installation. A. Dry‐wall anchor B. 1.77” L‐Bracket C. 3.54” L‐Bracket D. Y‐Bracket E. M5 Screw F. Wood Screw G. Fix Plate H. Center Support Bar I. Support Joiner K. Butterfly Screw J. Elbow Joint L. Tension Rods M. Vertical Upright Frame N. Horizontal Curved Frame O. Screen Material 3 Rev.052611‐AS www.elitescreens.com info@elitescreens.
Installation Instructions Assembly 1. Insert both Elbow Joints (J) into each Horizontal Curved Frame (N) and join all four frame parts together as shown below. 2. After making sure that all four corners join at right angles to form a perfect rectangle and fasten together with the M5 screws (E). Minimal gap is normal here 3. Lay out the Screen Material (O) and Tension Rods (L) on a clean and dry surface and gently roll out the screen material on the back of the frame.
4. Insert the screen Tension Rods (L) through the sleeves according to their corresponding length on each edge of the screen. 5. Slip the tension rods into the grooves running along each side on the back of the frame. Clip on the Fix Plates (F) to the back of the frame to secure the rods into place forming a tight and flat surface. Tension Rod Fix Plate Viewing Surface 5 Rev.052611‐AS www.elitescreens.com info@elitescreens.
Black Backing g for AccousticP Pro1080 0 Mode els This proceedure only ap pplies to Acou usticPro 1080 0 models, disrregard if yourr curved frame us now an AcousticP Pro 1080 variaant. The blackk backing counters the effeects of light penetration p th hat would otherwisee light up all ittems behind the screen an nd spoil the picture. p The black backing b goes behind b the pro ojection surfacce and is held into position by b Velcro‐faced d fix plates.
ATTACH THE FIX PLATES 1. Make sure that the material and frame are lying face down on a clean, dry and non‐abrasive surface. 2. Center the material inside the frame. Note: The material will be noticeably smaller because stretching the material is required to create a sufficient amount of tension for perfect material flatness. 3. Start attaching the Fix Plates in the center of the Horizontal Curved Frame’s edge and (1) then alternate with the center short sides (2).
CENTER SUPPORT BAR 1. Insert the Support Joiner (I) into each side of the Center Support Bar (H) to complete assembly. Support joiner Center support bar 2. Insert the Center Support Bar (H) into the upper top groove on the back of the frame (not the one where the fix plate inserts) with the bottom end near the approximate center point of the frame and place it in at an angle so that both ends of the bar are in alignment with the groove. 3.
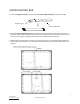
INSTALLATION Wall Horizontal Curved Frame Mid‐Point (Y‐Bracket) L‐Point (L‐Bracket) R‐Point (L‐Bracket) 9 Rev.052611‐AS www.elitescreens.com info@elitescreens.
1. Locate your desired installation height, draw the Datum Line and mark the drill‐hole area of the Mid‐Point. Note: The center of the hole must align with the Datum Line. 2. Mark the drill‐hole area of the L‐Point and the R‐Point. The top of the bracket must align with the Datum Line. 3. Drill a hole with the proper bit size according to the included Wood Screws (F). 4. Line up the brackets with the drilled holes on the installation location and screw then in using a Phillips screwdriver. 5.
Model Numbers Parts List Curve235Model Number 85w 96w 103w 115w 125w 138w 147w 158w 2 2 4 9 1 2 2 1 2 44 7 7 4 0 1 5 2 2 4 9 1 2 2 1 2 52 7 7 4 0 1 5 2 2 4 9 1 2 2 1 2 52 7 7 4 0 1 5 2 2 4 9 1 2 2 1 2 56 7 7 4 0 1 5 2 2 4 9 1 2 2 2 4 62 9 9 2 2 1 5 2 2 4 9 1 2 2 2 4 66 9 9 2 2 1 5 2 2 4 9 1 2 2 2 4 68 9 9 2 2 1 5 2 2 4 9 1 2 2 2 4 72 9 9 2 2 1 5 Part Name Horizontal Curved Frame Upright Vertical Frame Elbow Joint M5*15 Assembly Screw Screen Material Top/Bottom Tension Rod Side Tension Rod
Lunette L Series Dimenssion Taable1 Unit:mm Model Curve235-85 5W Curve235-96 6W Curve235-103 3W Curve235-115 5W Curve235-125 5W Curve235-138 8W Curve235-158 8W Unit: Inches Model Curve235-85 5W Curve235-96 6W Curve235-103 3W Curve235-115 5W Curve235-125 5W Curve235-138 8W Curve235-158 8W Diago onal Size/As spect Ratio 85"(2.3 35:1) 96"(2.3 35:1) 103"(2..35:1) 115"(2..35:1) 125"(2..35:1) 138"(2..35:1) 158"(2..
Warranty Policy • • • • • • • • Two (2) Year parts and labor warranty from defects in workmanship from purchase date as follows (except for refurbished units as specified below). Three (3) Year parts and labor warranty from defects in workmanship for GEMR (Government, Educational, Military, & Religious) purchases of new product only. Refurbished Units carry a 90‐DAY parts and labor warranty. Each party will be responsible for one way shipping during the warranty period.
Contact Info US & Canada Tech Support & Warranty Claim Please contact us at service@elitescreens.com or call +1 877‐511‐1211 #3 or fax +1‐562‐926‐8433 Europe Tech Support & Warranty Claim Please contact us at service@elitescreens.eu or call +49‐(0) 40‐30392958 Asia Tech Support & Warranty Claim Please contact us at service@elitescreens.com.cn or call +86‐(0) 755‐8461‐7989 Taiwan Tech Support & Warranty Claim Please contact us at service@elitescreens.com.