Electric Screen Elite Home 2 series Ver.1.6 Users Guide www.elitescreens.com / eliteinfo@elitescreens.
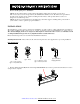
Accessories for Home 2 series ① IR Red +12V ② RF ③ Wall box Green - 0V ④12V trigger ⑤ Eye receiver ⑥ Battery Please always point to the eye receiver when using the IR remote ⑦ Bubble level www.elitescreens.com / eliteinfo@elitescreens.
Important Safety and Warning Precautions 1. Be sure to read this manual before use and follow the procedures specified: Please retain this manual for future reference. To avoid any damage, do not use any accessories not recommended by the manufacturer. Handle the device carefully during transportation to avoid impact. Do not put the device on uneven or inclined surfaces. Do not put heavy objects on the power cord; affix the power cord properly to avoid someone tripping over it.
Warning Individual modifications to this product are prohibited and will void the warranty. Please contact our Service Department for any questions. NOTE: Warning This equipment has been tested and found to comply with the limits for a Class B digital device, pursuant to Part 15 of the FCC Rules. These limits are designed to provide reasonable protection against harmful interference in a residential installation.
1. 5/12V Trigger: The built-in 5/12V trigger 3-prong power cable input for your new CineTension2 allows your screen to synchronize its drop and rise with the projector's power cycle. The screen drops when the projector powers up and retracts when the projector powers down. The 5/12 volt adaptor connects to your projectors trigger output via a separate cable that may or may not be provided by the projector manufacture.
Please read this guide prior to installation. ● Make sure the current rating is equal to that of the appliance rating when an extension cord is used. ● Do not use any accessories not provided by the manufacturer with this screen. We will not be responsible for any risks of fire, electric shock, or injuries resulting from the misuse of this product with accessories not designed for use with this product. ● Make sure the screen is mounted in a horizontal level position.
2. Slide the Extruded Hanging Brackets (D) thru the rail located below the slide channel until it meets with the top part of the bolts (B) and then slightly tighten the lug-nuts located on the top and bottom of the bolt with a wrench to secure the extruded hanging brackets. 3. Mark the location of where the screen is to be installed and drill your hole. hole and finish tightening the bolts to the bracket. Masonry Anchors and Bolts (C) are used on concrete/masonry wall/ceilings.
The IR receiver will be connected from the screen Power Cord Approx. 6 ft. length IR “eye” sensor 11.65 mm. in width Although the IR remote requires a direct line of sight with the IR sensor to function, the screen’s case can be hidden from sight and operated using the RF remote. When depressing the directional buttons you should hear a faint click signifying that the mechanism is working properly. 8 0mm in w id th RF IR UP Stop Down This is the IR (Infra-Red) remote with a range of 15 Ft.
1. Q: Why does my screen no longer function? A: There are a few possible things you could check: A.) Make sure your wall plug has power and that the screen is properly plugged in. B.) Please check the fuse to y our screen. (Call Tech support for location of fuse) C.) If screen works well with the line switch but not with the remote control, make sure the remote control has good batteries in it. D.) Our electric screens with a tubular motor installed are equipped with a Thermal relay.
Two (2) year warranty parts and labor from purchase date as follows (except for refurbished units as specified below): Refurbished units carry a 90-day parts and labor warranty. Demo units or open box items are AS IS items and do not carry a warranty. Each party will be responsible for one way shipping during the warranty period. DOA (Defective On Arrival): Must be reported within 7 business days of receipt. An RMA (Return Merchandise Authorization) number must be issued in order to process a replacement.
Two ways to register your warranty with Elite Screens Inc. A. On Line (F aster and Easier) www.elitescreens.com/register.htm B. Fill out & Fax to (562)483-8498, Attn: Customer Service Dept.
www.elitescreens.com / eliteinfo@elitescreens.