
User Guide


Rev.12/2/2014-EA info@elitescreens.com 12
D
H
G
Below ceiling installation instructions
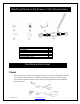
Please make sure all parts listed below are included before proceeding with the installation.
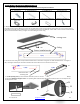
Hardware Parts List for below ceiling installation
A. End Flange x 2
B. Hanging bracket x 2
C. Threaded rod x 4
D. Socket wrench x 1
E. M8x16mmx1.5mm
washer x 28
F. M8 nut x 20
G. M8 Top expanding bolt x 4
H. M8x40mm hex screw x 4
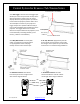
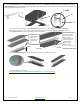
1. Measure and cut the ceiling installation slot:
The width should not exceed 100mm and not less than the width of the screen’s housing. Measure the length of your screen to determine the
length. Note: The length of the installation space is not greater than the screen size table (C3), and the width is not less than the screen size table
(A4). Consult the dimensions table (C) in regards to accommodating the screen casing.
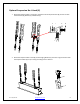
2. Drill 4 holes in the ceiling that correspond with the attachments on the various casing sizes. The width should be 120mm. The length of
(A4) in the diagram below depicts the distance between the holes located on each ear end of the screen’s case.
3. The M8 expanding bolts (G) mount into thick wood beams, stone or concrete and will support the screen. Use the Socket wrench (D)
to attach the M8x40mm hexagonal screws. The expanding bolts should be firmly tightened and tested to make sure that they will hold
the weight of the screen.
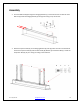
The ceiling wall
Install screw holes
Ceiling
Ceiling Truss
Screen installation slot
100
70
L (A4)
L (A4)
L (A4)