
User Guide


Rev.12/2/2014-EA info@elitescreens.com 13
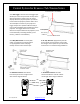
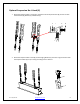
4. Insert the threaded rods (C) through the M8 expanding bolts and then attach the M8x40mm hexagonal screws with the washer (E). Last put the
Hanging Bracket (B) through the threaded rod equal to the height of the screen’s housing. Once they are firmly in place (as shown below) make sure
that they will hold the weight of the screen.
5. Push the screen up into the space. Use the threaded rods (C) to attach the screen assembly to the ceiling. The hexagonal
screws (E) will connect the screen to the rest of the assembly. Once firmly in place, use the nuts (F) to ensure a firm connection.
Use the socket wrench (D) to make sure that the bolts are firmly tightened.
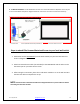
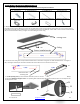
6. Install end flange cover panel (A) between the gap and the screen to complete the installation.
For Complete Dimensions Please Visit:
http://www.elitescreens.com/images/pdf/DimensionsTable/evanesce_tension_below_dims.pdf
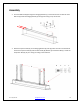
Ceiling
Socket wrench (H)
Ceiling
E and F
C
B
C
Push
Push the screen
to the hole of the
ceiling,the
screw across the
hole of the end
cap.
Use the Socket wrench
to attach the washer
and the outside hex
screws, and then
adjust the bottom of
the screen to make it
parallel with the
ceiling, and then
fasten the screw.
Wall
L (A4)