
User Guide
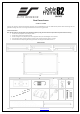
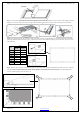
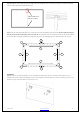
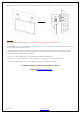
Table Of Contents
- Thank you for choosing an Elite Screens fixed frame projection screen! Congratulations on your new Sable Frame B purchase! Please read through this user guide before utilizing the screen. Correct usage and maintenance will ensure a long product life.
- Care & Use Instructions
- Dust, dirt and scratches on the projection surface will affect the picture quality, please take note of the points below to prevent that from occurring:
- 1. Do not touch the projection surface with your hands
- 2. Do not write or draw on the projection surface
- 3. Do not use fingers or sharp objects to point on the projection surface; this will damage the screen material.
- 4. Use a soft-damp cloth to clean the projection surface; do not use chemical cleaning agents or alcohol.
- 5. Use clean water when dampening the cleaning cloth and do not rub against the material to clean it.

03/16/17 - DR www.elitescreens.com
4
Step 10. Position the Center Support Bar (l) in the middle of the frame and align the hole on each end of the support bar with the top and bottom
frame screw holes. Then fasten with the M4x12Screws (e).
Step 11. After the Center Support Bar (l) is secure, connect the center of the vertical portions of the material (2). Be sure to hook the Springs (b)
onto the Tension Rod (k) to avoid damage to the screen material. Next, connect the center of the horizontal sections of the material (3). Return
to the vertical sides, securing the remainder of the springs (4). Lastly, secure the remaining springs of the horizontal sides of the screen (5).
Installation
Step 11. Measure the overall length and height of the frame and drill holes for the Brackets (g). Line up the wall brackets with the drilled holes on the
installation location and screw them in using a Phillips screwdriver. If not installing into a structural wood stud, use a hollow wall Anchor (j), then screw in the
M5x50 Screws (j) with a screwdriver. Make sure the brackets are leveled.
1
1
1
1
2
2
3
3
5
5
4
4
Align the M6 screws
with the two holes.