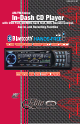
VR500CS-BT AM/FM Stereo In-Dash CD Player with USB Port, SD/MMC Card Slot, RDS, Remote Control, Aux In, and Recording Function
Welcome! Dear Customer, CONGRATULATIONS. The VR500CS-BT MP3/CD Player with AM/FM Receiver, USB Port and SD Card Slot, Electronic Anti-Shock (ESP) & Fold-down Detachable Face, when used as described, will give you years of dependable service in your car, truck, RV, or mini-van. We have taken numerous measures in quality control to ensure that your product arrives in top condition and will perform to your satisfaction.
Precautions • This unit will only play the following discs. • This unit does not play files that have Digital Rights Management(DRM). • If you have files that have Digital Rights Management(DRM) you should consult with the vendor that you purchased files from for instructions on proper use. Type of disc Label on the disc Recorded material Size of disc Audio only 12 cm CD, MP3, & WMA • Do not attempt to modify the unit. • Modifying the unit will void the warranty.
Notes On Installation • Disconnect negative battery terminal before starting installation. Consult the vehicle’s owner’s manual for proper instruction. • The unit is designed for a 12Volt DC negative ground operation system only. Before installing the unit, confirm that your vehicle is a 12Volt DC negative ground system. • Be sure to connect the color coded leads according to the diagram. Incorrect connections may cause the unit to malfunction or damage the vehicle’s electrical system.
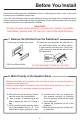
Before You Install Automotive audio equipment installations can be challenging at times, even to the most experienced of installation technicians. If you are not confident working with electrical wiring, removing and re-installing interior panels, carpeting, dashboards or other components of your vehicle, please call your dealer in order to have the unit professionally installed.
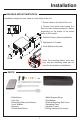
Installation DIN FRONT-MOUNT (METHOD A) NOTE: Unit should be installed horizontally or less than a 30° angle. 1. Insert Half Sleeve into dash-board hole and bend mount tabs outwards to secure it. 2. If necessary, attach the mounting strap to the rear of the unit, then attach it with the supplied nut as in fig. 2. 3. Insert the unit into the Half Sleeve until you hear a click sound 4.
Installation DIN REAR-MOUNT (METHOD B) Installation using the screw holes on both sides of the unit. 1. Screw holes on the side of the unit. 2. Screws. Use either truss screws (5 x 8mm) or flush surface screws (4 x 8mm), depending on the shape of the screw holes in the bracket. 3. Vehicle’s Factory Mounting Bracket 4. Dashboard or Console 5. Hook (Remove this part) Note: The mounting sleeve, outer trim ring, and the mounting strap are not used for this method of installation.
Installation BUILT-IN MICROPHONE The built-in microphone is located on the front left side of the unit. There is no setup required for this microphone and it is tuned to pick-up the voices of the front and rear seat passengers. Built-In Microphone GIVE US A CALL, WE'LL HELP YOU INSTALL. PLEASE DO NOT RETURN PRODUCT TO STORE. Visit us on the WEB www.vr-3.com For Information and Technical Assistance, Call Toll-Free in U.S.A. and Canada.
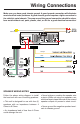
Wiring Connections Make sure you have good chassis ground. A good ground connection will eliminate most electrical noise problems. A good chassis ground requires a tight connection to the vehicle’s metal chassis. The area around the ground connection should be clean, bare metal without rust, paint, plastic, dust, or dirt for a good electrical connection.
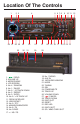
Location Of The Controls 1 2 3 28 27 26 25 33 4 24 23 32 31 5 6 78 22 21 30 29 20 19 18 17 16 15 14 13 18. No. 7/MONO 19. AUX IN 20. INFRA RED WINDOW 21. MODE 22. T-MENU 23. SEL 24. POWER/MUTE 25. TRACK UP 26. VOLUME DOWN 27. / CANCEL 28. TRACK DOWN 29. DISC SLOT 30. RESET 31. RED LED 32. DISC EJECT 33. SD / MMC CARD SLOT 1. / SEND 2. VOLUME UP 3. MICROPHONE 4. LCD SCREEN 5. No. 4 / RANDOM 6. No. 1 / PAUSE 7. No. 5 / -10 TRACK DOWN 8. No. 2 / REPEAT 9. No. 3 / INTRO 10. No.
Remote Control OPERATING THE REMOTE CONTROL Aim at the front panel of the CD Receiver. The maximum operating distance is about 6M. Make sure that the signal path is not obstructed. Do not drop or throw the remote control. Do expose the remote control to direct sunlight or place next to a heating unit or other heat source. 1. T-MENU 2. / MODE/SEND 1 /CANCEL/MUTE 3. 2 4. NO. 2 / REPEAT 3 5. NO.1 / PAUSE 4 6. NO. 5 / DOWN 10 5 7. NO. 4 / RANDOM 6 8. NO. 8/ TA CONTROL 7 9. NO. 7/ MONO 8 10. NO.
Basic Operation 1. TURNING THE UNIT ON / OFF SEL button 6 times and LOUD will appear on the LCD. Use the + button or - button to turn Loudness ON & OFF. Press any Button to turn the unit ON. On the Faceplate, press and hold the POWER button for 2 seconds to turn the unit off. On the Remote Control press the Power button to turn the unit ON & OFF. Subwoofer Control Press and hold the # / BAND button for 2 seconds and SW will appear on the LCD to indicate the sub woofer output is ON.
Basic Operation Function Menu(cont.) Telvol In order to maintain the sound quality of phone calls, TELVOL is suggested to be below 35. Telephone default volume is 25. 4. TUNE OR TRACK (UP & DOWN) / /+/TUNE UP OR DOWN IN RADIO MODE Manual Tuning Mode: Press and hold the button or Button for more than 2 seconds to to enter Manual Tuning Mode, then press the / buttons to tune each frequency step upward or downward DSP Enables Pre-set Equlizer settings. Press Volume +/- buttons to choose a preset EQ.
Radio Operation CHOOSE RADIO BAND B. Reset Automatic Scan & Store Press and hold the symbol / AS/PS button for 3 seconds and the receiver will scan the radio stations in your area, then save them over the current pre-sets. On the faceplate or remote control, press the # / Band Button to change the radio band. The unit has five bands - three FM (FM1, FM2, and FM3) and two AM (AM1 and AM2) Band selects. Each of the five bands can store up to six preset stations, for a total of 30 preset memory stations.
Radio Operation TA (TRAVEL ANNOUNCEMENT) / TP (TRAVEL PROGRAM IDENTIFICATION) AS (AUTO STORE) / PS (PRESET SCAN) / FILE SEARCH BUTTON AS (Auto Store) In tuner mode, Press the AS/PS button for longer than 2 seconds to store radio station’s with the best reception to the preset buttons automatically. Enable or disable TA mode: (Default is OFF) 1) Press TA button once to activate the Traffic Announcement function, Press the TA button again to turn off the TA function.
Bluetooth Operation BLUETOOTH FEATURES PAIRING 1. Bluetooth V2.0 EDR compliant 2. Supports HFP, A2DP, AVRCP. 3. Class 2, Up to 8 meters wireless digital connection. 4. ECHO cancellation with noise elimination 5. Last number redial 6. Display incoming number 7. Call list 8. A2DP (Advance Audio Distribution Profile) A2DP is designed to transfer a uni-directional 2-channel stereo audio stream, like music from an MP3 player, to a headset or car radio.
CD Operation DISC SLOT track. Press this button again to resume playback. Press the OPEN button to open the faceplate, then insert a disc into the disc slot. As the disc is read TOC READ will appear on the LCD, then the first track will start to play. • If there is error, “CD ERROR” will be displayed on LCD. In order to avoid CD ERROR, please use good quality discs and keep the discs clean. • Supported Disc Types: Audio CD/ CD-R/ CD-RW, MP3 / WMA.
CD Operation (Cont) to resume playback. back. Press the Button again to resume. REPEAT SELECTING TRACKS On the Remote or Face Plate, press the No. 2/RPT Button to repeat the same track continuously. “RPT” will appear on the display. Press this button again to stop repeating tracks If the MP3/WMA files are stored in folders on the USB drive or SD Card, the unit will start by playing the first song in the first folder.
USB/SD/MMC Card Operation button to change the folder. 4. Press the #/Band button to select the folder shown on the LCD, and the first track in the folder will start to play. File Management FILE / FOLDER SEARCH In CD, USB, SD/MMC mode, press the / AS/PS button to enter search mode. Below is toggle sequence of search modes.
File Management COPYING A MP3 FILE FROM A CD 4. The first file copied to a USB or SD memory will be given the name, “MUSIC01”, the second file saved will be named “MUSIC02”, and so on. NOTE: There is no sound heard during copy from MP3 file in a CD to Memory Device. When copying files from a MP3 CD you may only copy one file at a time. 1. Insert a CD with MP3 audio files into the disc slot. 2. Use the |<< button or the >>| button to start playing the file you wish to copy. 3. Press the No.
RCA Out, SUB Out & ID3 Tag 1. RCA OUTPUT WARNING The RCA Output Jacks are on the back of the unit. (Refer to Wiring Diagram) This output is for connecting an amplifier, equalizer, or other audio componement that requires a pre-amp out connection. (Red = Right, White = Left) Follow the manufacturers instructions for the audio component that you are connecting.
Specifications GENERAL Power Supply ................................................................................................DC 11 - 16 Volt Fuse .........................................................................................................................15 Amps Load Impedance ............................................................. Compatible 4 to 8 Ohm Speakers Dimensions .....................................................................
Limited Warranty VIRTUAL REALITY SOUND LABS® products are designed and manufactured to provide a high level of trouble-free performance. VIRTUAL REALITY SOUND LABS® warrants, to the original purchaser, that its products are free from defects in material and workmanship for 30 days from the date of original purchase. As part of our commitment to product excellence, VIRTUAL REALITY SOUND LABS® and/or its affiliates routinely improve the designs, materials or production methods of its existing products.
©2008 Intellectual Solutions Inc., All Rights Reserved, All designs, logos and images are the exclusive property of Intellectual Solutions Inc. and/or its affiliates. U.S. and Foreign Patents Pending.