■ chapter 2 bios setup and security feature C H A P T E R ▼ T W O BIOS SETUP AND SECURITY FEATURE In this chapter, you will learn how to enter the BIOS Setup Menu and manipulate various hardware control settings. You will also learn how to use the built-in security features.
■ chapter 2 bios setup and security feature The Setup Utility is a hardware configuration program built into your computer’s BIOS (Basic Input/Output System). It runs and maintains a variety of hardware functions. It is a menu-driven software, which allows you to easily configure and change the settings. The BIOS contains manufacture’s default settings for the computer’s standard operations. However, there are occasions when you may be required to modify the default settings in the BIOS.
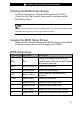
■ chapter 2 bios setup and security feature Entering the BIOS Setup Screen First turn on the power. When the BIOS performs the POST (Power-On Self Test), press F2 key quickly to activate the AMI BIOS Setup Utility. Note: You may need to press F2 key fairly quickly. Once the system begins to load Windows, you may have to retry by cycle-power on again Leaving the BIOS Setup Screen When you have finished modifying the BIOS settings, exit the BIOS. It takes a few seconds to record changes in the CMOS.
■ chapter 2 bios setup and security feature Modifying the BIOS Settings The AMIBIOS setup main menu is subdivided into sub-menus. Each menu item is described in this section. Main Setup Under this menu, you may change time/date and view basic processor and system memory information. Item Date Selections / Sub-menu N/A Time N/A Description Type in the current date, in MM/DD/YY format. Type in the current date, in HH:MM:SS format.
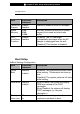
■ chapter 2 bios setup and security feature storage device. Item Selections / Sub-menu TouchPad Enabled Support Disabled Share Memory 32MB 64MB 128MB LCD Enabled AutoDimm Disabled Function Description Enable or disable the built-in touchpad. You may choose the amount of system memory to be used as video frame buffer. [Enabled]: The LCD backlight automatically decreases when the AC Adapter is unplugged from the wall. [Disabled]: This function is disabled.
■ chapter 2 bios setup and security feature ►Boot Device Priority Item 1st Boot Device Selections / Description Sub-menu Removable Dev. Set the type of device for the 1st drive Intel UNDI, PXE-2 BIOS attempts to boot from. If Intel UNDI, Hard Drive PXE-2 is selected, system will attempt to CD/DVD load boot sector from the Ethernet port. 2nd Boot Device Set the type of device for the 2nd drive BIOS attempts to boot from.
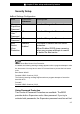
■ chapter 2 bios setup and security feature Security Setup ►Boot Settings Configuration Item Change Supervisor Password Change User Password Clear User Password Boot Sector Virus Protection Selections / Sub-menu N/A Description N/A Install or Change the Password N/A Install or Change the Password Disabled Enabled To enable or disable the boot sector protection. When Enabled, BIOS gives a warning when any program attempts to rewrite or delete the boot sector.
■ chapter 2 bios setup and security feature The passwords activate two different levels of protection: 1. System always asks for password every time it is powered on. 2. System asks for password only when you attempt to enter BIOS utility. The passwords are encrypted and stored in NVRAM. Make sure you write them down or memorize them. If you lost the passwords, the computer may need to be sent back to the factory or to an authorized service dealer to reset the passwords.
■ chapter 2 bios setup and security feature Power Setup Item Selections / Sub-menu Description Power Button Mode On/Off Suspend [On/Off]: When the power button is pressed, the system is turned off. [Suspend]: When the power button is pressed, the system enters the suspend mode. Note: The Suspend Mode selection in BIOS only applies to older Windows version (such as Windows 3.1 or Windows 95 or NT4) or non-Windows operating system.