
User Manual
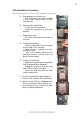


12
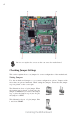
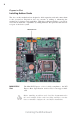
Installing the Motherboard
Installing Memory Modules
This motherboard accommodates two memory modules. It can support two 240-pin
DDR3 1333/1066 SDRAM. The total memory capacity is 8 GB.
You must install at least one module in any of the two slots.
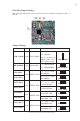
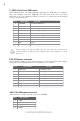
DDR3 SDRAM memory module table
Installation Procedure
Refer to the following to install the memory modules.
1 This motherboard supports unbuffered DDR3 SDRAM .
2 Push the latches on each side of the SO-DIMM slot down.
3 Align the memory module with the slot. The SO-DIMM slots are keyed
with notches and the SO-DIMMs are keyed with cutouts so that they
can only be installed correctly.
4 Check that the cutouts on the SO-DIMM module edge connector match
the notches in the SO-DIMM slot.
5 Install the SO-DIMM module into the slot and press it firmly down until it
seats correctly. The slot latches are levered upwards and latch on to
the edges of the SO-DIMM.
6 Install any remaining SO-DIMM modules.
Do not remove any memory module from its antistatic packaging until
you are ready to install it on the motherboard. Handle the modules only
by their edges. Do not touch the components or metal parts. Always wear
a grounding strap when you handle the modules.
1. To achieve better airflow rates and heat dissipation, we suggest
that you use a high quality fan with 3800 rpm at least. CPU fan and
heatsink installation procedures may vary with the type of CPU fan/
heatsink supplied. The form and size of fan/heatsink may also vary.
2. DO NOT remove the CPU cap from the socket before installing a
CPU.
3. Return Material Authorization (RMA) requests will be accepted
only if the motherboard comes with the cap on the LGA1155 socket.
Memory module Memory Bus
DDR3 1066 533 MHz
DDR3 1333 667 MHz