
User's Manual


Page 12 M1XRFTW Installation Manual
H or RRF
Total
Wireless
Zones
(max.)
16 H or RRF H or RRF H or RRF H or RRF H or RRF H or RRF H or RRF H or RRF H or RRF H or RRF
Data Bus
Addr 12
Zn 177-192
* * H or RRF H or RRF H or RRF H or RRF H or RRF H or RRF H or RRF
H or RRF H or RRF H or RRF H or RRF H or RRF H or RRF H or RRF
H or RRF H or RRF H or RRF H or RRF H or RRF H or RRF H or RRF
* * * ** * H or RRF H or RRF H or RRF H or RRF H or RRF H or RRF
* ** * * * * ** * H or RRF H or RRF H or RRF H or RRF H or RRF
* * * ** * * * * ** * H or RRF H or RRF H or RRF
H or RRF
* ** * * * * * * ** * H or RRF H or RRF
H or RRF
* * * * * * * * * * * * H or RRF H or RRF* ** *
* *
H or RRF
H or RRF
H or RRF
H or RRF
H or RRF
H or RRF
H or RRF
H or RRF
Data Bus
Addr 13
Zn 193-208
Data Bus
Addr 9
Zn 129-144
Data Bus
Addr 11
Zn 161-176
Data Bus
Addr 8
Zn 113-128
Data Bus
Addr 6
Zn 81 - 96
Data Bus
Addr 3
Zn 33 - 48
Data Bus
Addr 4
Zn 49 - 64
Data Bus
Addr 7
Zn 97 - 112
Data Bus
Addr 5
Zn 65 - 80
Data Bus
Addr 10
Zn 145-160
32
48
64
80
96
112
128
144
* * * *
H or RRF
* * * * * *
H or RRF
H or RRF
* *M1XRF
Starting
Zn ID #17
Data bus
Addr 2
Zn 17-32
H or RRF
Total
Wireless
Zones
(max.)
16 H or RRF H or RRF H or RRF H or RRF H or RRF H or RRF H or RRF H or RRFH or RRF H or RRF
Data Bus
Addr 12
Zn 177-192
* * H or RRF H or RRF H or RRF H or RRFH or RRF H or RRF H or RRF
H or RRF H or RRF H or RRF H or RRF H or RRFH or RRF H or RRF
H or RRF H or RRF H or RRF H or RRF H or RRFH or RRF H or RRF
* * * ** * H or RRF H or RRF H or RRF H or RRFH or RRF H or RRF
* ** * * * * ** * H or RRF H or RRF H or RRFH or RRF H or RRF
* * * ** * * * * ** * H or RRF H or RRFH or RRF H or RRF
* ** * * * * * * ** * H or RRFH or RRF H or RRF* *
H or RRF
H or RRF
H or RRF
H or RRF
H or RRF
H or RRF
H or RRF
Data Bus
Addr 13
Zn 193-208
Data Bus
Addr 9
Zn 129-144
Data Bus
Addr 11
Zn 161-176
Data Bus
Addr 8
Zn 113-128
Data Bus
Addr 6
Zn 81 - 96
Data Bus
Addr 4
Zn 49 - 64
Data Bus
Addr 7
Zn 97 - 112
Data Bus
Addr 5
Zn 65 - 80
Data Bus
Addr 10
Zn 145-160
32
48
64
80
96
112
128
* * * *
H or RRF
* * * * * *
H or RRF
H or RRF
* *
M1XRF
Data Bus
Addr 2
Zn 17 -32
Starting
Zn ID #33
Data bus
Addr 3
Zn 33-48
H or RRF
Total
Wireless
Zones
(max.)
16 H or RRF H or RRF H or RRF H or RRF H or RRF H or RRF H or RRF H or RRFH or RRF H or RRF
Data Bus
Addr 12
Zn 177-192
* * H or RRF H or RRF H or RRF H or RRFH or RRF H or RRF H or RRF
H or RRF H or RRF H or RRF H or RRF H or RRFH or RRF H or RRF
H or RRF H or RRF H or RRF H or RRF H or RRFH or RRF H or RRF
* * * ** * H or RRF H or RRF H or RRF H or RRFH or RRF H or RRF
* ** * * * * ** * H or RRF H or RRF H or RRFH or RRF H or RRF
* * * ** * * * * ** * H or RRF H or RRFH or RRF H or RRF
H or RRF
H or RRF
H or RRF
H or RRF
H or RRF
H or RRF
Data Bus
Addr 13
Zn 193-208
Data Bus
Addr 9
Zn 129-144
Data Bus
Addr 11
Zn 161-176
Data Bus
Addr 8
Zn 113-128
Data Bus
Addr 6
Zn 81 - 96
Data Bus
Addr 7
Zn 97 - 112
Data Bus
Addr 5
Zn 65 - 80
Data Bus
Addr 10
Zn 145-160
32
48
64
80
96
112
* * * *
H or RRF
* * * * * *
H or RRF
H or RRF
* *
Data Bus
Addr 2
Zn 17 -32
Data Bus
Addr 3
Zn 33 - 48
Starting
Zn ID #49
Data Bus
Addr 4
Zn 49 - 64
M1XRF
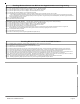
Cells marked " * * " indicate a Reserved Address which can only be used for wireless zones.
Cells marked " RRF " indicate bus addresses where ONLY a redundant M1XRF Receiver can be installed.
Cells marked " H or RRF " indicate bus addresses where either a M1XIN Hardwired Expander OR a redundant M1XRF Receiver can be installed.
These tables are intended to help visualize how the Wireless Zones and Hardwired Zones share the data bus address assignments.
They should help with the setting of a starting zone ID and data bus address(s) to obtain the total and best mix of wireless and
hardwired zones. At a minimum, the left column shows the total "max." wireless zones that may be obtained based on the starting
zone ID and data bus addresses chosen.
1. Each table has a bolded column showing the 1st wireless zone ID at a particular value (associated with a data bus address).
NOTE: The total (max.) number of wireless zones is decreased by 16 zones for any hardwired expanders installed or
enrolled in the range of zones 17 through 160. This is because only zones 17 through 160 can be used for wireless.
2. Decide how many "total" wireless zones might be required for the job. This narrow down which table to concentrate on.
3. Consider existing or future M1XIN hardwired zone expanders. The wireless starting zone ID is critical if you want all wireless zones to be
sequential with no hardwired zones interspersed between them. The following are some suggested guidelines:
- If the job needs 16 hardwired zones or less with no plans for expansion then start the first wireless at zone 17 (associated with data bus
address 2). This leaves the most room for future wireless expansion all the way up to zone 160.
- If the job needs lots of hardwired zones and only a handful of wireless zones consider starting the M1XRF at a higher address, leaving room
for future hardwired expansion at the lower addresses.
4. Select any table below and start from the left column by choosing the total number of wireless zones required. Follow the row of cells across
to the bold column displaying the starting zone ID and associated data bus address where you wish to begin.
- Cells marked with "* *" indicate bus addresses "reserved" exclusively for wireless zones. However, any of these addresses may also be used
for a redundant M1XRF Receiver. Redundant Receivers provide additional range and coverage for extremely large or difficult buildings. See
Appendix C regarding Redundant Receivers.
- Cells marked "RRF" indicate bus addresses where ONLY a redundant M1XRF Receiver can be installed.
- Cells marked "H or RRF" indicate bus addresses where either a M1XIN Hardwired Expander OR a redundant M1XRF Receiver can be installed.
NOTE: An M1XRF installed for redundancy does not increase the number of wireless zones, it only increases
range and/or coverage
.
No RF Zones Here
No RF Zones Here
No RF Zones Here
Appendix A - Data Bus Selection Tables