ELK-6052 Smoke Detector and ELK-6053 Heat Detector Instruc ons Read and retain for as long as the product is being used. It contains vital informa on on the opera on and installa on of your Detector. The booklet should be regarded as part of the product. If you are just installing the unit, the booklet must be given to the householder. The booklet is to be given to any subsequent user. CONTENTS Page 1 Quick Start Guide .....................................
DETECTOR SHOULD BE CEILING MOUNTED AT LEAST 305MM (12”) FROM WALLS & OBSTRUCTIONS, IDEALLY CENTRALLY IN ROOM/AREA DETACH THE DETECTOR FROM THE MOUNTING PLATE. REMOVE THE PULL TAB TO CONNECT BATTERY OR BATTERIES & POWER THE UNIT (Discard cardboard between base and detector) PRESS THE TEST BUTTON TEST DETECTOR AT LEAST WEEKLY Installer shall conduct a go/no-go field test using approved canned smoke test product: “SMOKE CHECK, Model 25S, Smoke Detector Tester.” Follow the Instructions printed on can.
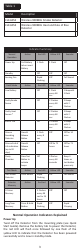
Table 1 Model Description ELK-6052 Wireless 900MHz Smoke Detector ELK-6053 Wireless 900MHz Heat and Rate of Rise Detector Indicator Summary Normal Operation Power Up Action Yellow LED Sounder 1 Flash 1 Flash Off Standby Off Off Off Sensing Fire Rapid Flashing Off Full Sound Fault Mode Pull Battery tab or insert Battery Red LED Action Red LED Yellow LED Sounder Low Battery Off 1 Flash every 48 sec 1 Beep with 1 Flash Faulty Smoke Sensor Off 2 Flashes every 48 sec 2 Beeps wi
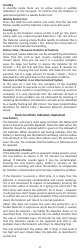
Standby In standby mode there are no active visible or audible indications to the occupant. To confirm that the Detector is operational perform a weekly button test. Weekly Button Test Press and hold the test button and verify that the red LED flashes rapidly and the Detector ramps up to full sound. Sensing Fire As soon as the Detector senses smoke it will go into alarm (along with any interconnected Detectors).
Faulty Smoke Chamber In the unlikely event of the smoke sensing chamber becoming defective, the Detector will give 2 short beeps with 2 yellow LED flashes every 48 seconds. The Detector must then be replaced. If it is not convenient to replace it immediately, pressing the test button will silence the beeps and stop the yellow LED flashing for 12 hours. This can be repeated as required.
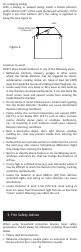
SMOKE DETECTION Sufficient smoke must enter your Smoke Detector before it will respond. Your Smoke Detector needs to be within 6m (20ft) of the fire to respond quickly. Smoke Detectors also need to be in positions where they can be heard throughout the property, so they can wake you and your family in time for everyone to escape.
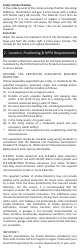
Figure 2 Bathroom Bedroom Kitchen Laundry Room Dining Room Bath Bedroom Living Room Bedroom If the premises is one story you should put your first Smoke Detector in a corridor or hallway between the sleeping and living areas. Place it as near to the living area as possible, but make sure that it can be heard loudly enough in the bedroom to wake someone. See Figure 2 for placement example.
On a Sloping Ceiling With a sloping or peaked ceiling install a Smoke Detector within 610mm (24”) of the peak (measured vertically). If this height is less than 610mm (24”) the ceiling is regarded as being flat (see Figure 4). APEX SMOKE DETECTORS <610mm (24”) x x Figure 4 Locations to avoid DON’T place Smoke Detectors in any of the following areas: • Bathrooms, kitchens, showers, garages or other rooms where the Smoke Detector may be triggered by steam, condensation, cooking smoke, etc.
• Use the Test Button to familiarize your family with the Detector sound and to practice fire drills regularly with all family members. Draw up a floor plan that will show each member at least two escape routes from each room in the house. Children tend to hide when they don’t know what to do. Teach children how to escape, open windows, and use roll up fire ladders and stools without adult help. Make sure they know what to do if the Detector sound goes off.
3. Get out as fast as you can. Have a prearranged meeting place outside for all family members. Check to make sure everyone is accounted for. 4. Call the Fire Department from a neighbor’s house or mobile phone. Remember to give your name and address. 5. NEVER re-enter a burning house. 4. Detector Limitations Limitations of Smoke Detectors While Smoke Detectors are extremely effective, independent authorities have stated that under some circumstances they may become ineffective.
6. Warranty Elk Products warranties the Elk-6052 Smoke Detector (excluding batteries) for 2 years from date of purchase against any defects that are due to faulty materials or workmanship. This warranty only applies to normal conditions of use and service, and does not include damage resulting from accident, neglect, misuse, unauthorized dismantling, or contamination howsoever caused. This guarantee excludes incidental and consequential damage.
5. Mark and drill holes using a 3/16” (5.0mm) drill bit through center of the marks. Insert plastic anchors provided and screw mounting plate to ceiling. 6. Carefully line up the Detector on to the mounting plate, gently press to the base and twist clockwise (see Figure 6). Figure 6 ROTATE UNIT CLOCKWISE 7. Press the Test button on each Detector to ensure that the Detector works (see Figure 7). Install all the other Detectors similarly.
If necessary, it is possible to further secure the Detector by using a 2-3mm (1/8”) diameter x 6-8mm (1/4”) long self tapping screw (not supplied) to firmly lock the Detector and its’ mounting plate together (see Figures 8c and 8d). Attach the Detector to the mounting plate. Line up the screw (not supplied) on the “U” shaped recessed area shown in Figure 8c and install screw until fully secured. To remove the Detector from the ceiling, remove the screw first, and then twist off counterclockwise.
1. To cancel a false detection from a Detector (which has its red light flashing rapidly), press the Test/Silence button and the Smoke Detector will automatically switch to a reduced sensitivity condition. The Smoke Detector will be silenced for a period of approximately 10 minutes. The red light on the cover of the Smoke Detector will flash every 8 seconds to indicate that the unit has been silenced. 2. The Smoke Detector will reset to normal sensitivity at the end of the 10 minute silenced period.
Chamber Cleaning Cleaning or replacing of the chamber cover should only be carried out by suitably trained personal. 1. 2. 3. Remove the Detector from the mounting plate. Remove the battery or batteries. With a flat screwdriver unclip the three cover clip points (see figure 9a). 4. Remove the cover (see figure 9b). 5. If the unit is a model containing a thermistor you will need to unplug the thermistor by holding the thermistor PCB and pulling the pins out of the sockets (see figure 9c). 6.
12. Press the test button to ensure the Detector is working correctly. Smoke Detector Automatic Self-Test The smoke chamber in the Smoke Detector automatically tests itself every 16 seconds. If the chamber is degraded it will beep twice every 48 seconds with 2 yellow LED flashes at the same time. If this happens clean the unit. If the beeping persists and the beep does not coincide with a yellow light flash, return the unit for service (see Section 5 - Getting Your Detector Serviced).
10. Technical Specification Power : 3V CR123A Lithium Battery (replaceable) Test/Silence Button: Test horn & silences Detector for 10 min. Operating Temperature : 4.4°C to 37.8°C (40°F to 100°F) Humidity Range : 15% to 95% R.H. (non-condensing) Audible Sounder: >85dB(A) at 3m (10ft) minimum RF Frequency: 900MHz Two-way Current Drain : Typical 9µA Standby Heat Sensor Fixed Rating : 57ºC +/- 2ºC (135°F +/- 5°F) Heat Sensor Rate of Rise : >40ºC (104ºF) 8.
This equipment complies with the FCC RF radiation exposure limits set forth for an uncontrolled environment. This equipment should be installed and operated with a minimum distance of 20cm between the radiator and any part of your body. This device must not be collocated or operating in conjunction with any other antenna or transmitter. Cet équipement est conforme aux limites d’exposition aux radiations dans un environnement non contrôlé.