
Instruction Manual


11
Elk Products warranes the Elk-6052 Smoke Detector (excluding
baeries) for 2 years from date of purchase against any defects
that are due to faulty materials or workmanship. This warranty
only applies to normal condions of use and service, and does
not include damage resulng from accident, neglect, misuse,
unauthorized dismantling, or contaminaon howsoever caused.
This guarantee excludes incidental and consequenal damage.
Further the warranty does not cover Acts of God, such as re,
ood, hurricanes and tornadoes. If this Detector should become
defecve within the guarantee period, it must be returned to Elk
Products, with proof of purchase, carefully packaged, with the
problem clearly stated. We shall at our discreon repair or replace
the faulty unit.
Elk Products shall not be liable for any incidental or consequenal
damages caused by the breach of any express or implied warranty.
Any implied warranty of merchantability or tness for purposes
is limited to the duraon of the above warranty period. This
warranty gives you specic legal rights and you may also have
other rights that vary from state to state.
Some states or jurisdictions do not allow the limitation
or exclusion of incidental or consequential damages, or
limitations on how long an implied warranty last so the above
limitation may not apply to you.
Do not interfere with the Detector or attempt to tamper with
it. This will invalidate the warranty, but more importantly may
expose the user to shock or fire hazards. This warranty is in
addition to your statutory rights as a consumer.
Elk Products makes no warranty, expressed or implied,
written, or oral, including that of merchantability or fitness
for any particular purpose, with respect to the battery.
The above warranty may not be altered except in writing
signed by both parties hereto.
1. Select a location complying with the advice in Section 2.
2. Enroll Detector into the Control Panel following the
instructions that accompany the ELK-M1XRFTWM Wireless
Receiver. Insert the battery or batteries per the Quick Start
Guide.
3. Temporarily place Detector in the intended mounting
location and perform a quick test by pressing the Test
button on the front of the Detector. This should be done
PRIOR to permanent mounting to ensure the location is
suitably in range of the Transceiver and/or the Control.
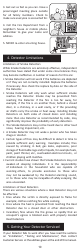
4. Remove the mounting plate and align on the ceiling. Try
to orient Detectors in the same orientation relative to the
wireless receiver. This means picking a part of the building,
say the front wall of the building and aligning with respect
to this (see Figure 5).
6. Warranty
7. Installation
Large
hole
nearest
front
wall
Orientate all mounting plates in the same direction
Front Wall Front Wall
Mounting Plate Mounting Plate
Mounting Plate Mounting Plate
Figure 5