
Instruction Manual


12
5. Mark and drill holes using a 3/16” (5.0mm) drill bit through
center of the marks. Insert plastic anchors provided and
screw mounting plate to ceiling.
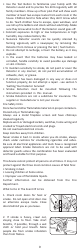
6. Carefully line up the Detector on to the mounting plate,
gently press to the base and twist clockwise (see Figure 6).
7. Press the Test button on each
Detector to ensure that the
Detector works (see Figure 7).
Install all the other Detectors
similarly.
Installer shall conduct a go/no-go field test using approved
canned smoke product: “SMOKE CHECK, Model 25S, Smoke
Detector Tester.” Follow Instructions printed on the can.
Contact your Central Monitoring Station to notify them of
the impending test.
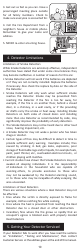
Tamper Proofing the Detectors
The Detector can be made tamper proof to prevent
unauthorized removal of the Detector.
Break off the small pillar on the base as shown in Figure 8a.
To remove the Detector from the ceiling it is now necessary
to use a small screwdriver, to release the catch (push catch
towards the ceiling) and then twist off the Detector (see
Figure 8b).
ROTATE UNIT CLOCKWISE
Figure 6
Figure 7
Smoke Detector
BREAK OFF
SMALL PILLAR
Figure 8a
How to Tamperproof
PUSH UP CATCH & TWIST
ALARM ANTI-CLOCKWISE TO REMOVE
Figure 8b
How to Remove