
Installation


Page 2
1000005817
1000005818 (Rev. A - 06/20)
WATER COOLER PREPARATION
● Remove Lower wrapper on the cooler by removing the (4) screws using a 5/16 nut driver
● Shut o water to the cooler
● Remove water pressure by pressing on any of the cooler push bars until no water comes out of the bubbler
● Unplug the water cooler
● Remove the P-trap from the cooler drain
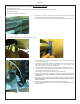
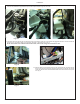
1. Remove the (4) screws – 2 per side on the upper shroud using the Torx bit or Allen
Wrench. (See Fig. 1) Note: The kit is for refrigerated units only.
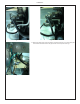
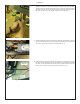
2. Take a black marker and mark the water line where it enters the base of the evaporator.
This will ensure the water line is reinserted fully later. Fig. 2 & 3
Fig. 1
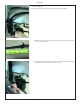
Fig. 4
Fig. 2 Fig. 3
3. Remove the water line from the evaporator. Have a bucket ready to catch water
coming from the evaporator.
4. Lift the basin shroud assembly, tilting forward towards the front of the water cooler and
unplug the two switch wires. One on the solenoid and one on the cold control. Once
both wires are free lift the assembly completely o.
5. Turn the basin/shroud assembly over on a table so that it is sitting on the basin.
6. Locate the serial number on the data label and write it down in permanent marker on
the blank label on the bottom of the new shroud.
7. Loosen the clamp on the drain and remove it and the plastic drain.
8. Remove the basin from the shroud by removing the four screws with the Torx bit or
Allen Wrench. Note: If your shroud has a regulator installed it will need to be
removed too.
9. Place the new shroud on the basin and attach it using the screws removed.
Note: If a regulator was removed from the old shroud it will need to be inserted
in the new shroud.
10. Insert the clamp and plastic drain into the rubber drain boot and tighten.
11. Using a Flat head screwdriver remove the plastic cap covering the electricals on the
compressor. Fig. 4